
Users encompass all the members of your project and their permissions and abilities. Administrators can view all users via The list view in the Project Console's Control panel. However, Administrators can only directly manage native users within the Smart Flows Project Console. To manage Connected users, you'll need admin privileges in your connector system.
Smart Flows comes with several user roles with varying privileges. This helps you manage control of your projects by defining what each person can do within the project. They are also several user types which define how you add and manage the head count of your users within Smart Flows.
User roles
There are several user roles in Smart Flows. A user role defines a user's privileges and access within Smart Flows.
User Types
User types define how user profiles are created and managed within Smart Flow. User types define how you added them to Smart Flows. User Roles define what they can do.
There are several user types in Smart Flows:
|
Role |
Function |
|---|---|
|
Experlogix Smart Flows Administrator |
Administrators have access to all components of Smart Flows with no restrictions. They are also able to assign and manage the roles of other users. |
|
Experlogix Smart Flows Designer |
Designers have a reduced number of Project Console abilities with a focused set of permissions related to creating managing templates and flows with permissions for managing your Project Console settings. They can access the Template Builder add-in for designing templates. |
|
Experlogix Smart Flows User |
Users can access Flow Execution Panel and run flows. |
|
Smart Flows Workflow Executor |
Group role that allows non-Smart Flows users to execute Microsoft Dynamics 365 CE Workflows. These users are not synced in Smart Flows. The Smart Flows Workflow Executor user role only exists in Microsoft Dynamics 365 CE. |
Individual User Settings
The Project Console Individual User Settings tab lets you view and configure a user's settings. You can access these settings in the User List view of the Settings in Project Console by selecting a user from the list.
Basic settings tab
The Basic Settings tab displays user identification details, including name and email address.
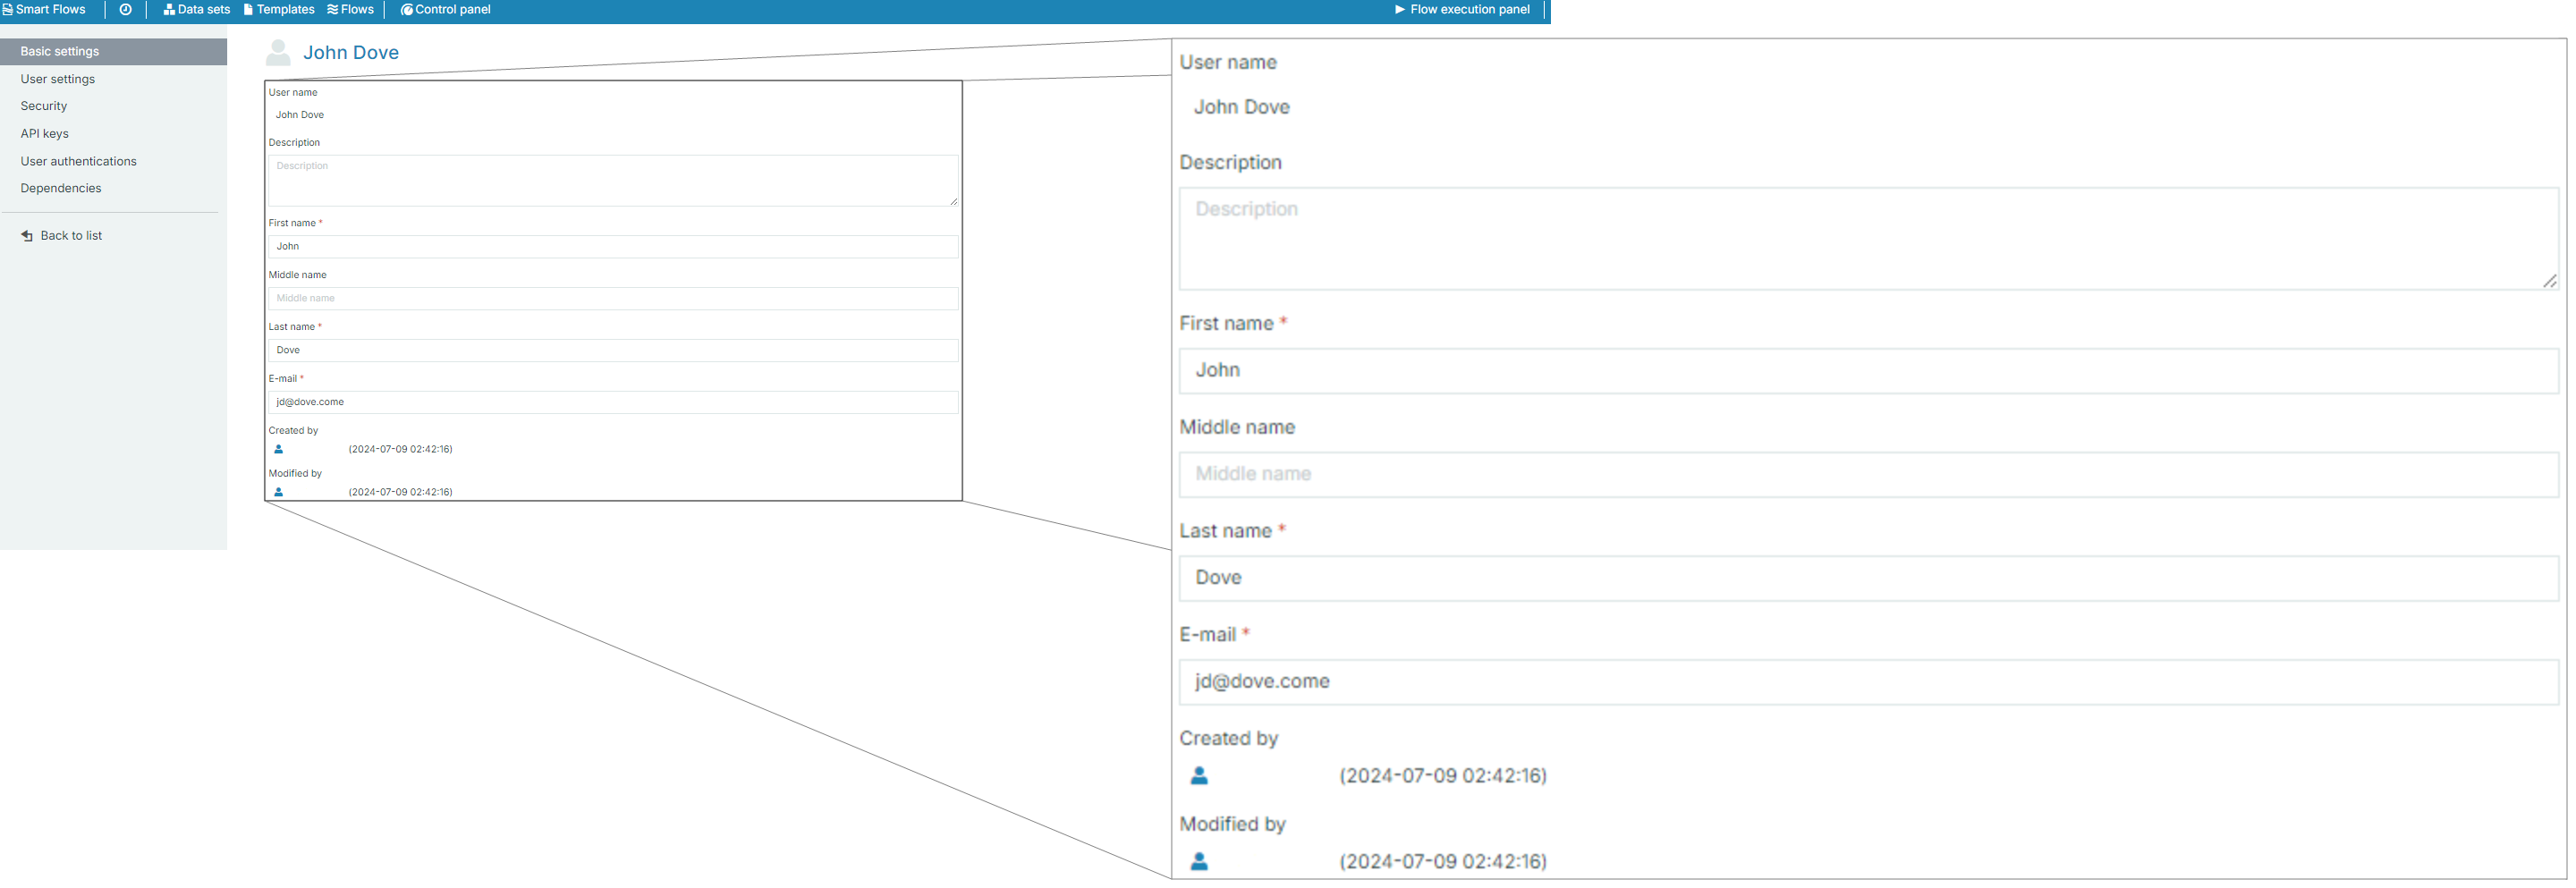
|
Setting |
Field Name |
Description |
|---|---|---|
|
User Information |
User name |
Displays the user's name. |
|
Description |
Optional field for adding a description of the user. |
|
|
First name |
First name of the user. |
|
|
Middle name |
Optional field for the user's middle name. |
|
|
Last name |
Last name of the user. |
|
|
|
Email address of the user. |
|
|
Created by |
Displays the admin who created the user and timestamp. |
|
|
Modified by |
Displays the admin who last modified the user and timestamp. |
User Settings tab
The User Settings tab lets you configure the time and date formats and the interface languages for an individual user.
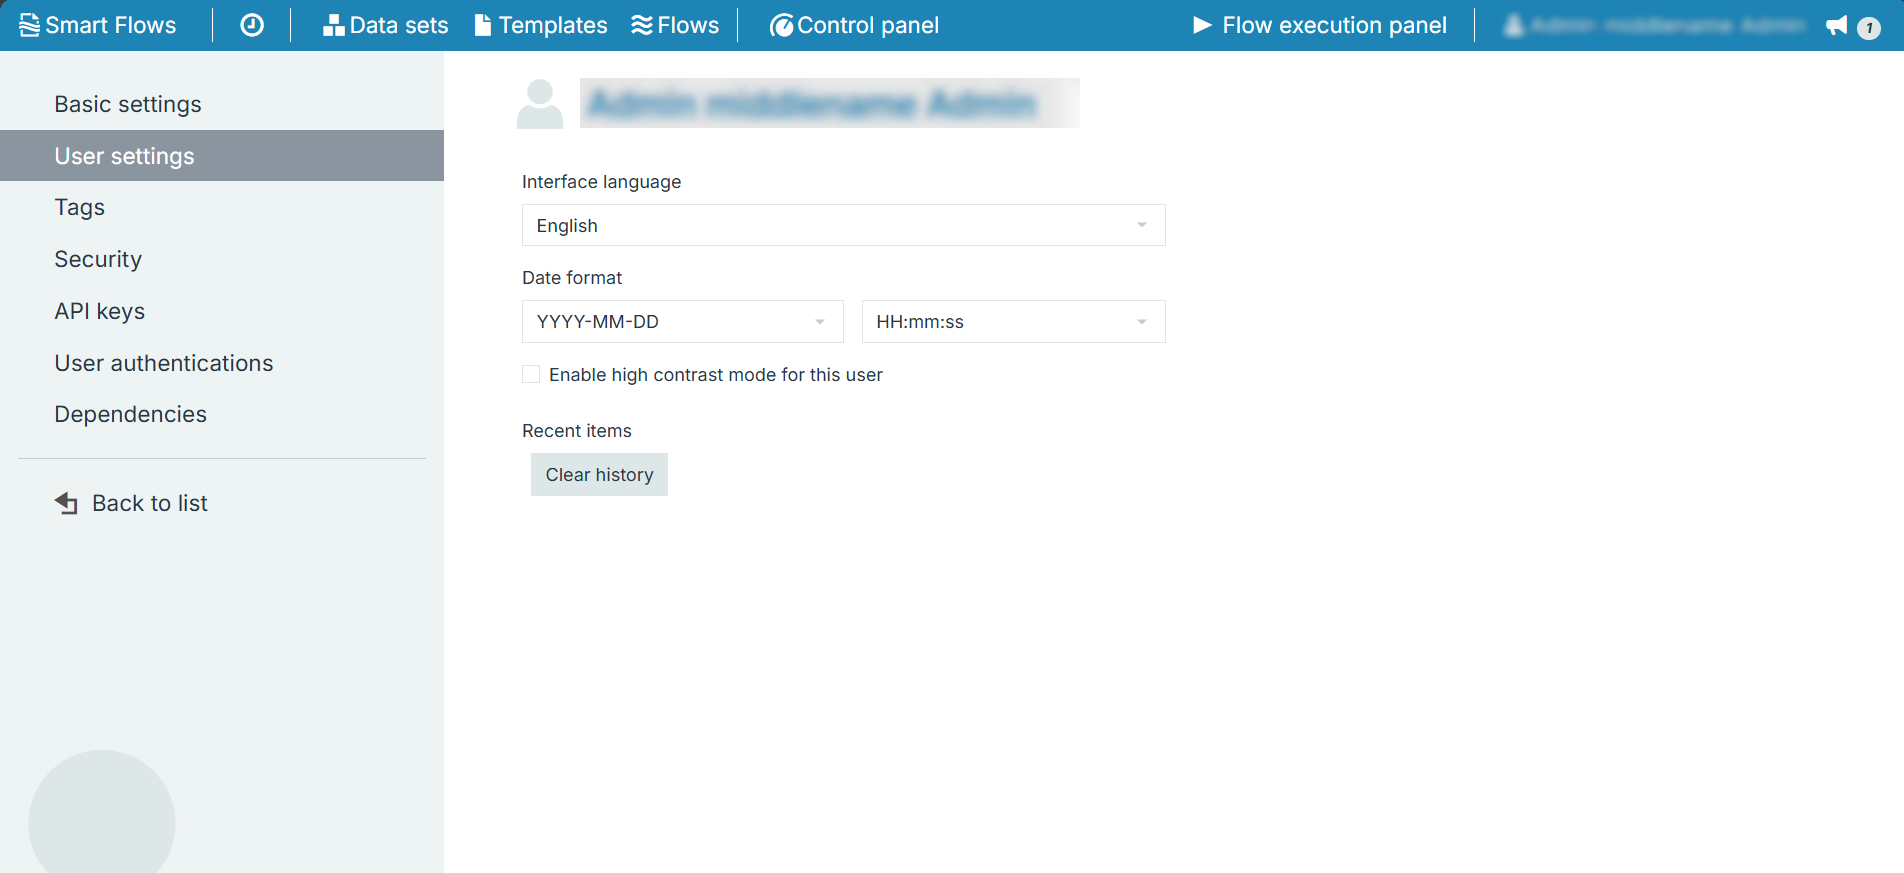
|
Setting |
Field Name |
Description |
|---|---|---|
|
User Settings
|
Interface language |
Set the preferred language for the user interface. |
|
Date format |
Choose the date format to be used by the user. |
|
|
Enable high contrast mode for this user |
Click the option to increase the User Interface contrast for a better visibility. The contrast of a.o. form control borders increases to a minimum ratio of 4.5:1. 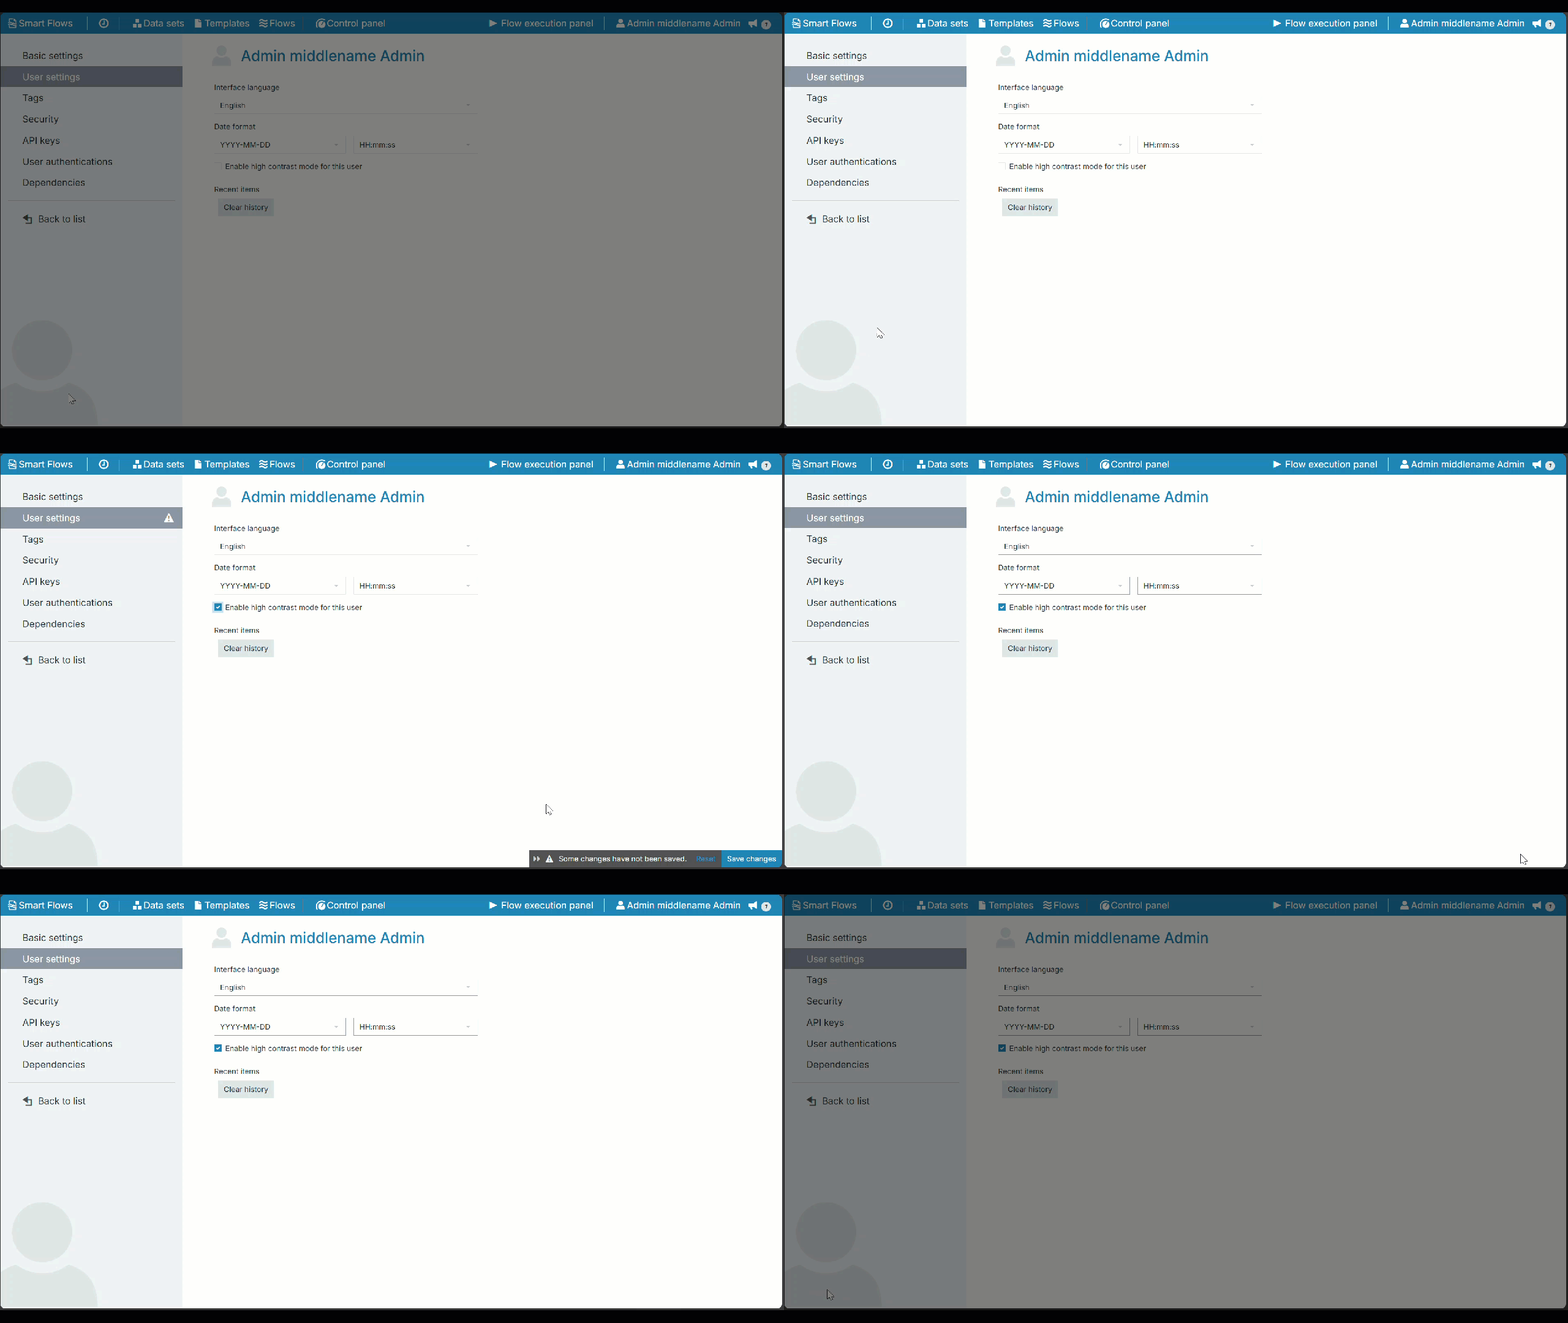
|
|
|
Recent Items |
Click 'Clear History' under the Recent Items section to clear the recent item history for the selected user. |
Please take note that the User Settings will override the settings at Project level.
Security tab
Use the Security tab to update a native user’s password and manage account status.
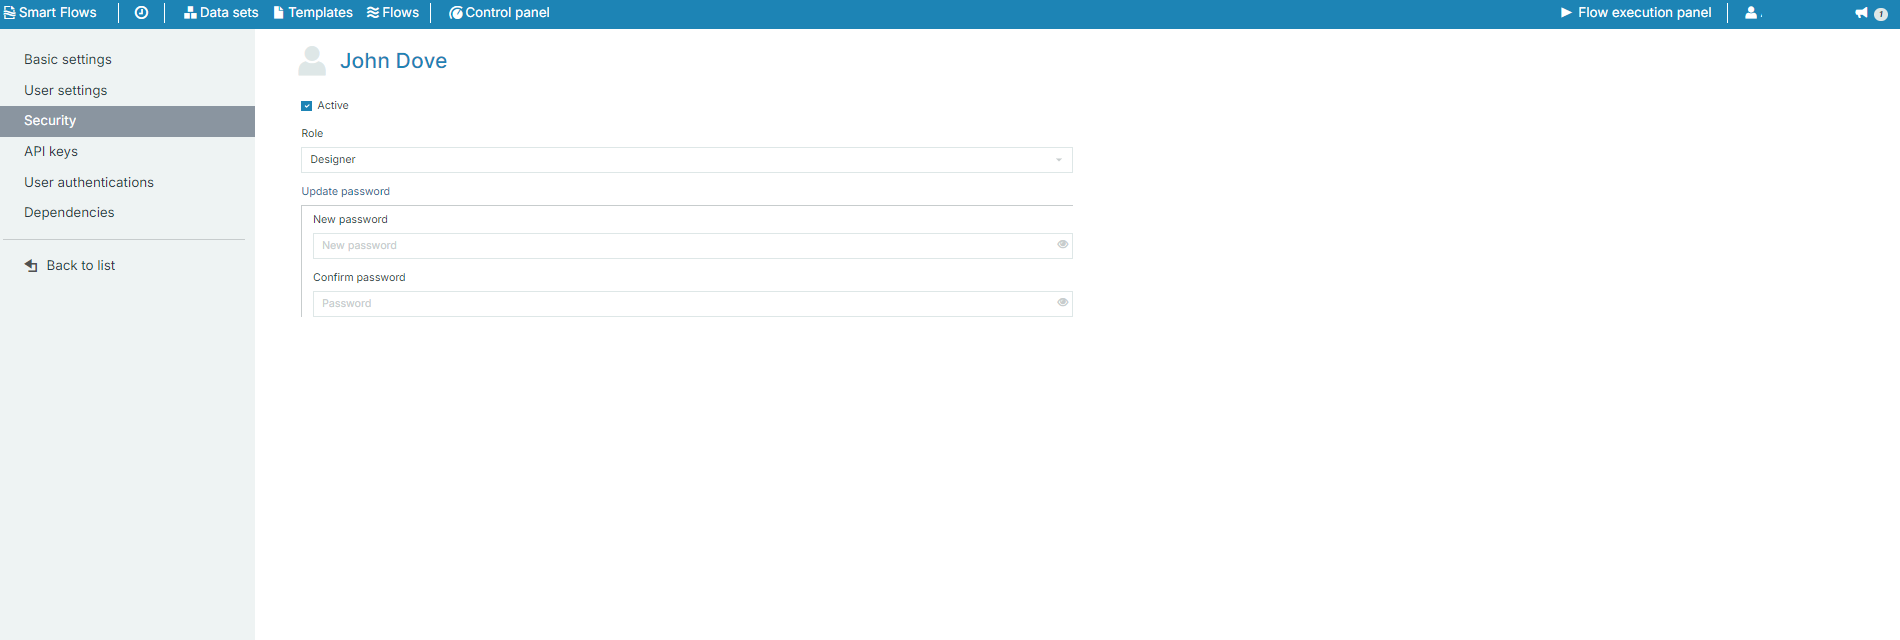
|
Setting |
Field Name |
Description |
|---|---|---|
|
Security |
Active |
Checkbox to enable or disable the user account. |
|
Role |
Displays the user’s assigned role (e.g., Designer, Admin, etc.). |
|
|
Update password |
Allows you to change the user's password. |
API keys tab
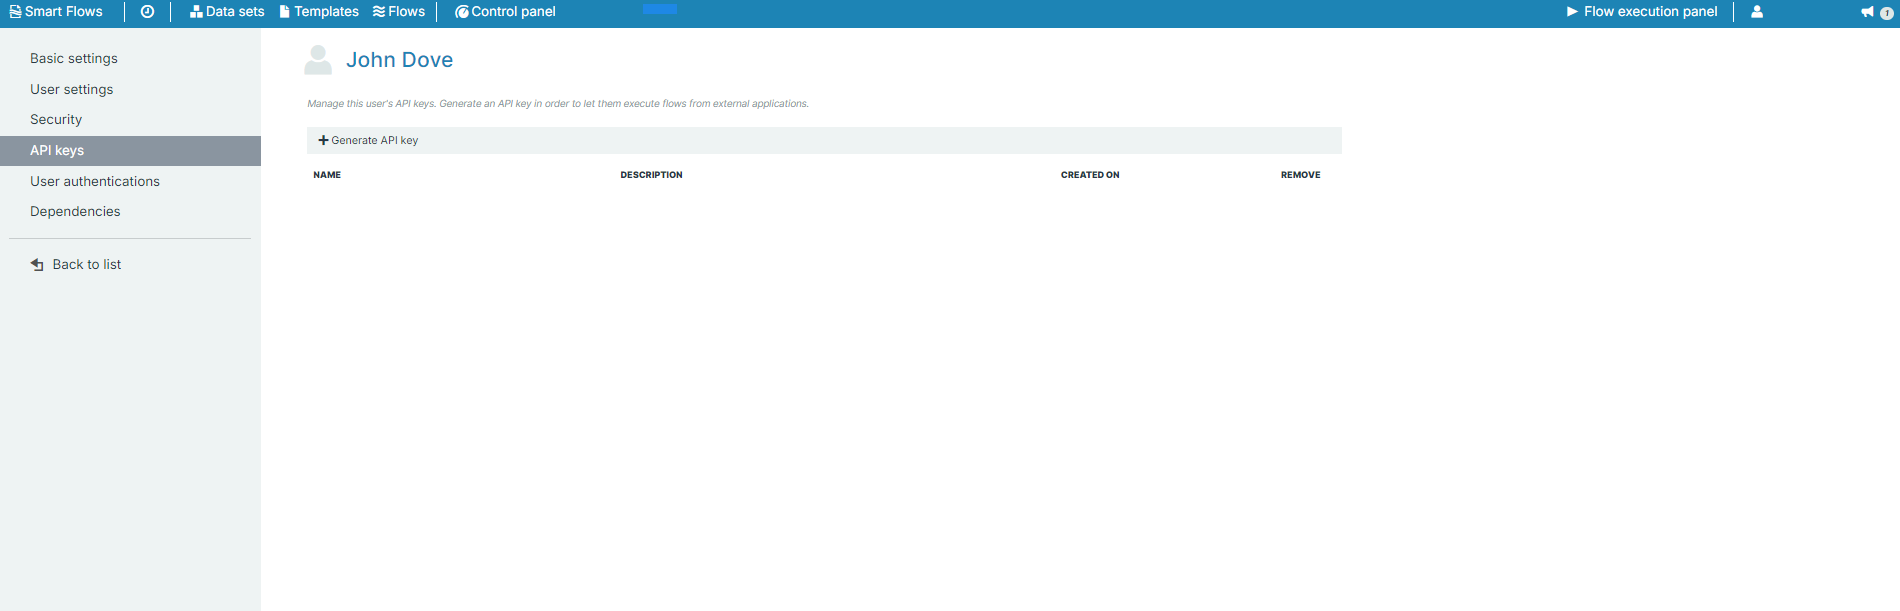
Administrators can use API keys to authenticate API access. See Using the API for more information.
|
Setting |
Field Name |
Description |
|---|---|---|
|
API Keys |
Generate API key |
Button to generate a new API key for external integrations. |
|
Name |
Name of the API key generated. |
|
|
Description |
Description of the API key. |
|
|
Created on |
Timestamp showing when the API key was generated. |
|
|
Remove |
Option to remove the API key. |
User authentications tab
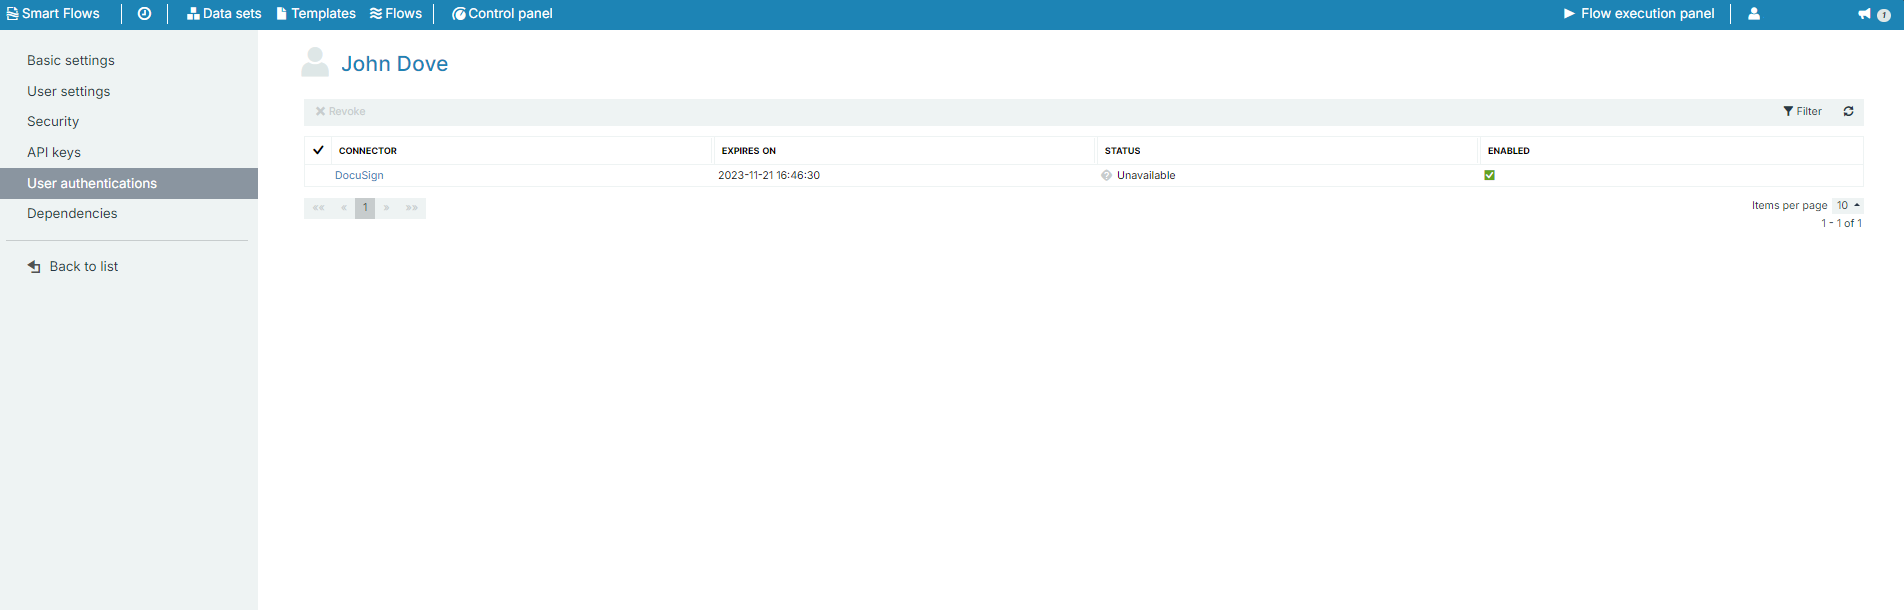
The User Authentications tab displays connectors through which the user is authenticated.
|
Setting |
Field Name |
Description |
|---|---|---|
|
User Authentications |
Connector |
Displays the connector used for user authentication (e.g., Docusign). |
|
Expires on |
The expiration date for the user authentication. |
|
|
Status |
Status of the authentication (e.g., Unavailable, Enabled), disconnected (tokens have expired - the user needs to log in again). |
|
|
Enabled |
Indicates if the authentication is currently enabled. |
Dependencies
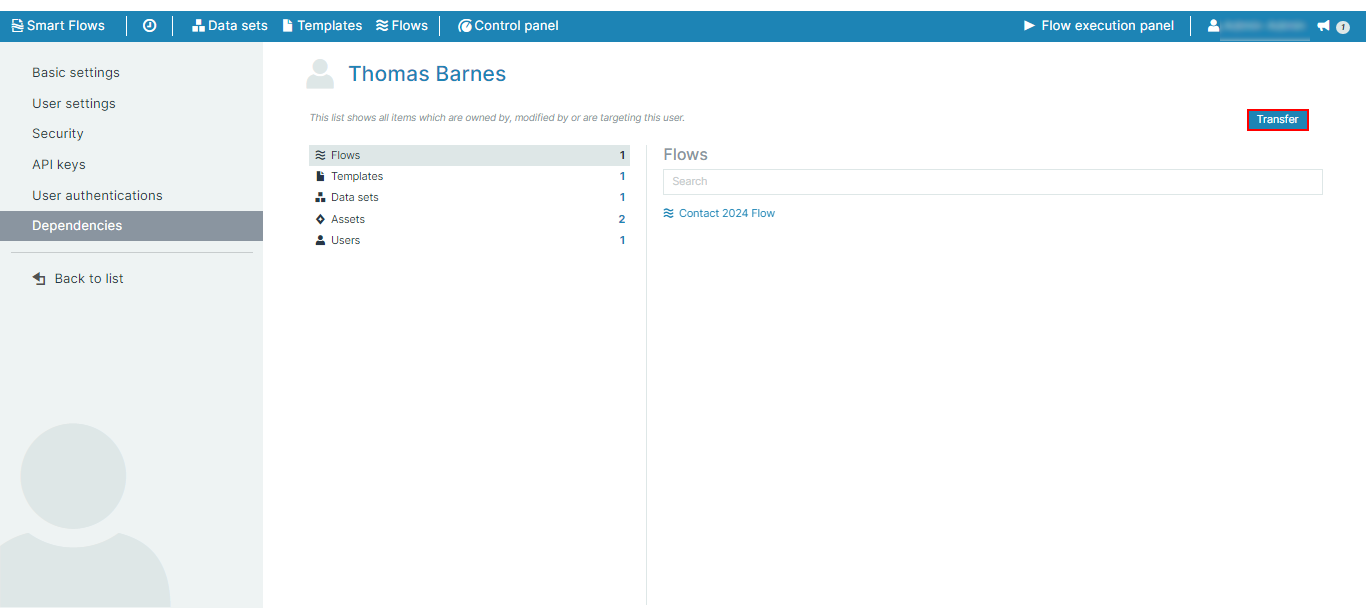
The Dependencies tab displays all dependencies between project items and a selected user. Dependencies can also be transferred to another user.
|
Setting |
Field Name |
Description |
|---|---|---|
|
Dependencies |
Flows |
Lists the flows owned by or assigned to the user. |
|
Templates |
Lists the templates associated with the user. |
|
|
Data sets |
Shows data sets owned or modified by the user. |
|
|
Flow executions |
Displays flow executions the user is involved in. |
|
|
Documents |
Lists documents the user has access to. |
|
|
Samples & data |
Displays samples and data connected to the user. |
Transferring User Dependencies
A single user may have many dependencies. If such a user leaves the company, their dependencies are lost. To keep these dependencies within the company, you can transfer them from one user to another.
You must be at same or higher role than the user who's dependencies you are transferring or moving.
-
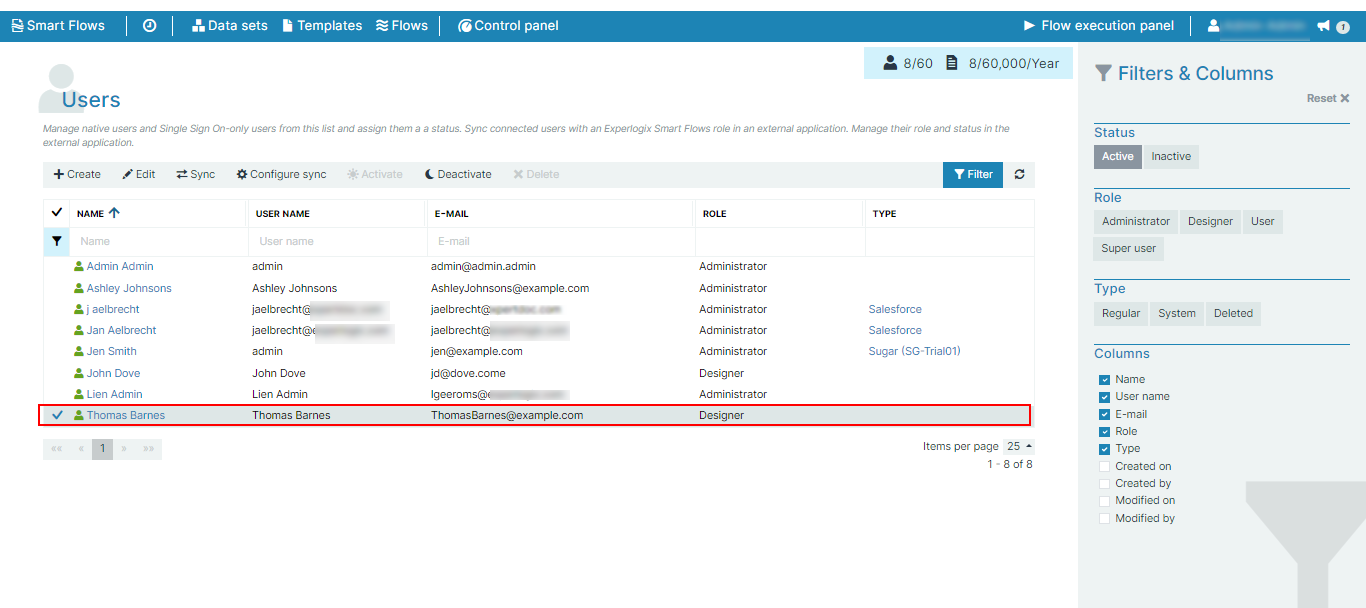
In the Project Console, select the Control panel > Users.
-
In the Users page, select a user.
-
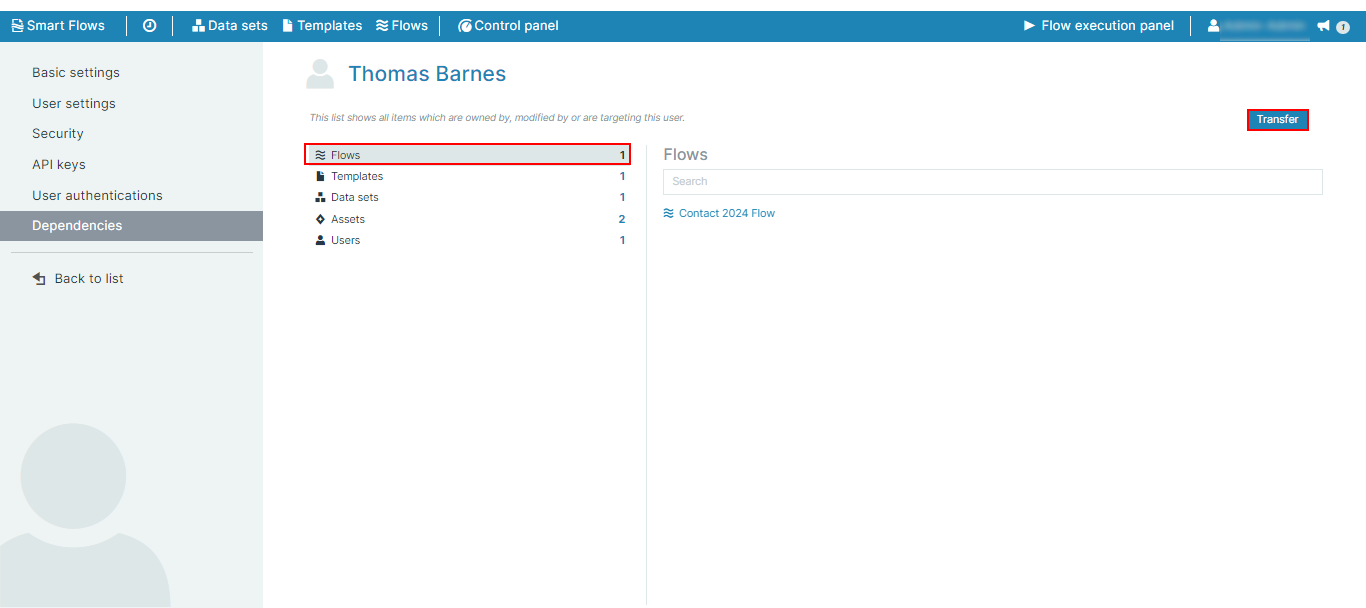
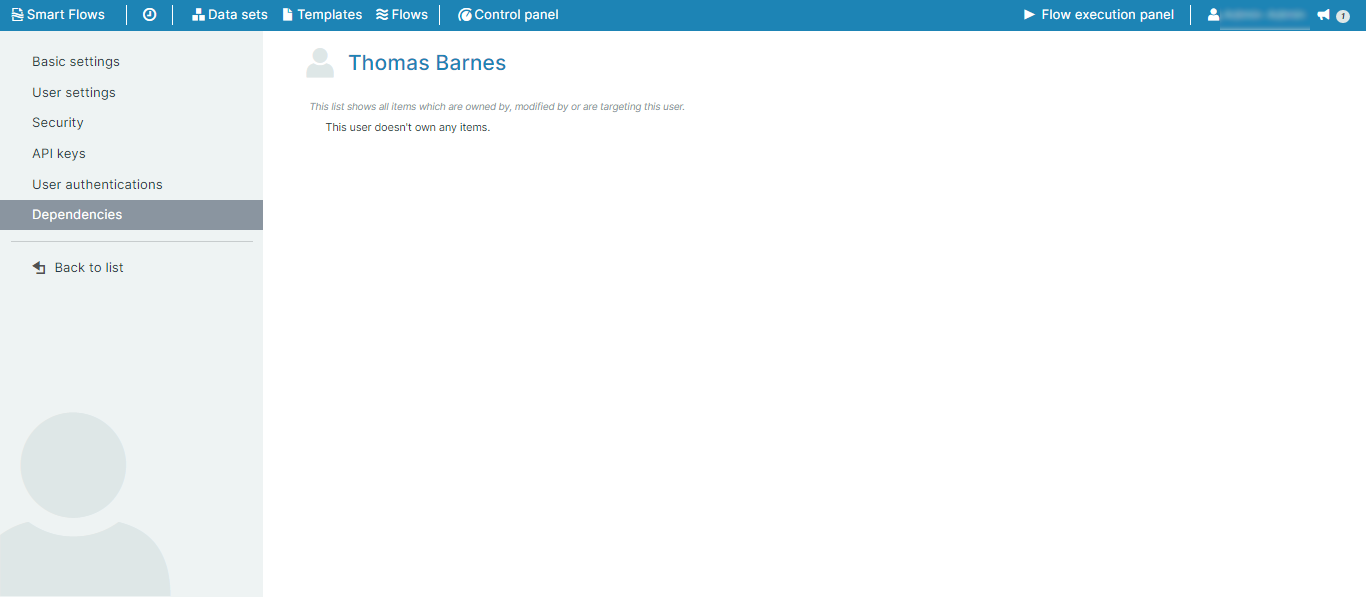
On the left-hand navigation, select Dependencies.
The list of the user's dependencies is shown.
-
To transfer all dependencies to another user, select Transfer.
-
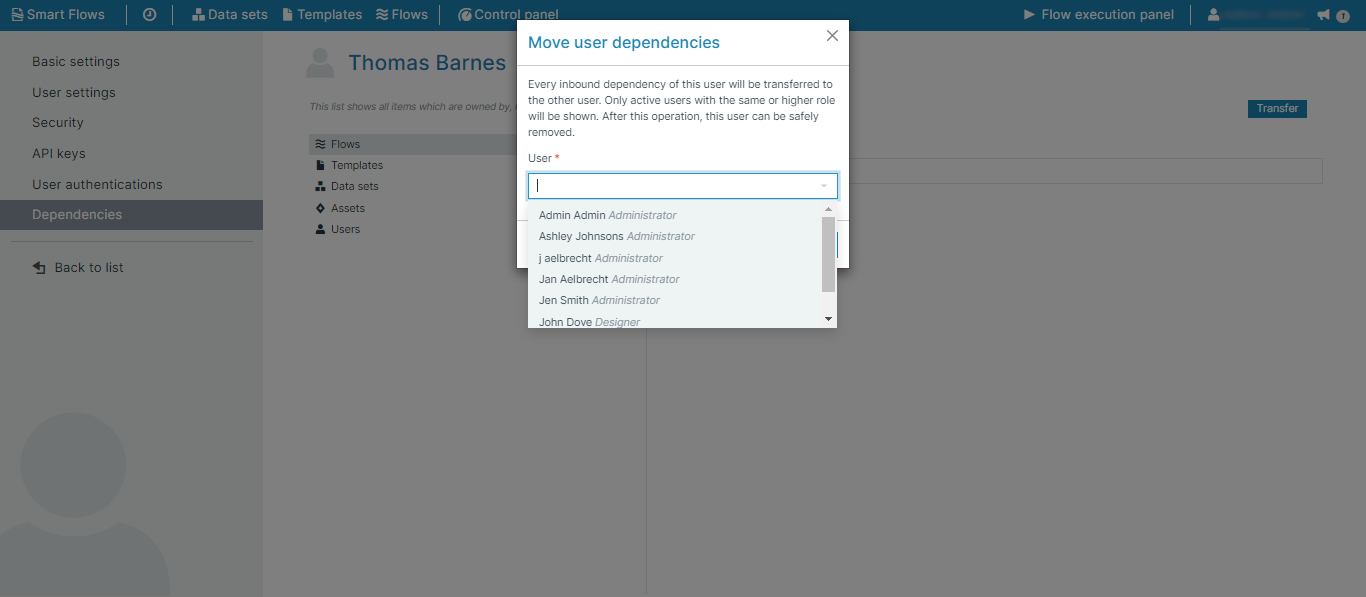
From the Move user dependencies dialog, select a user to transfer the dependencies.
-
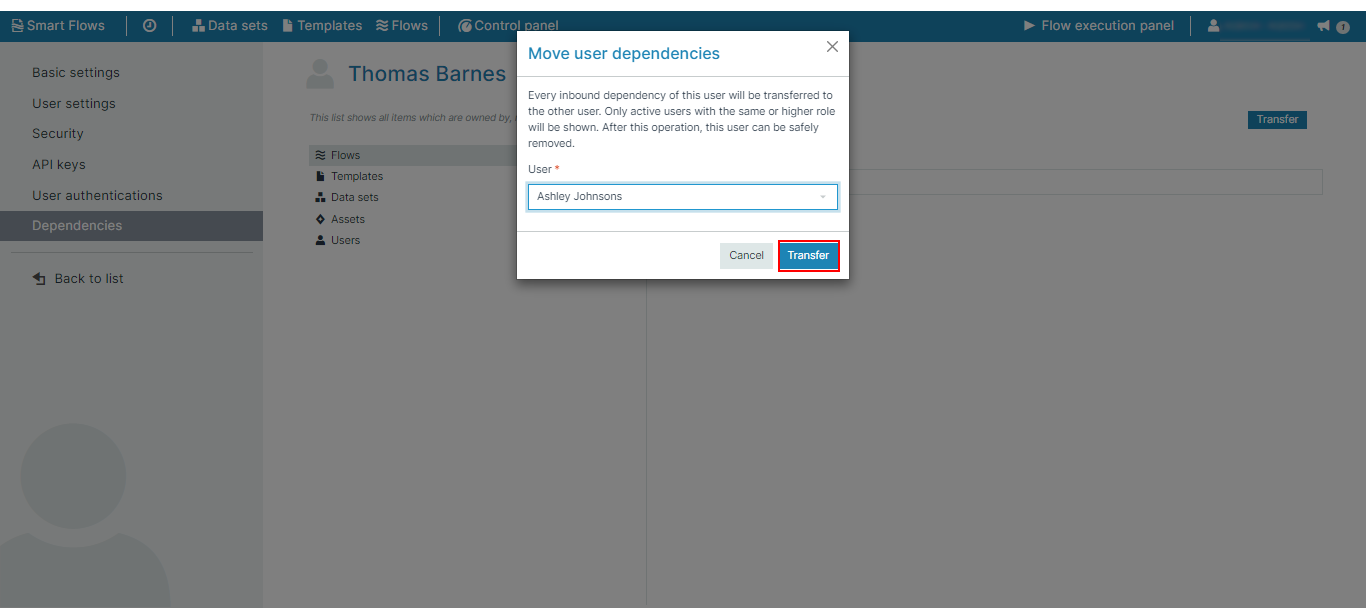
Select Transfer.
-
From the Relink inbound dependencies dialog, select Confirm.
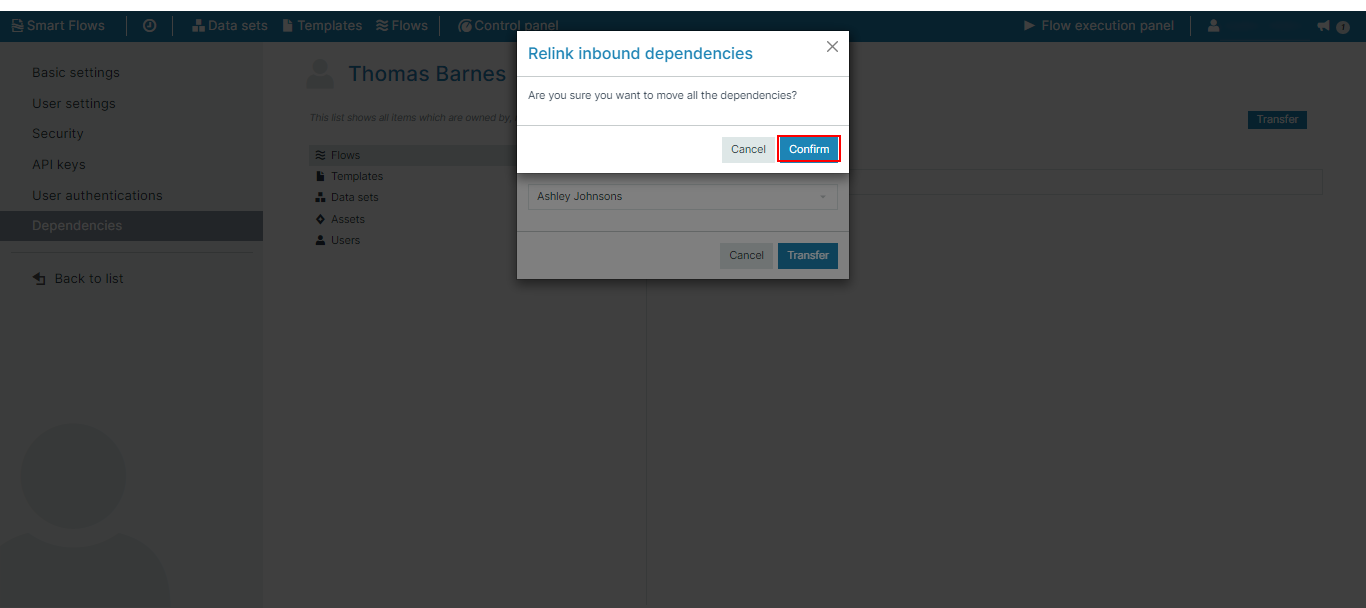
All the dependencies have been transferred out to the new user. No dependencies are left with the user.
Managing Users
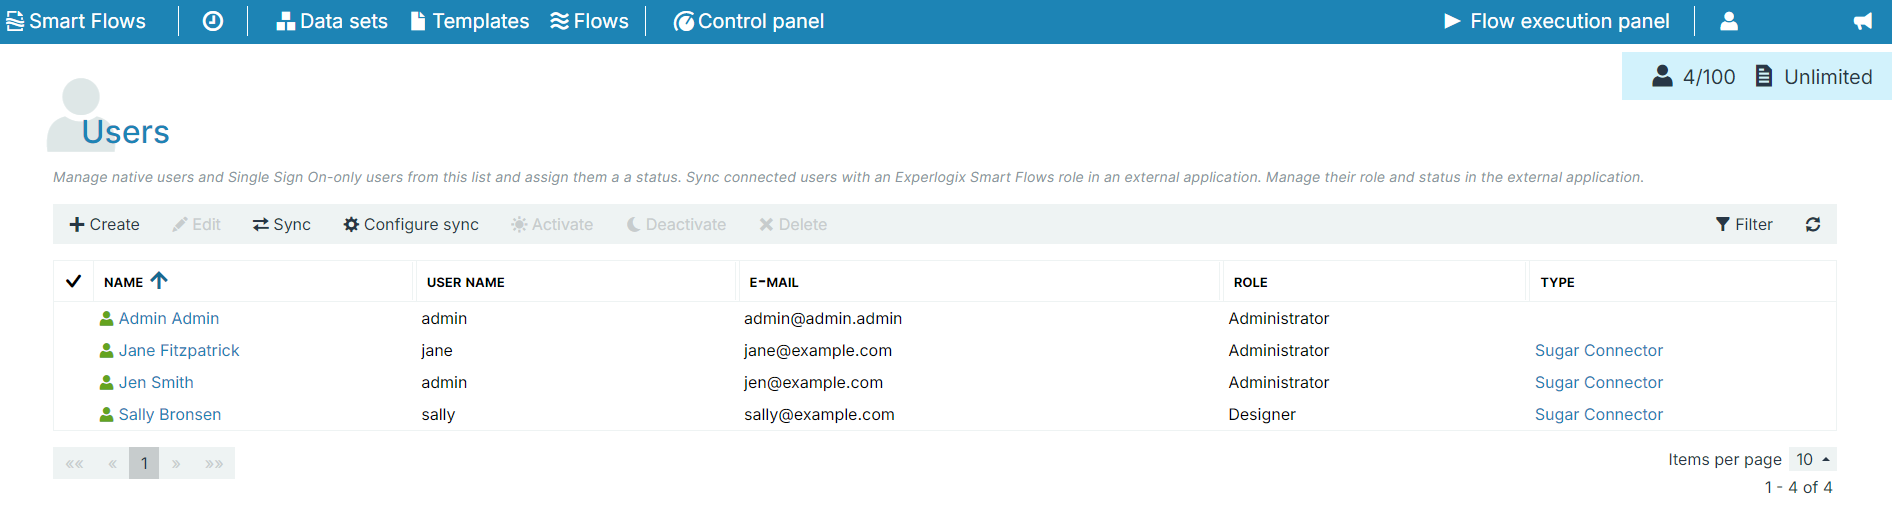
Users encompass all the members of your project and their permissions. Administrators can view all users via the list view in Project Console's Control panel. However, Administrators can manage only native users in the Smart Flows Project Console. To manage Connected users, you require admin permissions on the connected host system.
Automated User Sync has been deprecated since Experlogix Smart Flows version 4.23 and will be fully removed in version 4.28. Customers using this functionality are strongly encouraged to transition to the Automated User Creation model, which has been the default behavior since version 4.23. Any remaining configurations relying on Automated User Sync must be replaced before upgrading to version 4.28.
See the News and Alerts section of What's New for more information.
System users
This section covers the management of native users in Smart Flows created and managed in the 'Project Console'. In this section, you will learn how to create, activate, and deactivate native users.
Creating System users
-
In Project Console, navigate to Control Panel > Users >+ Create.
-
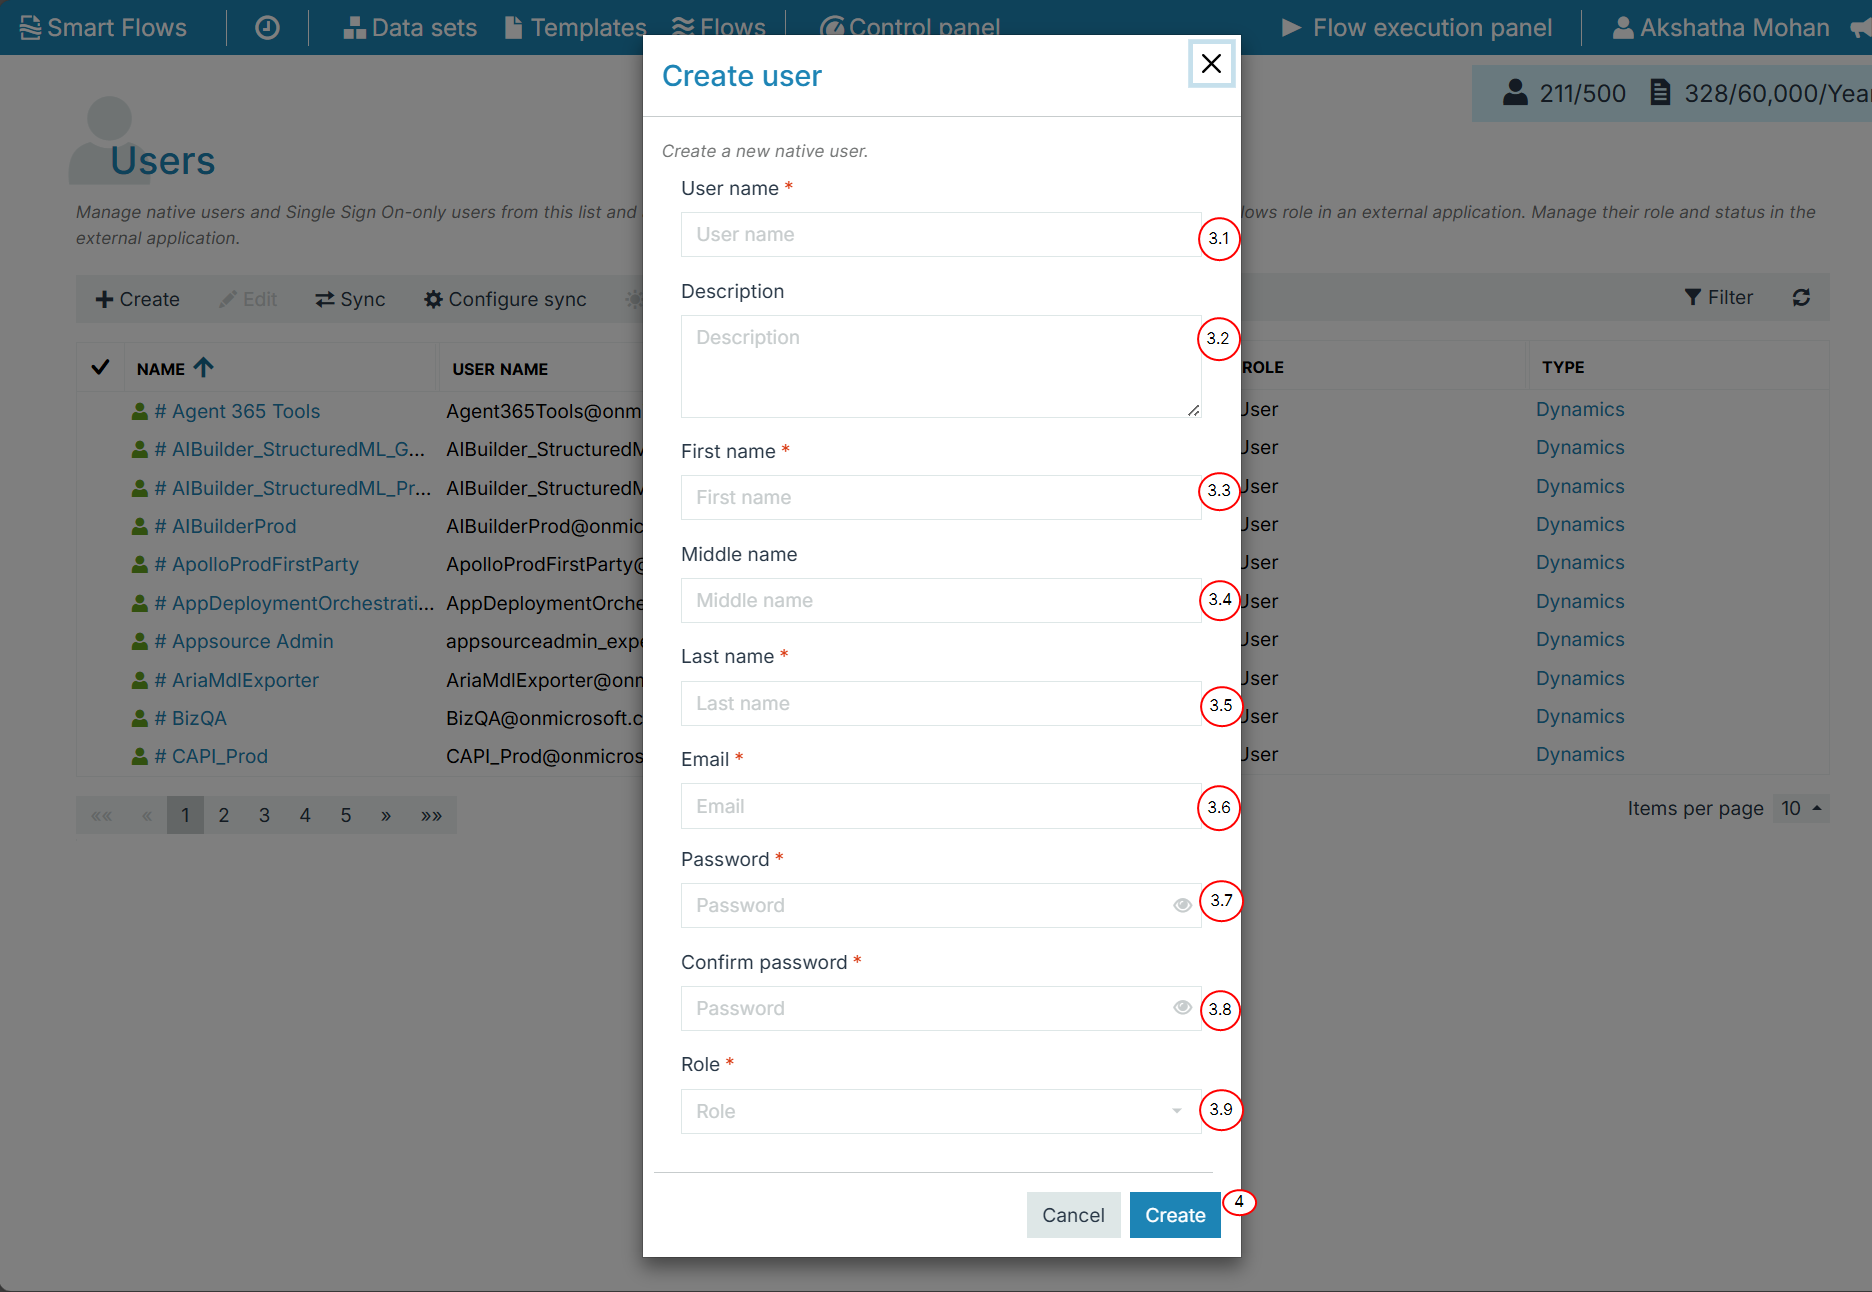
Create the user.
-
In the User name field, input the name to display for the user.
-
In the Description field, input any descriptions you need for the user.
-
In the First name field, input the user's first name.
-
In the Middle name field, input the user's middle name.
-
In the Last name field, input the user's last name.
-
In the E-mail field, input the e-mail the user will utilize for logging into Smart Flows.
-
In the Password field, input a password for the user.
-
In the Confirm password field, input the same password entered in the Password field.
-
In the Role field, select the User Role to define the new user's permissions in your project.
-
-
Select the Create.
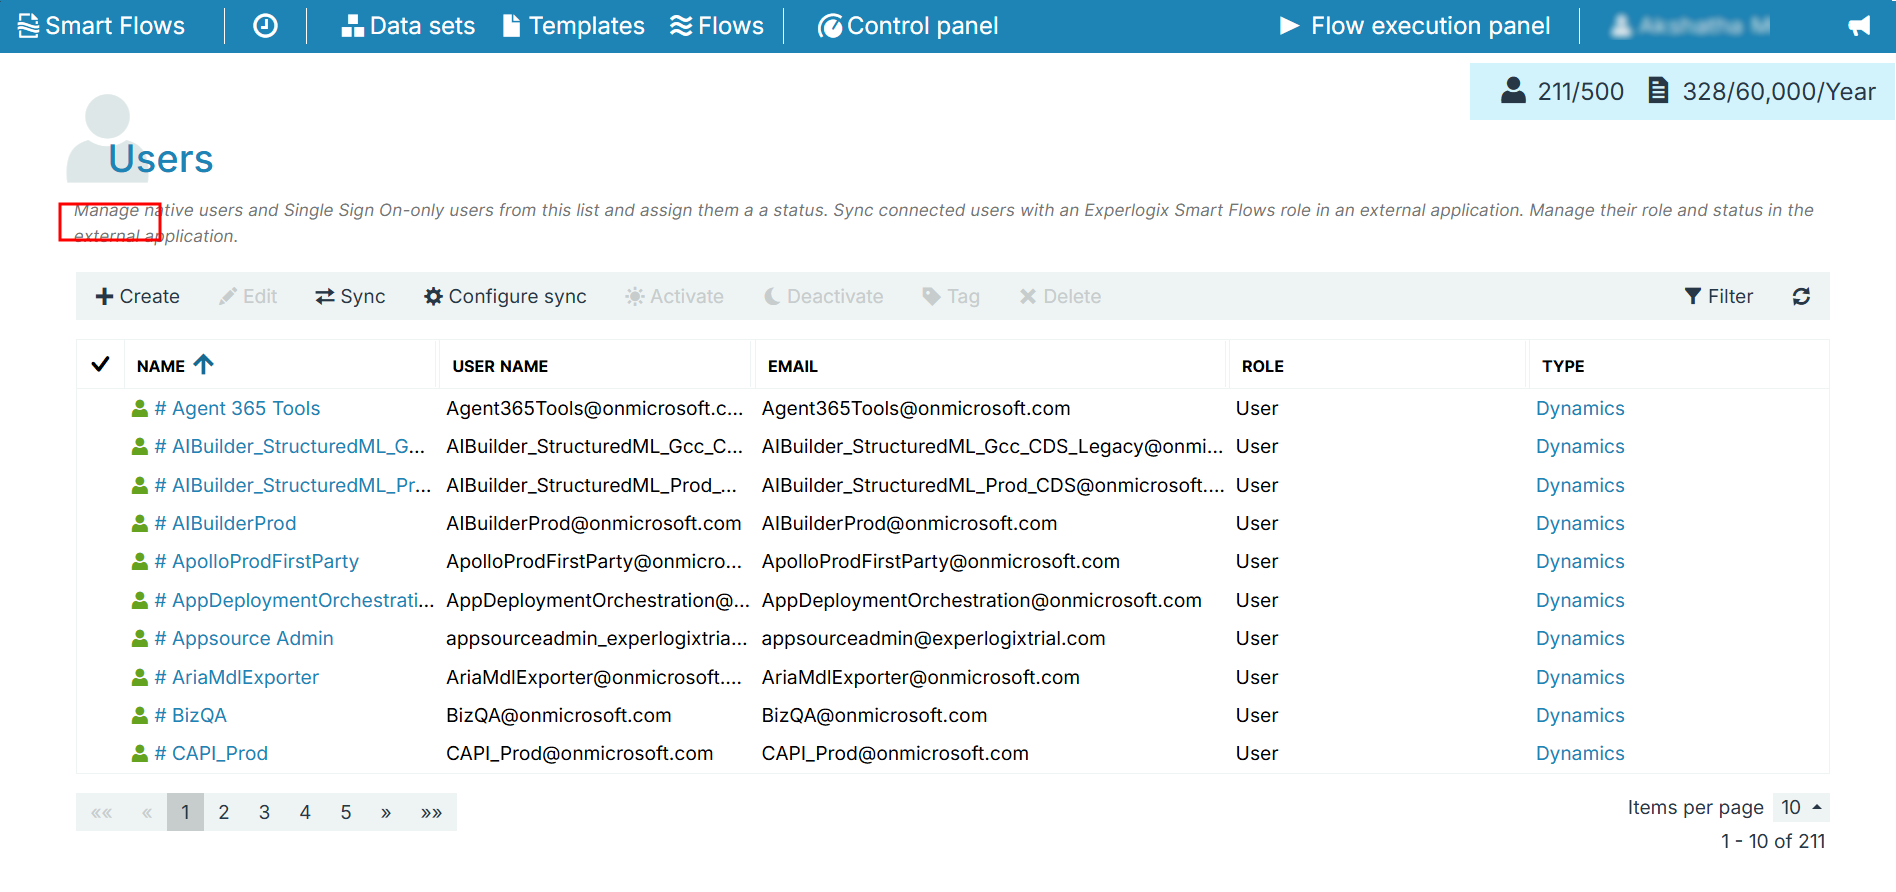
The new user displays in the List view.
Activating and deactivating native users
Administrators can activate and deactivate native users from the native users' List view in Project Console's Users List view. Activating a user confirms their creation within Smart Flow, while deactivating a user renders them unable to log in or interact with Smart Flows. All items created by a deactivated user remain intact after deactivation.
It is not possible to deactivate the final remaining native administrator.
-
In the User's page, select the System.
-
Select the users.
-
Select Activate or Deactivate as required.
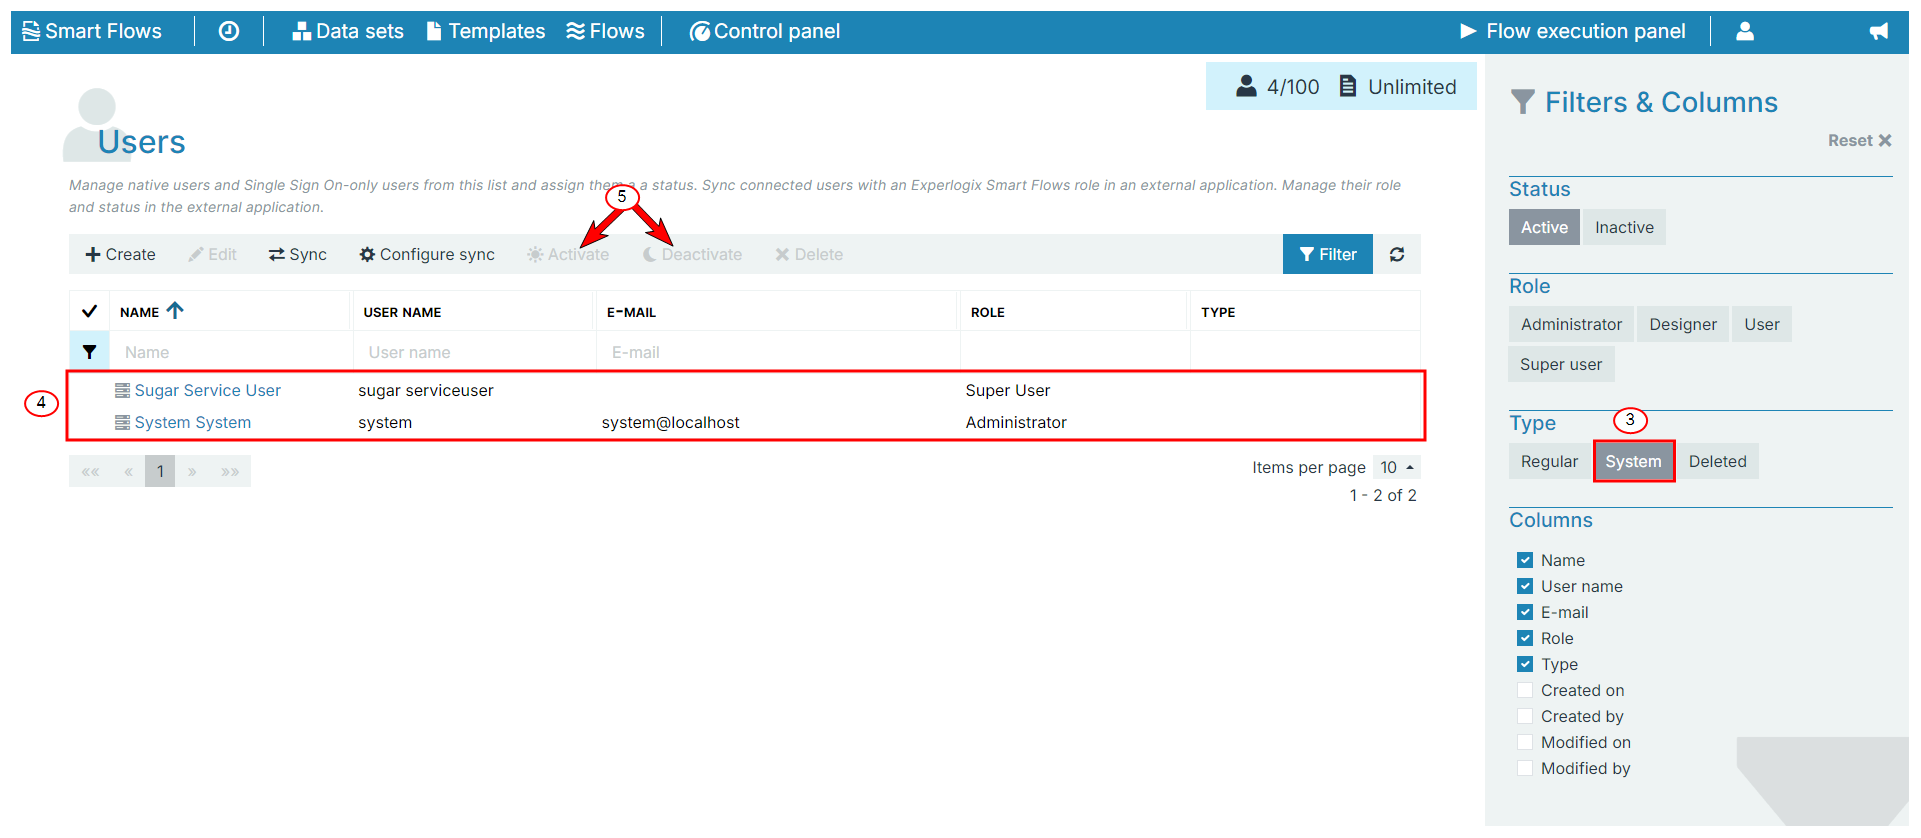
Connected Users
This section covers syncing connected users from connectors to Smart Flows. Connected users are not native to the platform and require synchronization from their connector system to ensure they have the correct roles and permissions in Smart Flows.
Syncing Connected Users
Syncing connects the existing users in your connected system to Smart Flows. This allows you to manage your users directly through your existing CRM or ERP system. However, you'll first need to assign them the correct security roles from within the connected host system. Connectors supporting automatic user creation at log in automatically receive a Smart Flows user id when they log into Smart Flows via the Login page.
When syncing connected users that existing within multiple connected host systems, such as Microsoft Dynamics 365 F&O and Microsoft Dynamics 365 CE, the system is configured to sync both connections at the same time. In order to remove a connected user the Smart Flows roles must be unassigned in all connected host systems.
Setting User Roles with Security Groups
Admin users in the connected system can create and assign users to the user groups outlined in the table below. With the updated user sync for Smart Flows, users assigned to the group are automatically created in Smart Flows when they attempt to log in via the Login page. You can also set user roles within Smart Flows via the teams function within Microsoft Dynamics 365 CE.
Syncing User Roles for Smart Flows Project Users after Smart Flows Version 4.23.0 newer or higher.
For the following connectors if you have "Individual user synchronization" enabled, then system automatically checks and updates the user security role in Smart Flows if there is a mismatch. Administrators can manage this via User management (Settings) in Project Console. The "Individual user synchronization" setting is enabled by default for all new projects created after Smart Flows Version 4.23.0.
The following connectors support users automatic user creation at login:
-
Microsoft Dynamics 365 F&O
-
Microsoft Dynamics 365 CE
-
Module for Sugar
-
Salesforce
The process below demonstrates how to set user roles for security groups within the Dynamics 365 CE environment. Users assigned to the security group will automatically receive the corresponding roles within Dynamics 365 CE, see Setting security role from within Dynamics process. We outline the steps below to modify an existing team to add the Smart Flows security roles; for more information on overall Microsoft Dynamics 365 CE team management, refer to Microsoft Dataverse teams management.
-
Create new teams for each of your Smart Flows Security Roles. Refer to create a new team for more information.
-
In Microsoft Dynamics 365, go to Settings > Security.
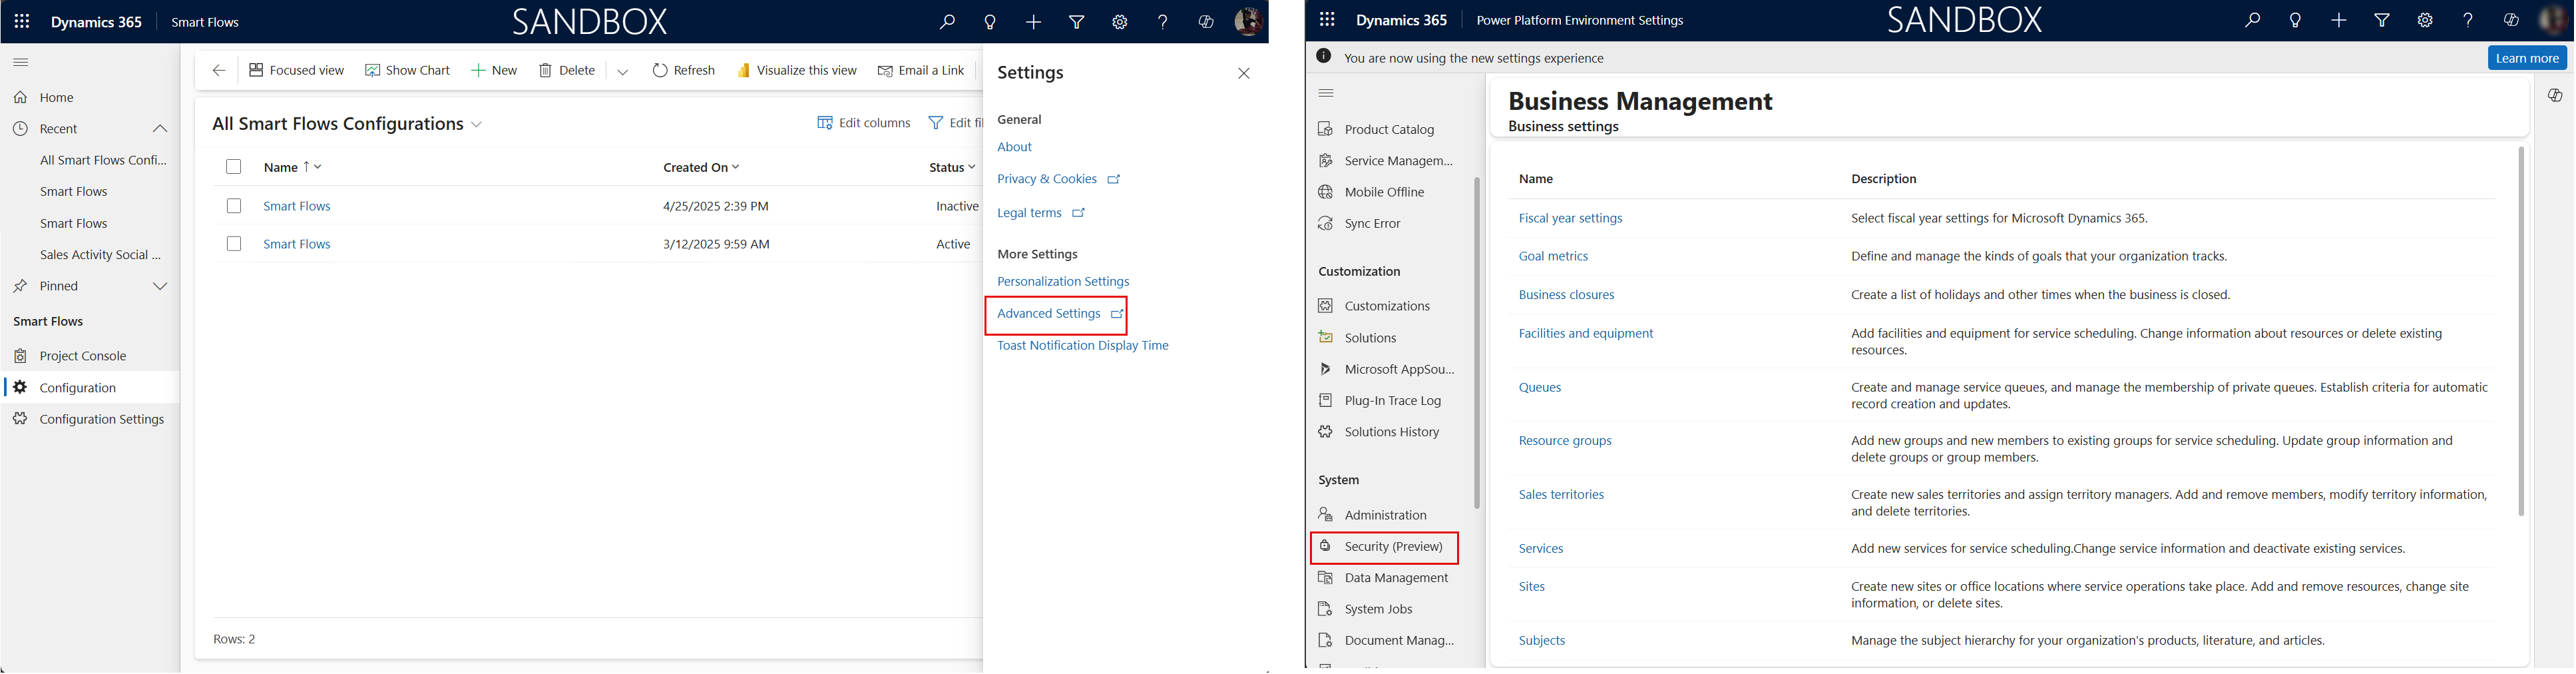
-
Select Teams.
-
Select a security group from the dropdown.
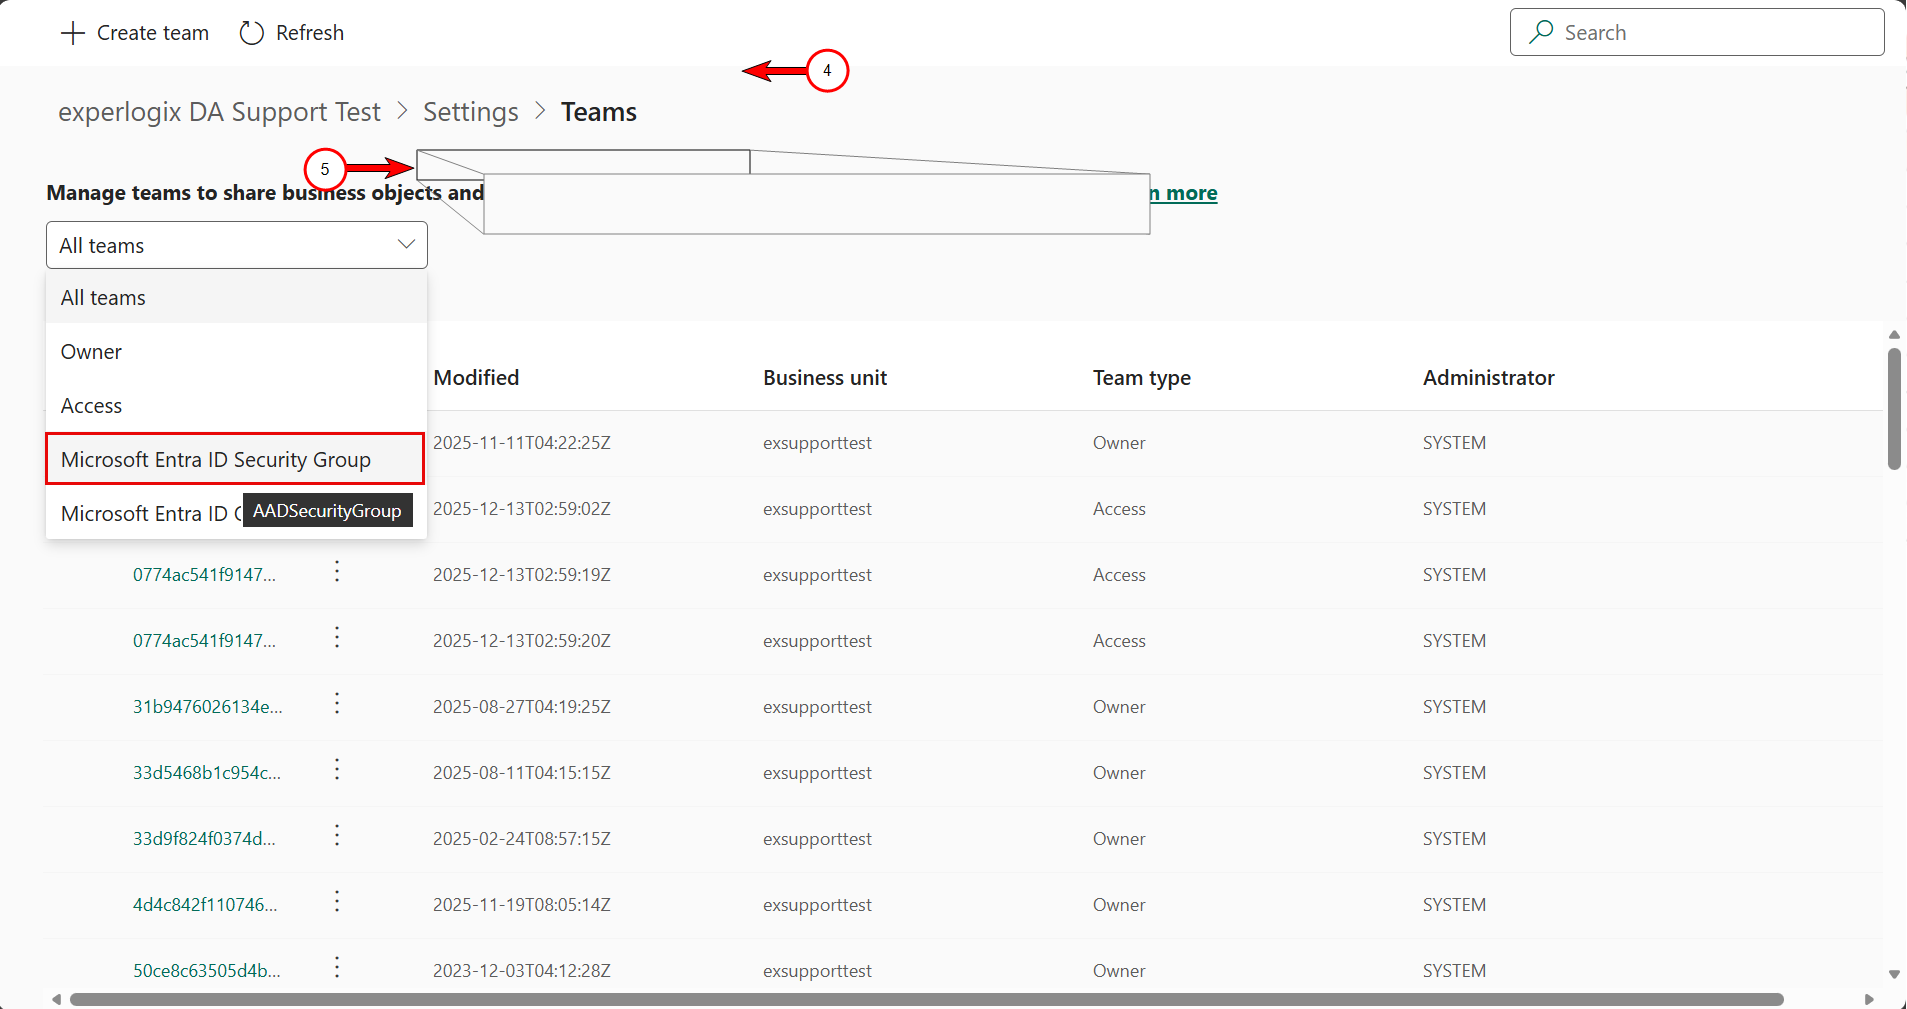
-
Select the Security Group you wish to modify.
The security group page loads.
-
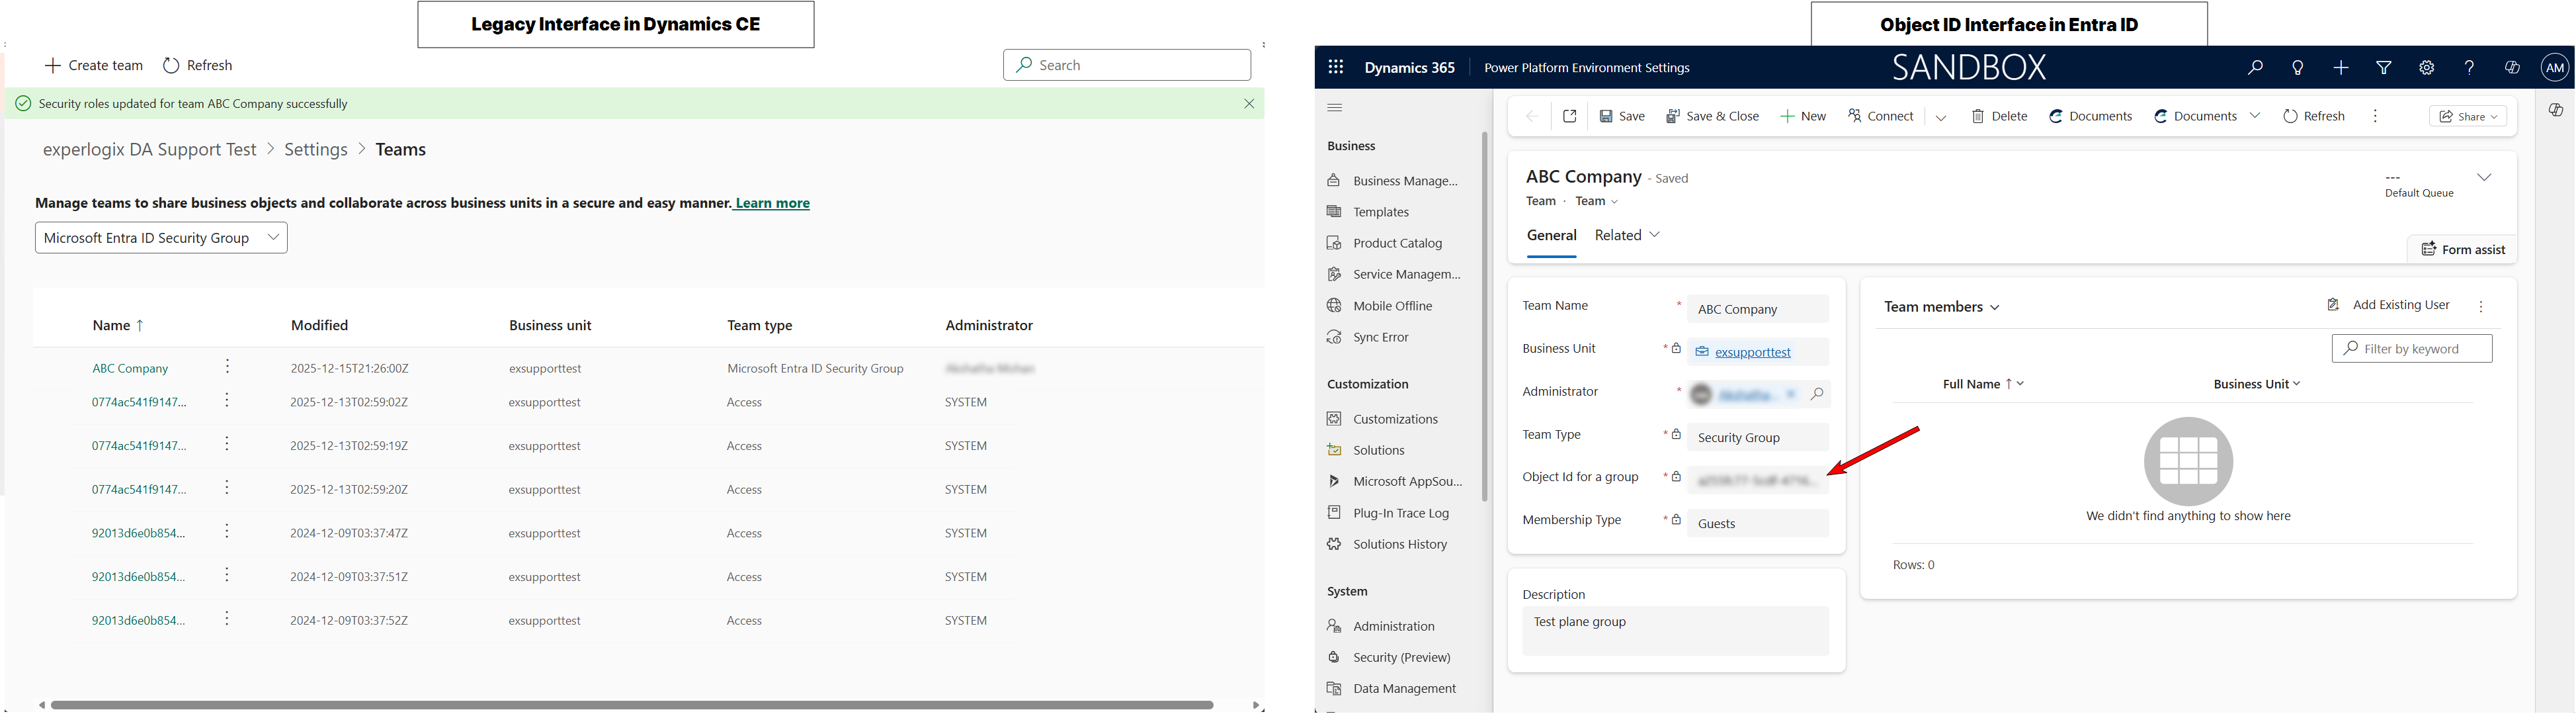
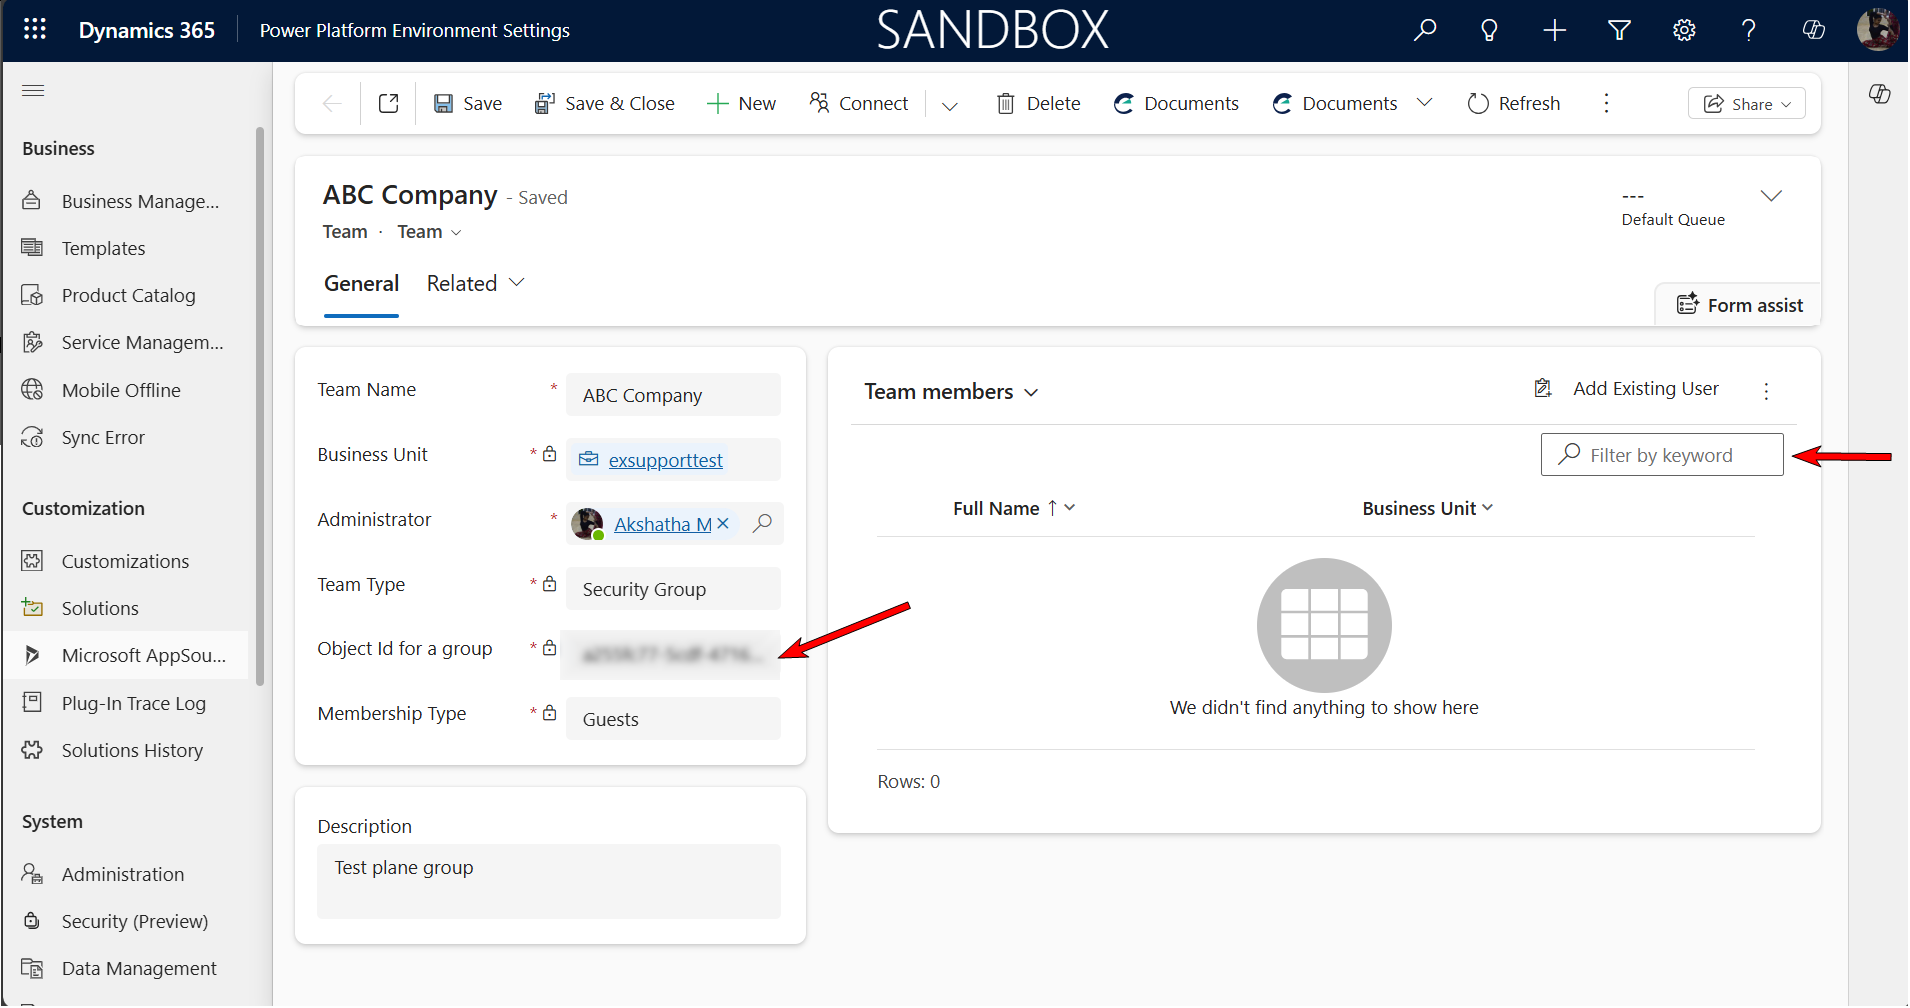
Retrieve the Microsoft Entra ID Object ID for the security role you wish the group to have. Refer to Find subscriptions and roles for more information.
-
Paste the Subscription ID into the Object ID for a group field.
-
Use the search bar to assign users to the Security Group. Refer to Manage team members for more information.
-
Repeat Step 2 through Step 8 for any remaining groups.
Manual user sync
When syncing connected users that existing within multiple connected host systems, such as Microsoft Dynamics 365 F&O and Microsoft Dynamics 365 CE, the system is configured to sync both connections at the same time. In order to remove a connected user the Smart Flows roles must be unassigned in all connected host systems.
-
In Project Console, select Control panel > Users.
-
In the Users List view, select the Sync button.
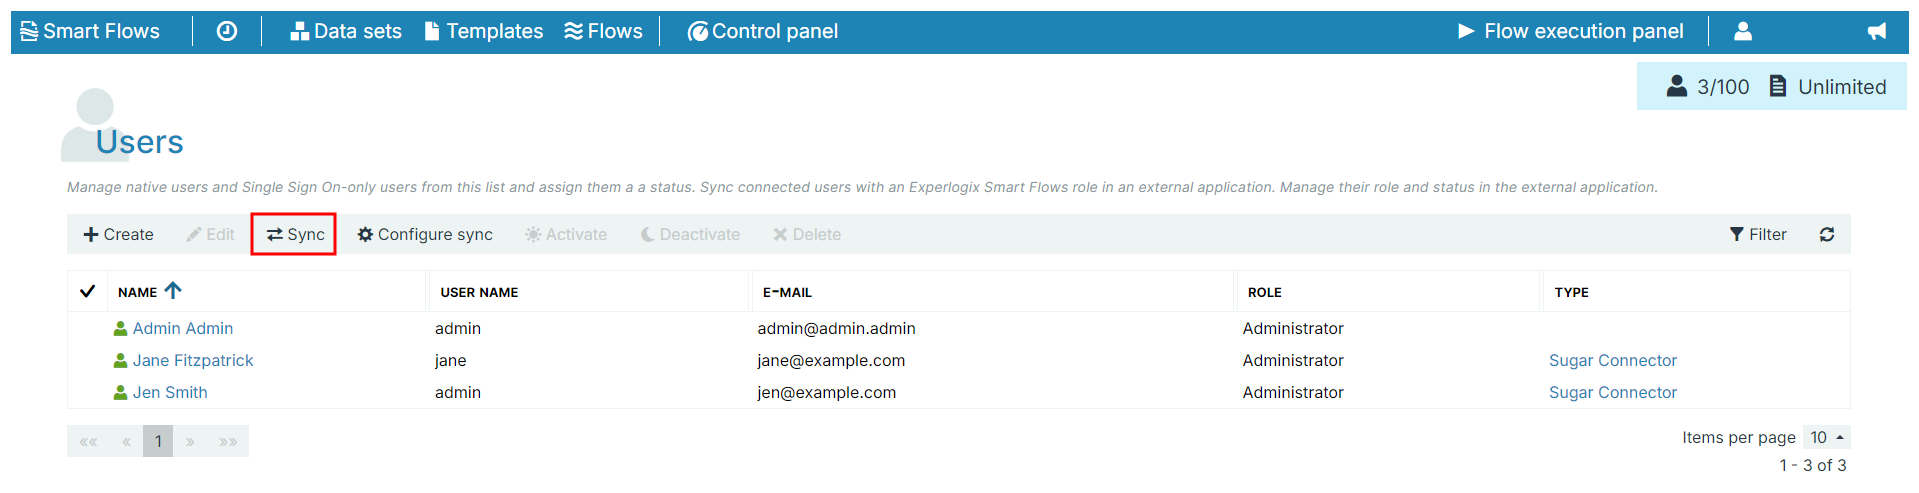
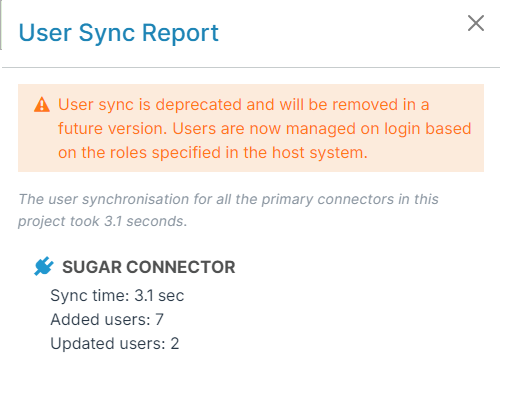
A message displays informing you that Smart Flows is syncing users in the background. When the synchronization process completes, you'll receive a user sync report.
Create Connector User on First Log-In
If you have assigned your users a Smart Flows Role in your connected system, they can sign in with their connector from the Smart Flows login for your instance, and their user profile will automatically be synced from your connector to Smart Flows when they log in for the first time. You must ensure that "On login with an existing user, update roles based on the Smart Flows role in the host system" is toggled on in the Settings for this functionality to work. See Settings for more information.
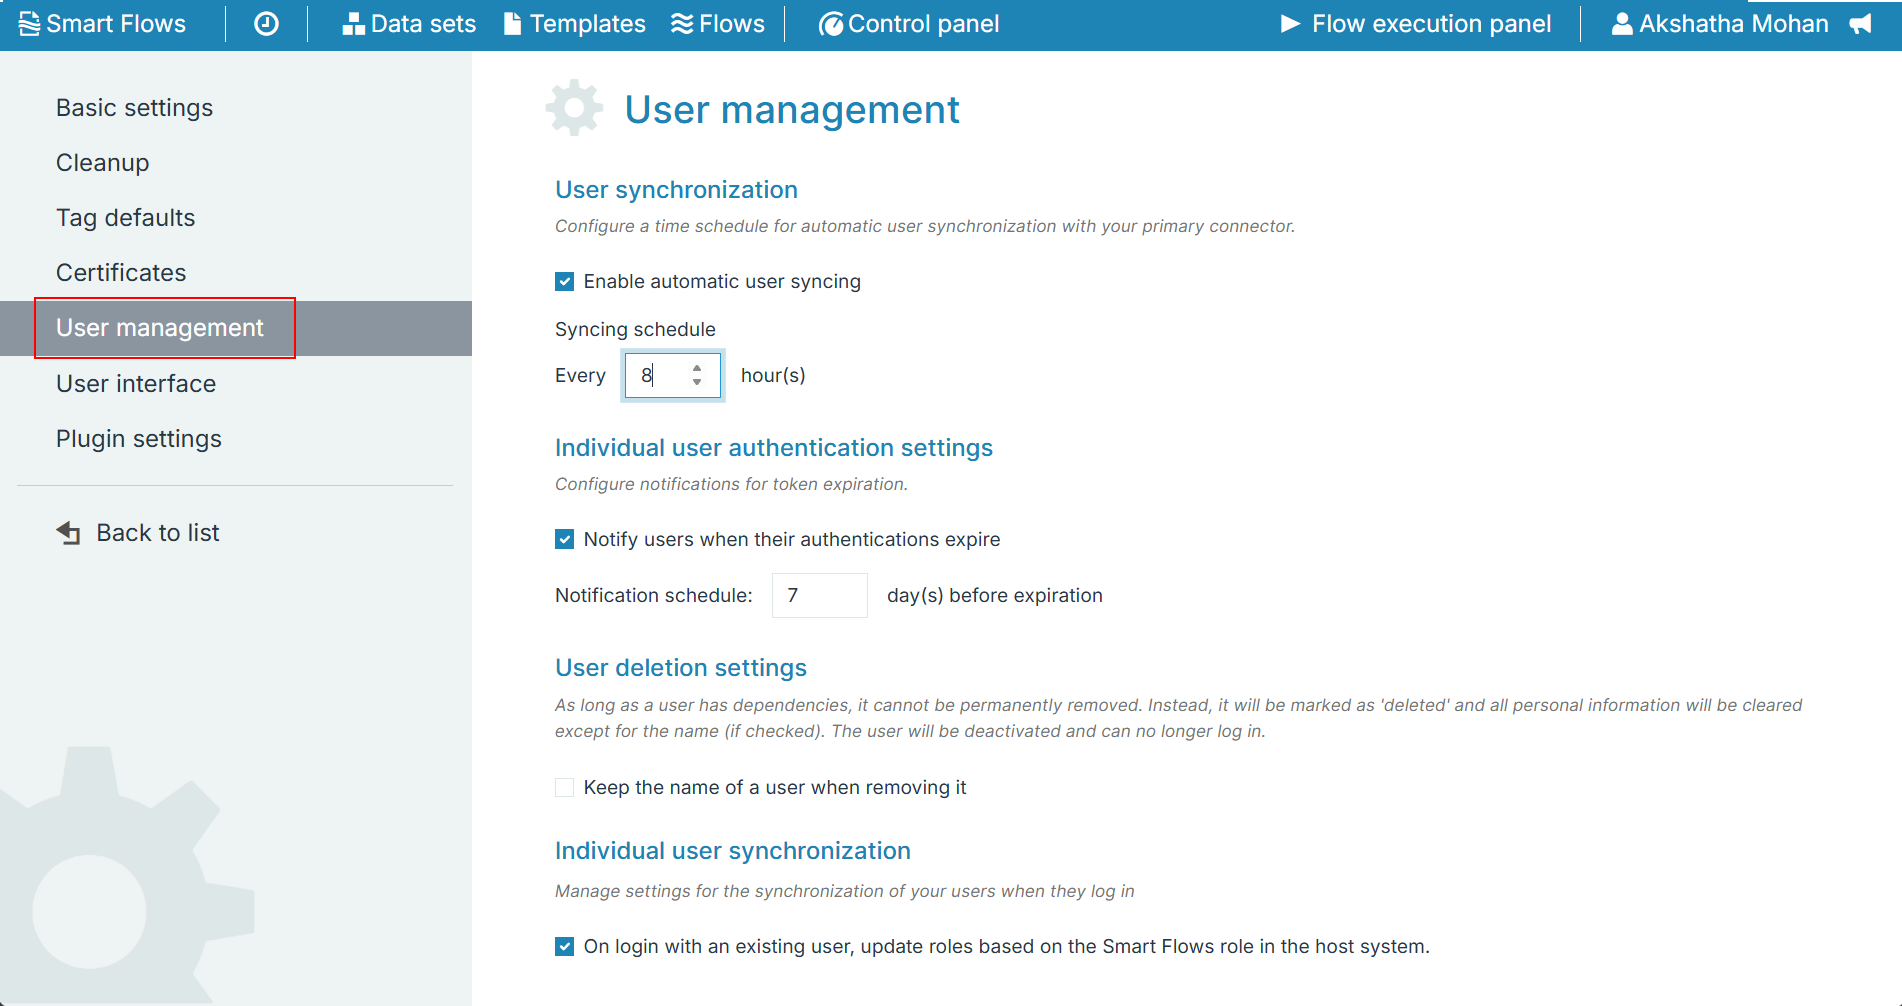
Not all roles can access all components of Smart Flows. For example, if you are assigned a User role in Smart Flows, you won't be able to log into Project Console. If you attempt to use the sync user at log in functionality to access a component Smart Flows that isn't allowed by your role, you'll receive an error message. For more information on specific user roles, see Setting User Roles with Security Groups.
Managing Entra ID User Permission
During authentication of the Smart Flows Dynamics connector, Microsoft Azure will ask the IT administrator to configure the user consent settings for the app. Smart Flows will not function for non-admin users when creating a Dynamics connector if the system configuration does not allow user consent for applications.
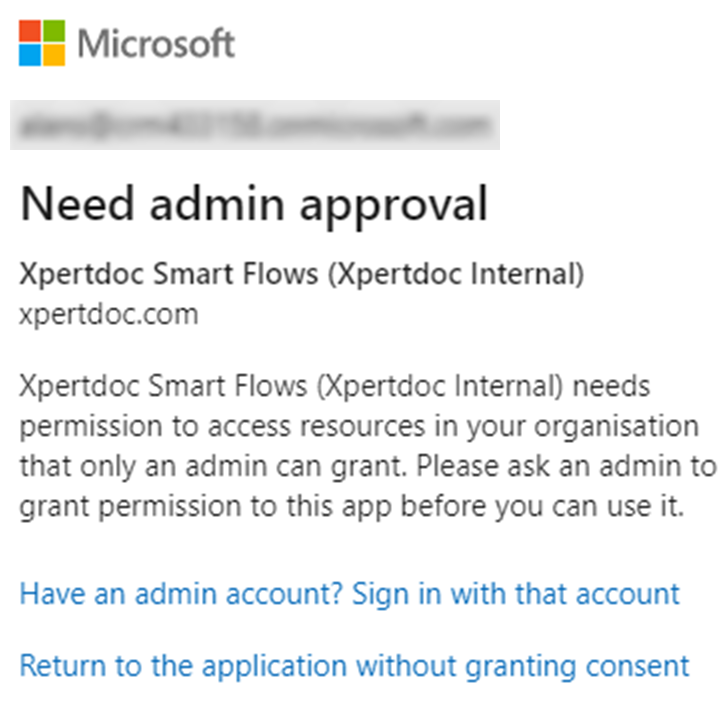
This permissions consent is completely separate from the security roles assigned in Dynamics. IT Admins have several configuration options available to meet their organizational security requirements. Our recommendation is to allow users for apps from verified publishers or to Assigning Smart Flows Consent to an Azure Groups.
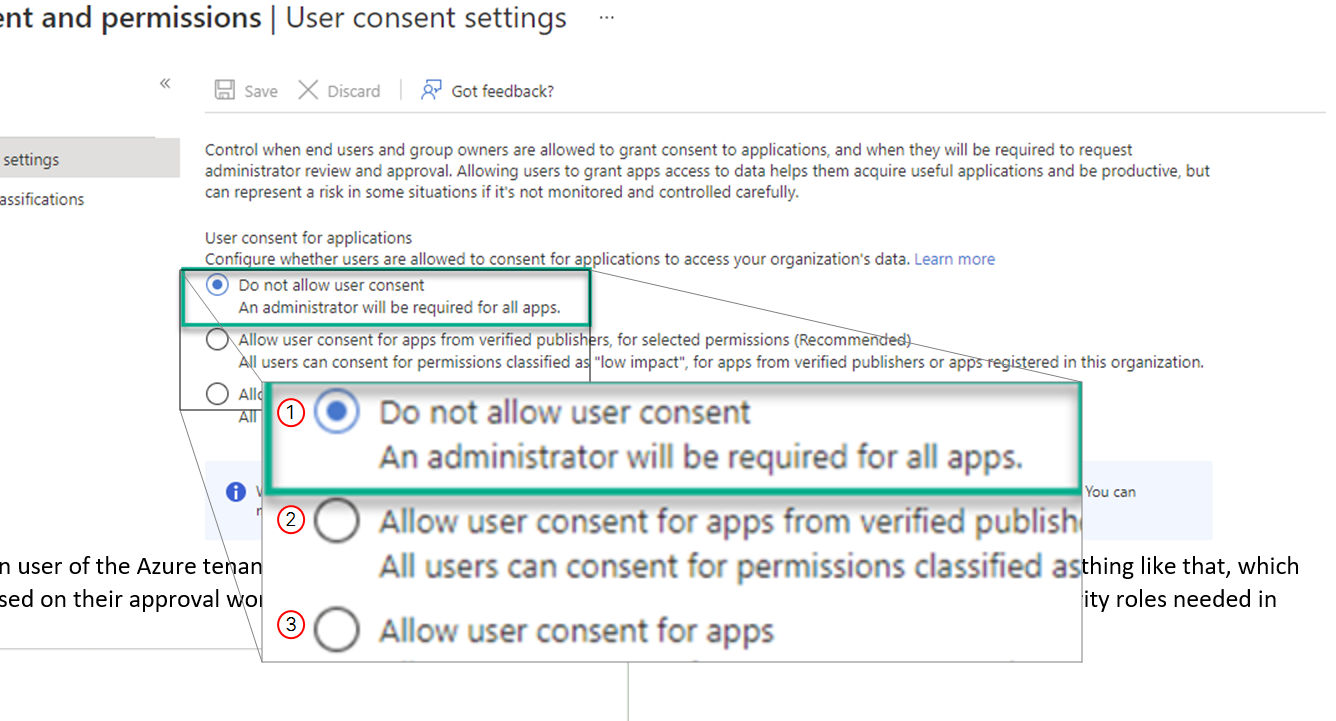
|
Index No. |
Field name |
Description |
|---|---|---|
|
1 |
Do not allow user consent |
Prevents users from consenting to allow the Smart Flows application to make connections. |
|
2 |
Allows users to consent to apps based on the permissions configuration on your organization has created. |
|
|
3 |
Allow user consent for apps |
Allows all Smart Flows users to consent to for approval when connecting Smart Flows connectors. |
Assign Smart Flows Consent to an Azure Group
Assigning consent permissions to a group allows organizations to tightly control which apps can access their CRM data and who can grant that consent.
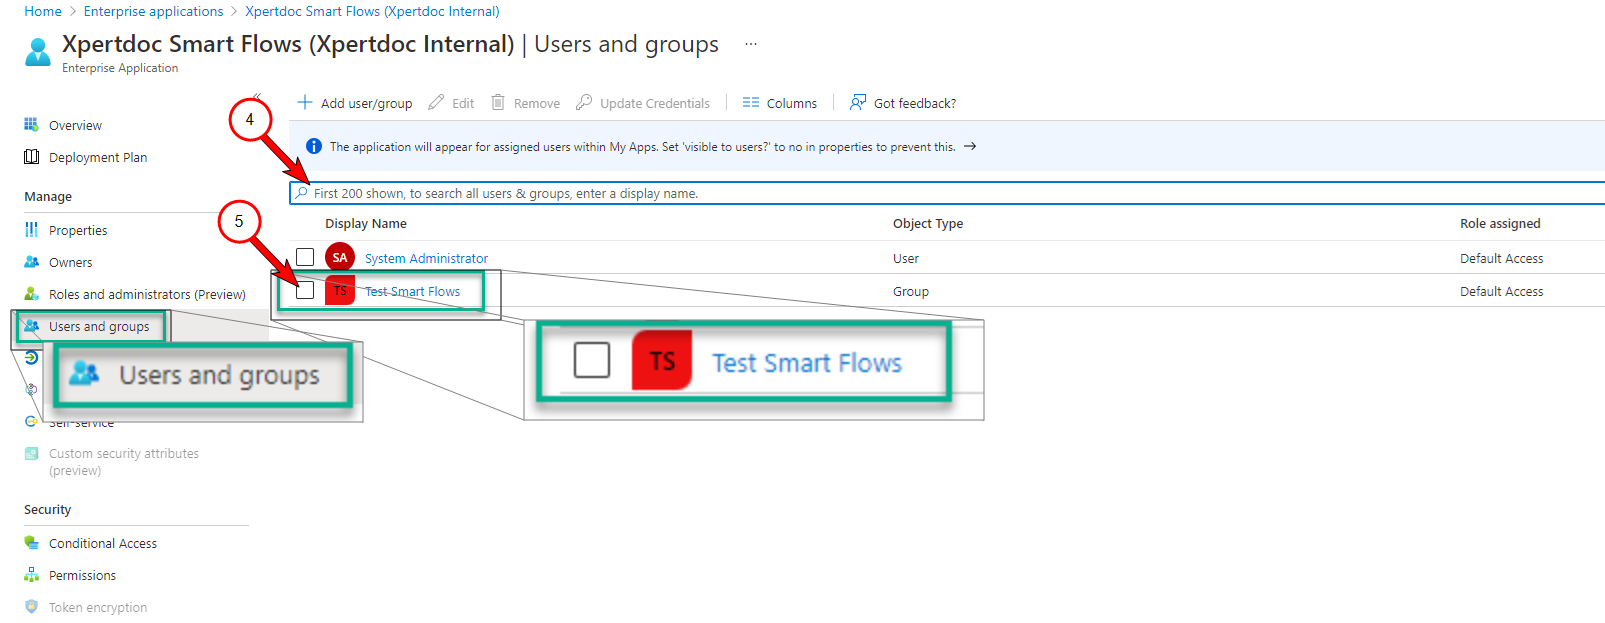
-
In Microsoft Azure, navigate to Home/Enterprise applications/Xperdoc Smart Flows.
-
Set Assignment required to Yes.
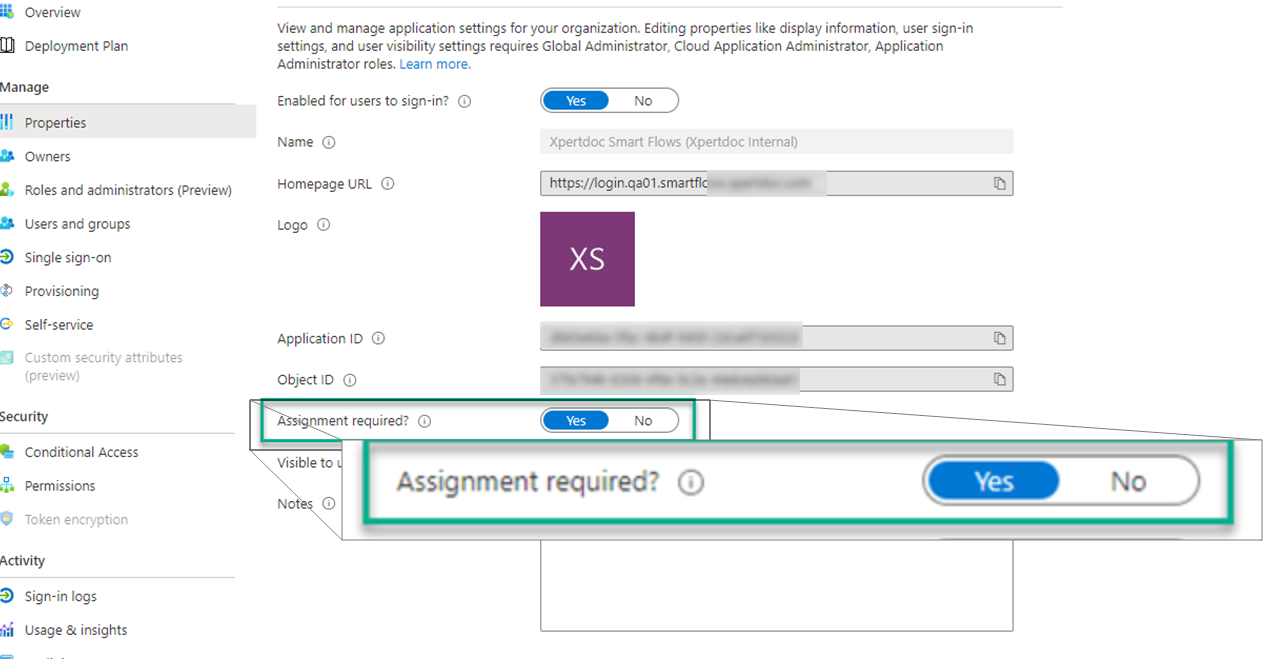
-
Create a group for Smart Flows users.
-
Search for and select the created group.
-
Assign that group the permissions to consent for the Experlogix Smart Flows application.
Approving Consent Requests
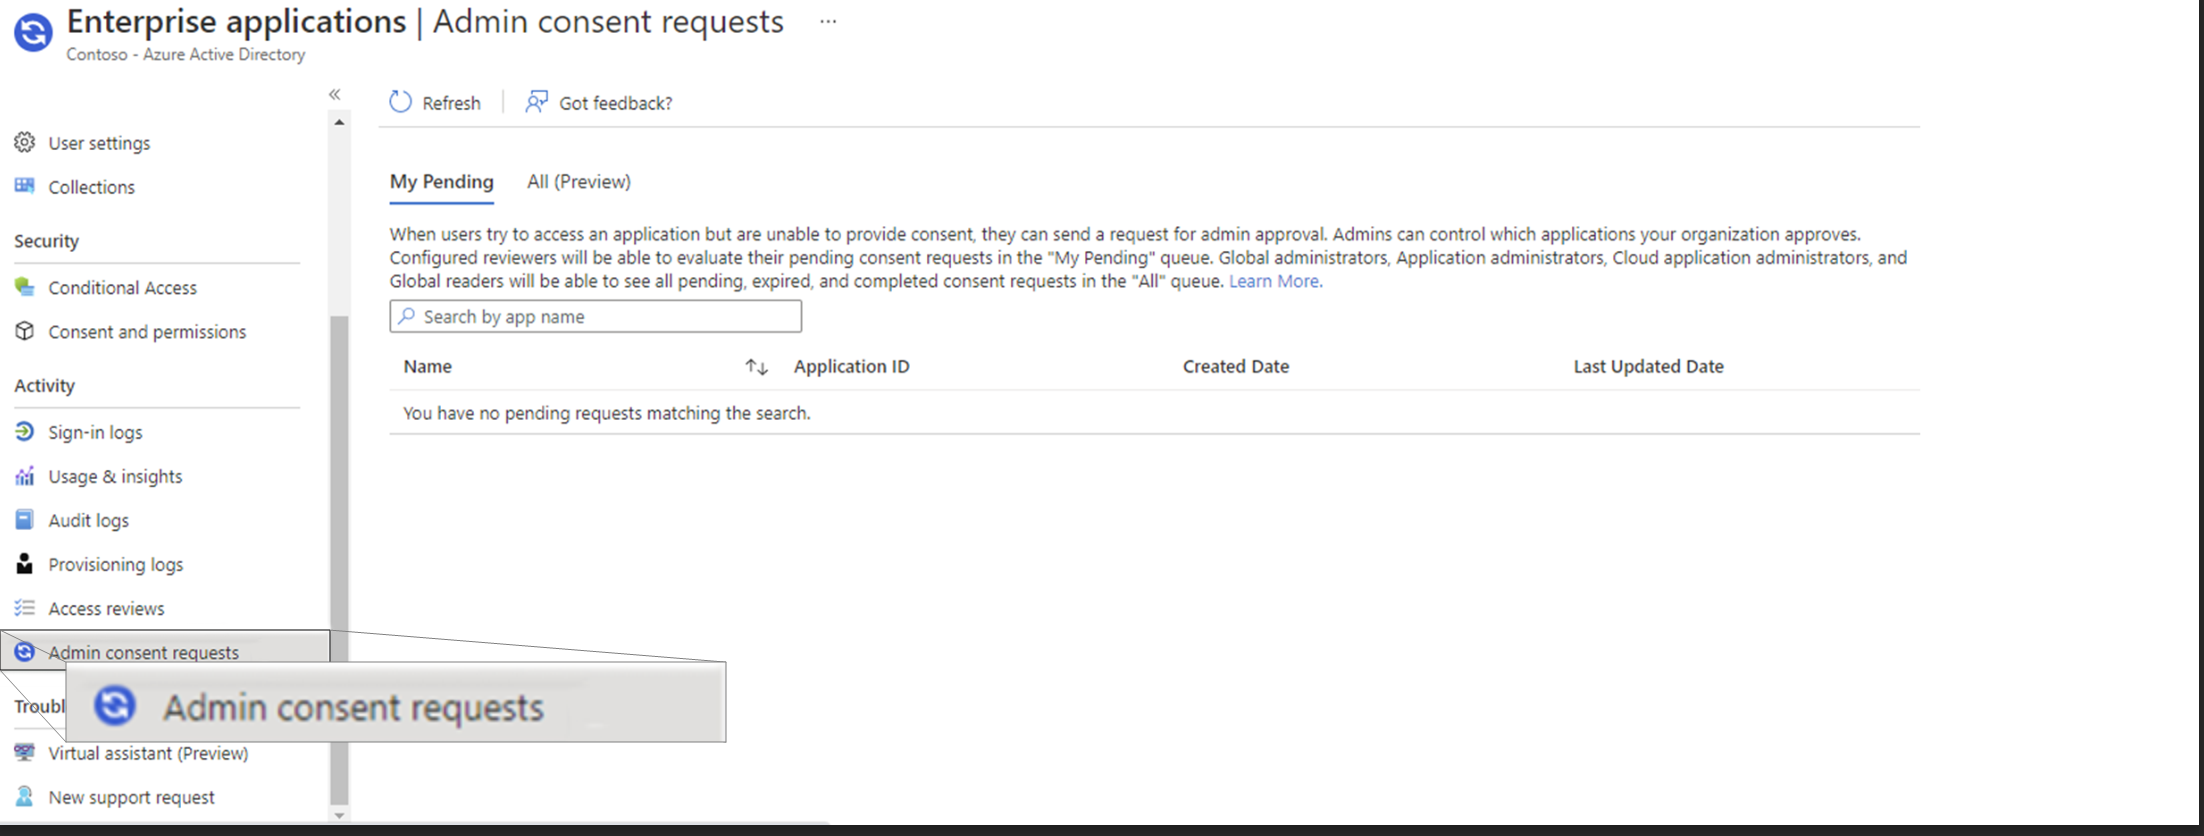
Microsoft Azure Administrators receive consent requests under the Admin Consent Requests tab.
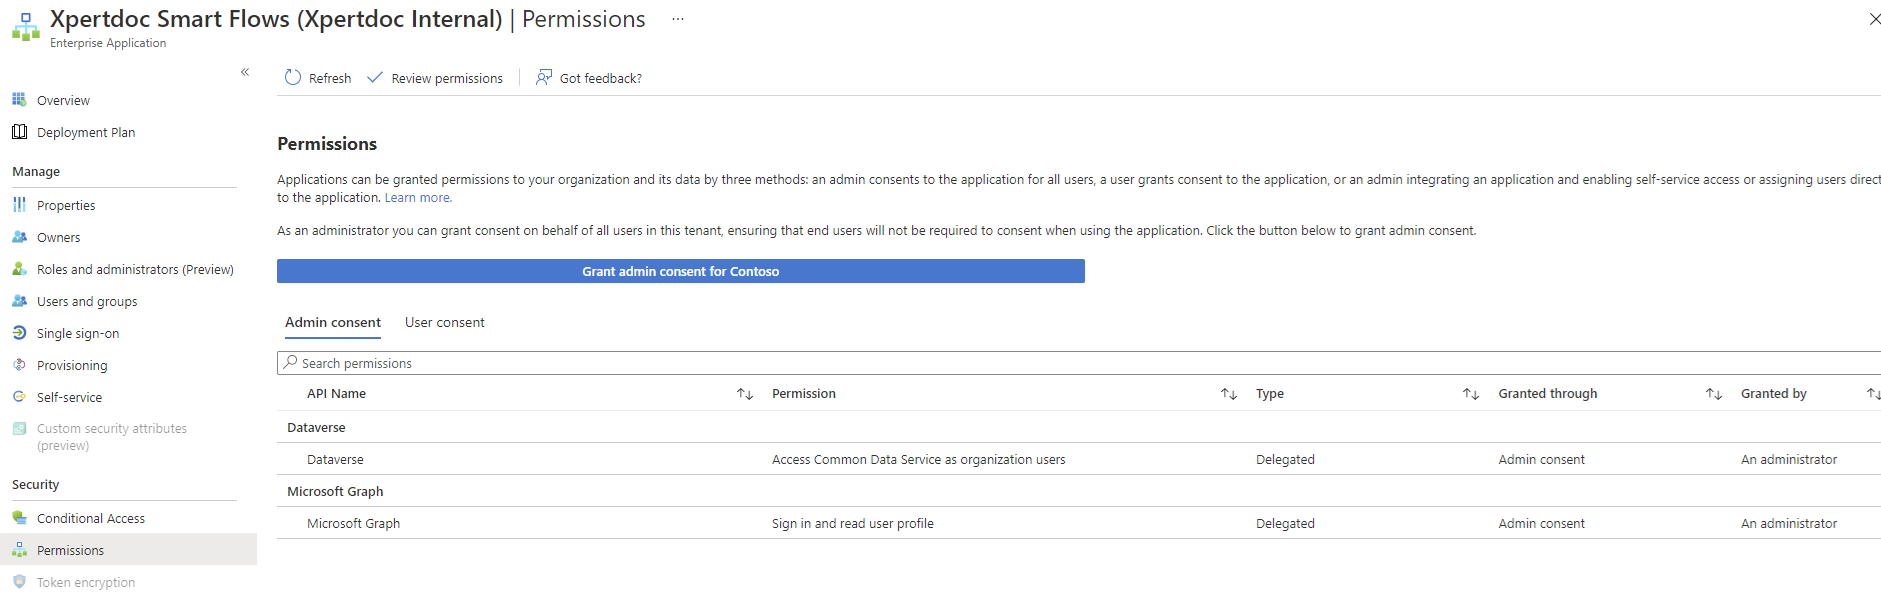
Once approved, it will add Admin Consent to the Enterprise application created for Smart Flows.
Transferring User Dependencies
A single user may have many dependencies. If such a user leaves the company, their dependencies are lost. In order for these dependencies to stay in the company, you can transfer dependencies from one user to another user.
You must be at same or higher role than the user who's dependencies you are transferring or moving.
-
In the Project Console, select the Control panel > Users.
-
In the Users page, select a user.
-
On the left-hand navigation, select Dependencies.
The user's dependencies are shown.
-
To transfer all dependencies to another user, select Transfer.
-
From the Move user dependencies dialog, select a user to transfer the dependencies.
-
Select Transfer.
-
From the Relink inbound dependencies dialog, select Confirm.
All the dependencies have been transferred out to the new user. No dependencies are left with the user.
Deleting Users
To delete a user from the system, you must first transfer its dependencies to another user. Secondly, you must deactivate the user before you can delete them.
Deactivate User
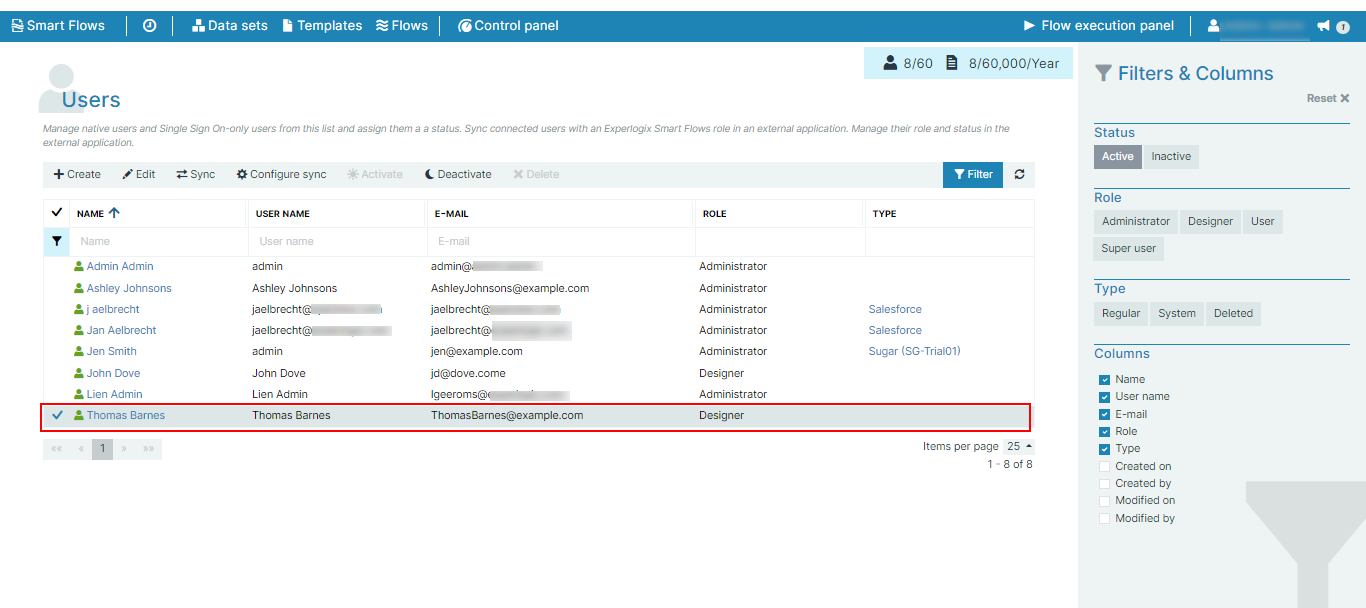
You can only remove or delete a deactivated user. If your user is active, you must first deactivate them. To deactivate a user, follow these steps:
-
From the Users page, select your user.
-
Select Deactivate.
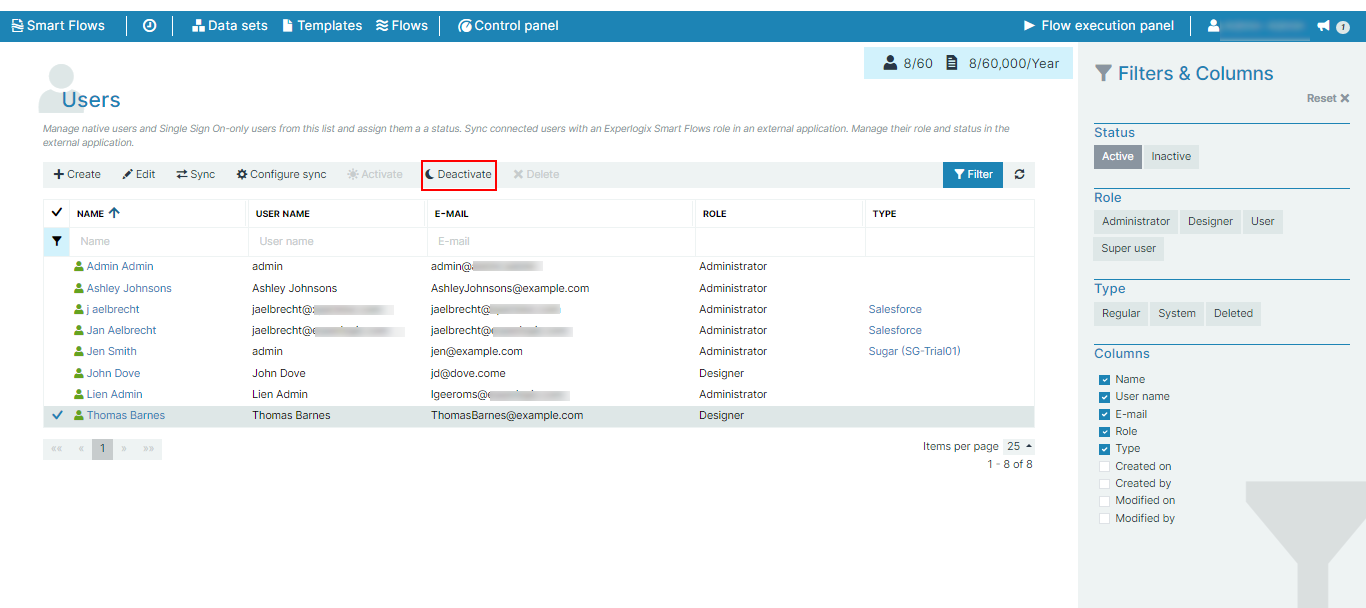
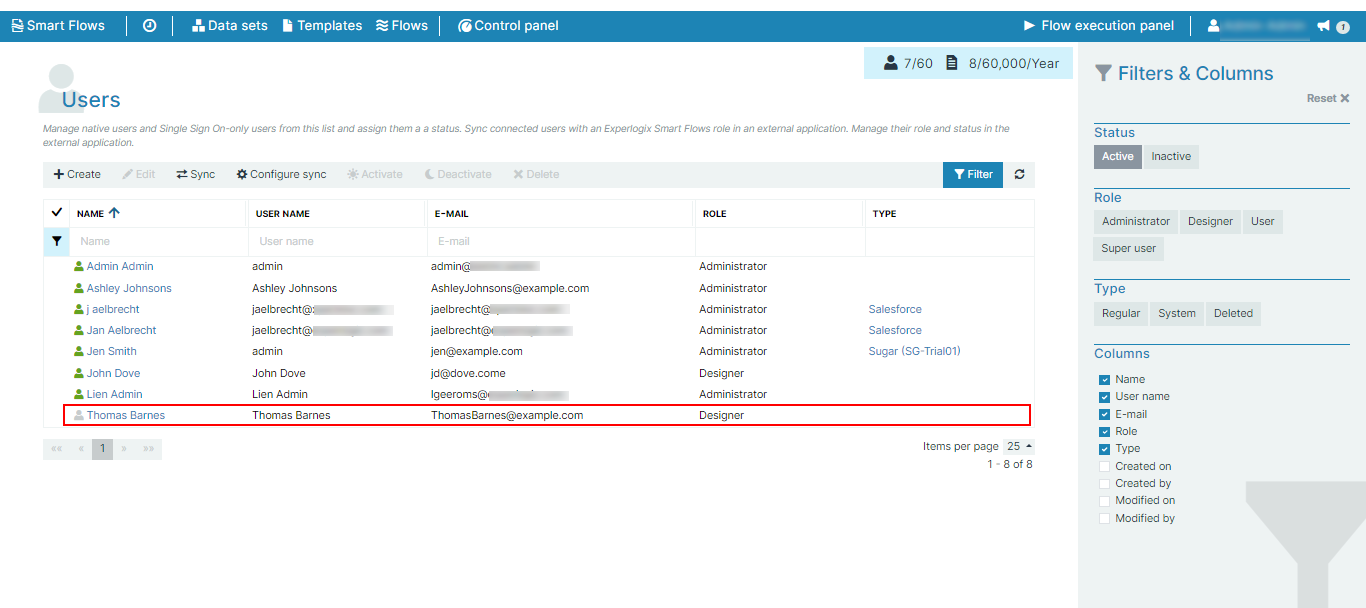
The silhouette icon changes displays gray.
Delete a User
Once a user has been deactivated, you can delete them.
-
In the List view, select the user(s) to delete.
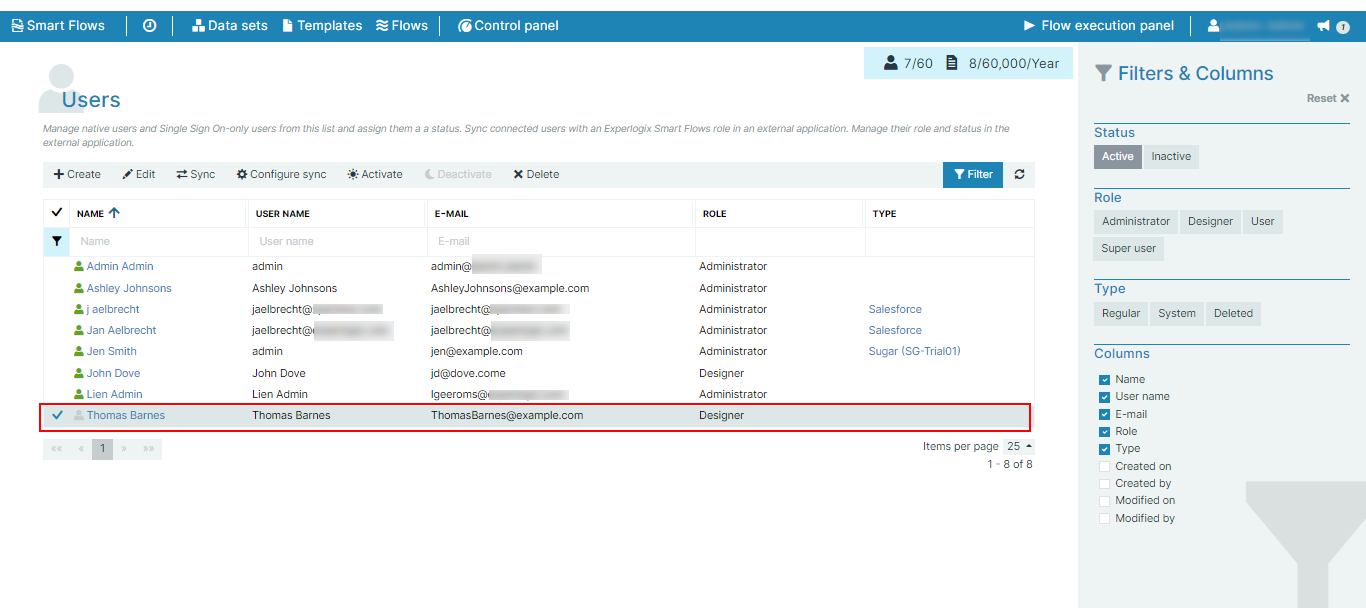
-
Select Delete.
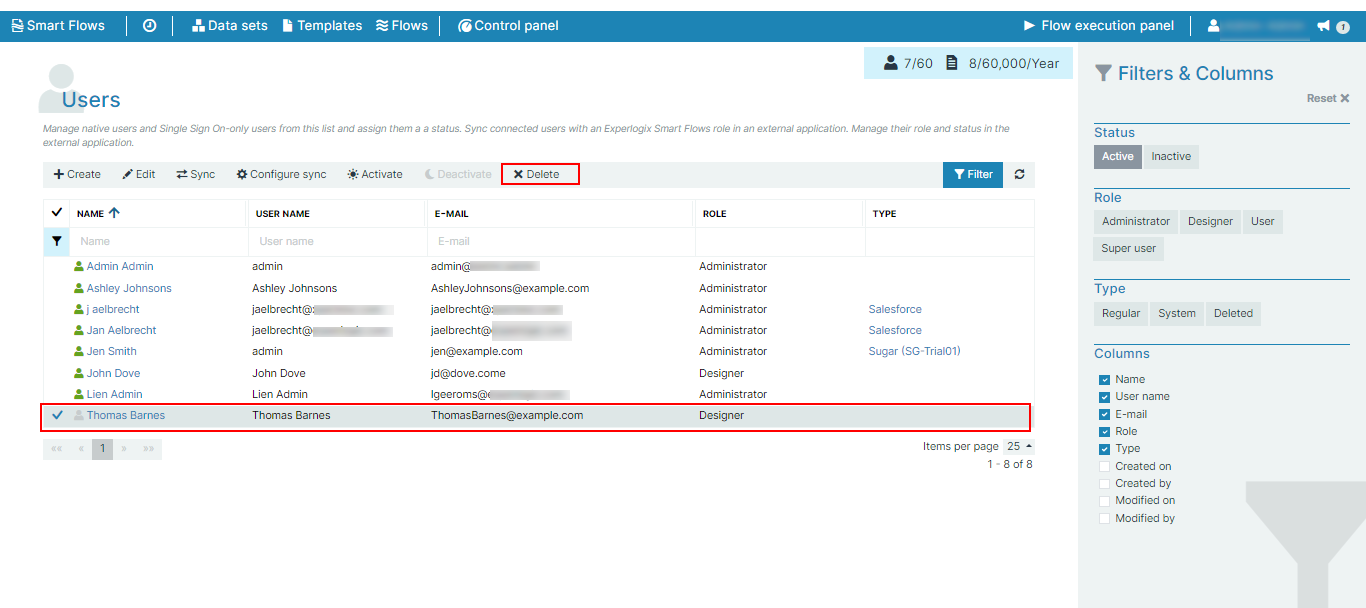
-
From the Delete user dialog, select Delete.
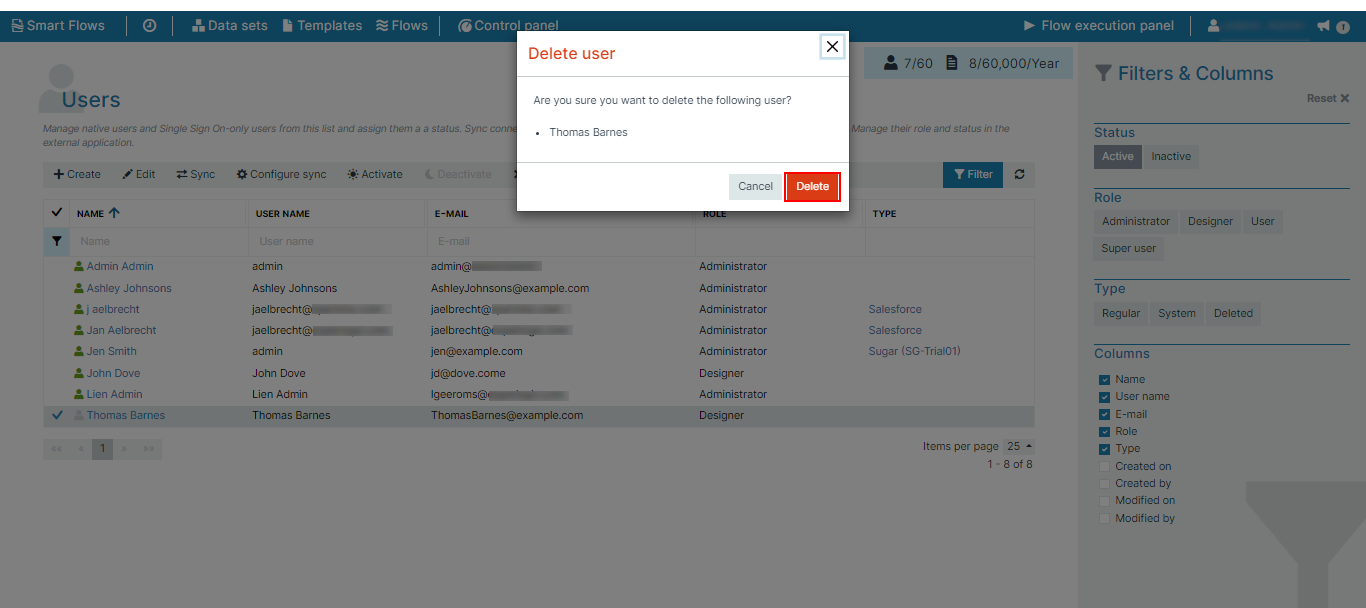
The user is deleted from the Users list.
User Authentications Tab
Enabling user authentication allows individual users in your Smart Flows project to authenticate via the connector. As an Administrator, this is advantageous because it allows you to trace user actions based on who completed the actions instead of seeing all actions as if they were taken by the user who created the connector. By default, individual user authentication is not enabled, so a Smart Flows administrator must enable it.
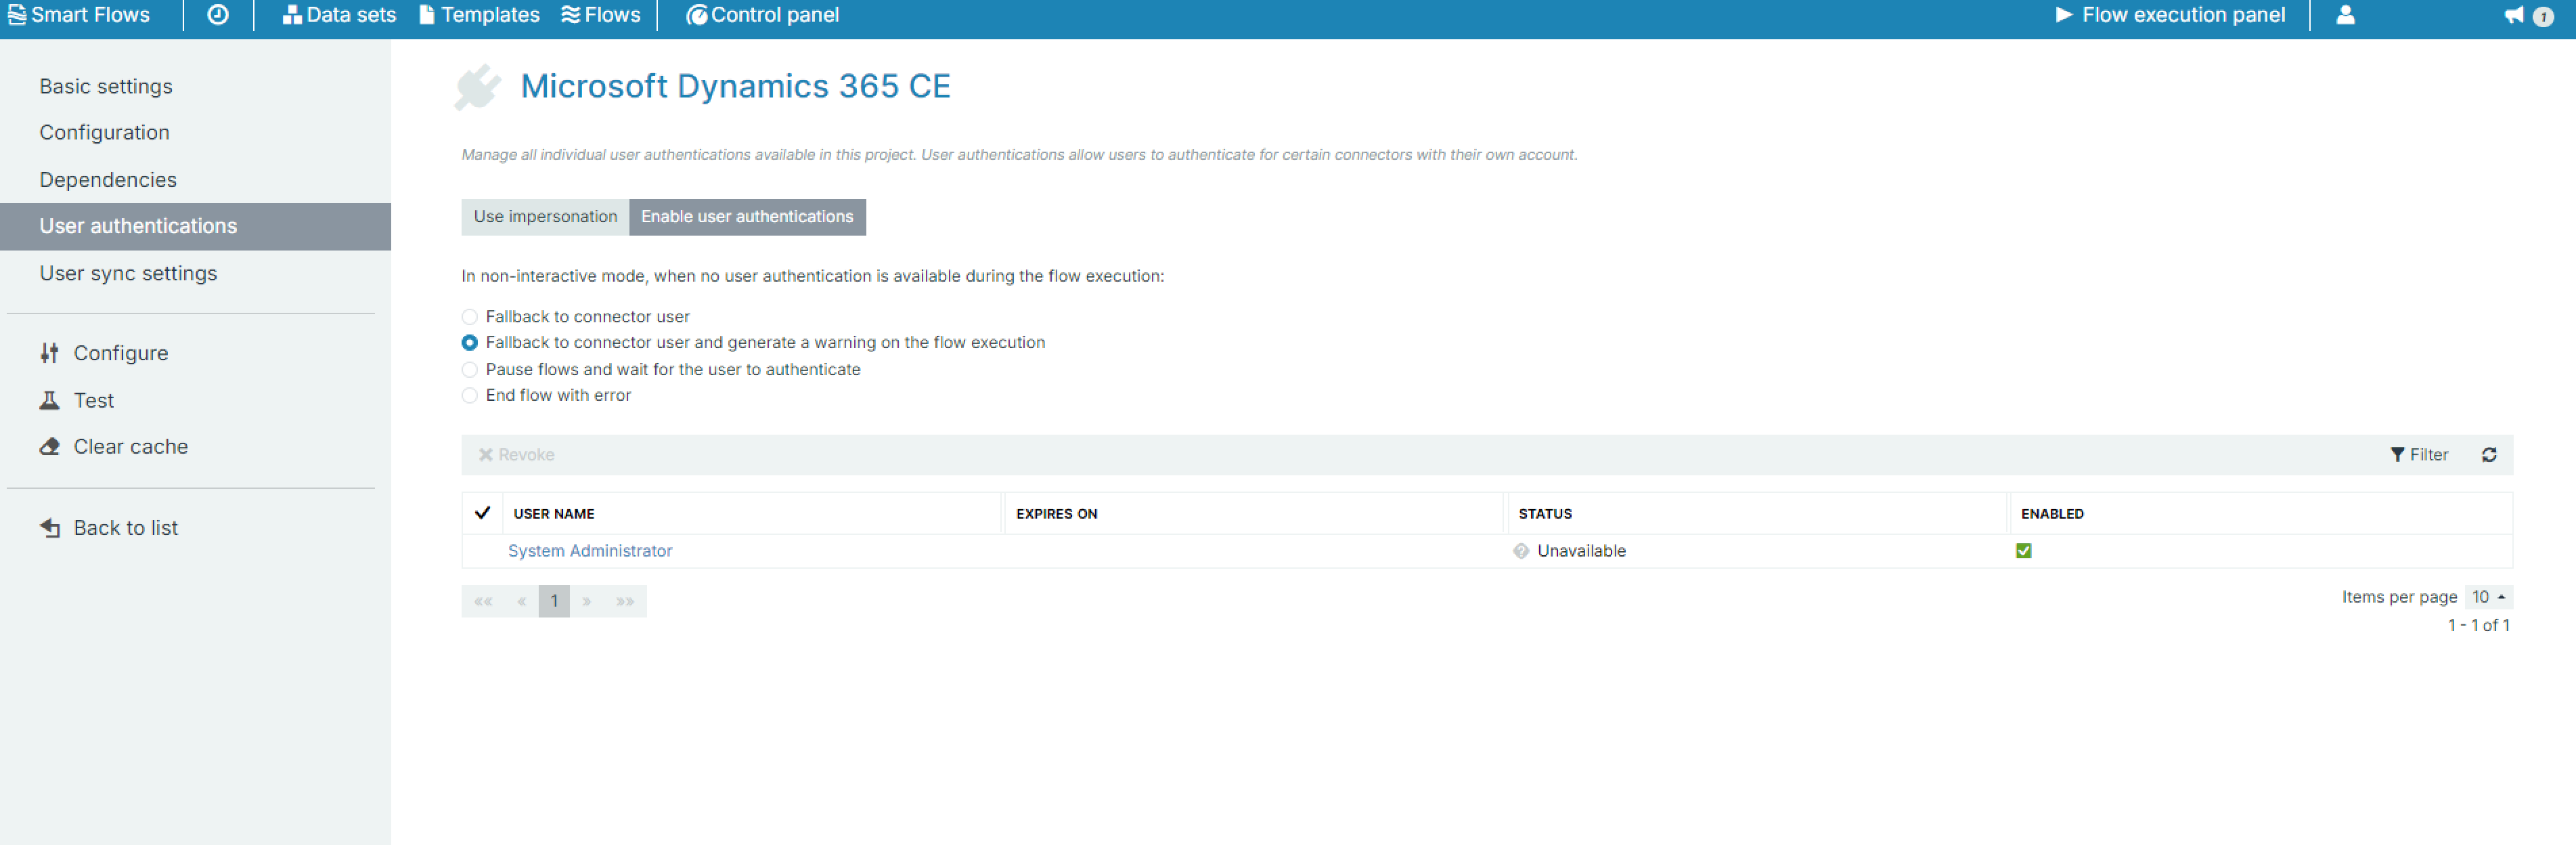
User Authentication Parameters
|
Parameter |
Description |
|---|---|
|
Enable user authentications for this connector |
Checked(ON): Users with authentication-enabled connectors can initiate flow executions. The execution of steps associated with the authentication-enabled connector will be carried out using the individual user's authentication credentials. Unchecked(OFF): All data transactions will be carried out under the identity of the service users authenticated during connector setup. This matches the functionality of Smart Flows before the implementation of individual user authentications. |
|
In non-interactive mode |
Non-interactive flow executions skip all user input and are triggered through the flows/executions/start endpoint of the Experlogix Smart Flows API, see Using the API for more information. The user may be required to authenticate for a flow in non-interactive mode with enabled user authentications, depending on the selected setting:
The user will be required to re-authenticate if the tokens related to the existing authentication have expired. |
|
Fallback to connector user |
The flow will run via impersonation using the identity of the user who originally created the connector. |
|
Fallback to connector user and generate a warning on the flow execution |
The flow will run via impersonation using the identity of the user who originally created the connector and generate a warning in the Flow Execution Panel. |
|
Pause flows and wait for the user to authenticate |
The flow waits with the status "Authentication needed,” until the user completes authentication via the authentication-enabled connector. |
|
End flow with error |
The flow ends with an error message. |
Enable User Authentication
Administrators must manually enable user authentication for their connectors using the process below. Please ensure your connector supports user authentication before proceeding.
-
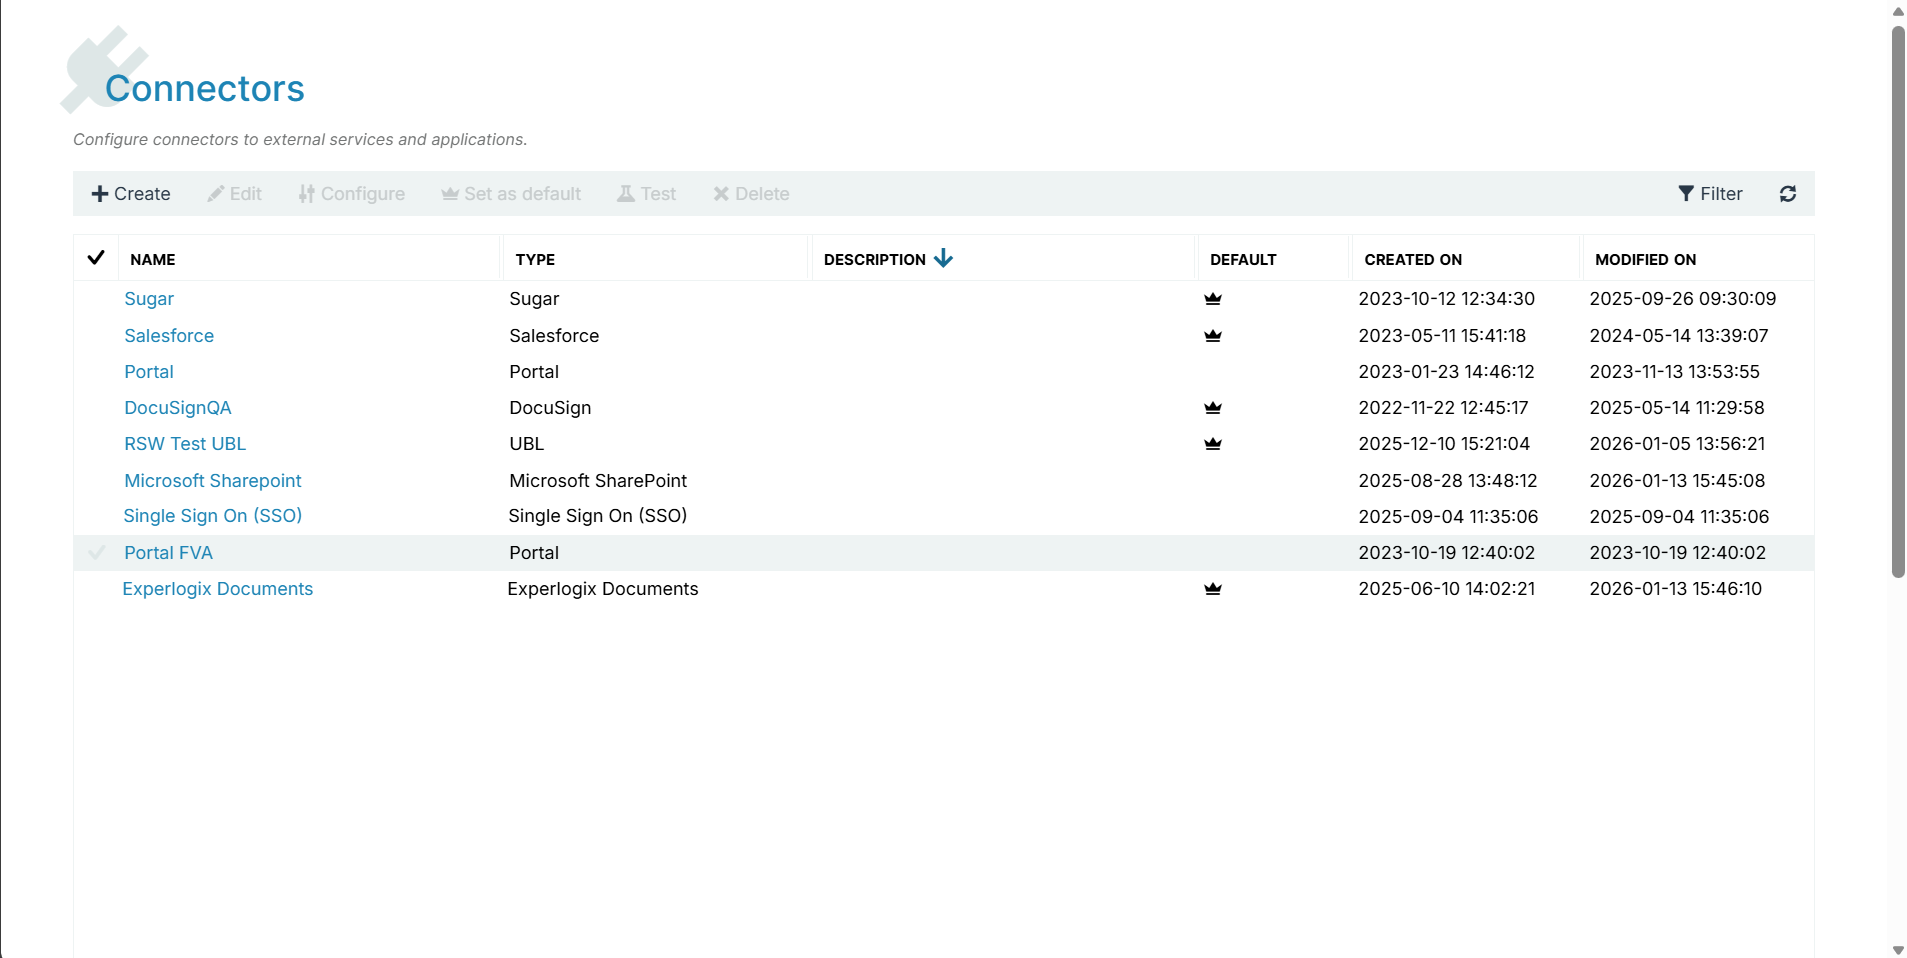
In the Control Panel, select Connectors.
-
In the Connectors List view, select an authentication-enabled connector.
-
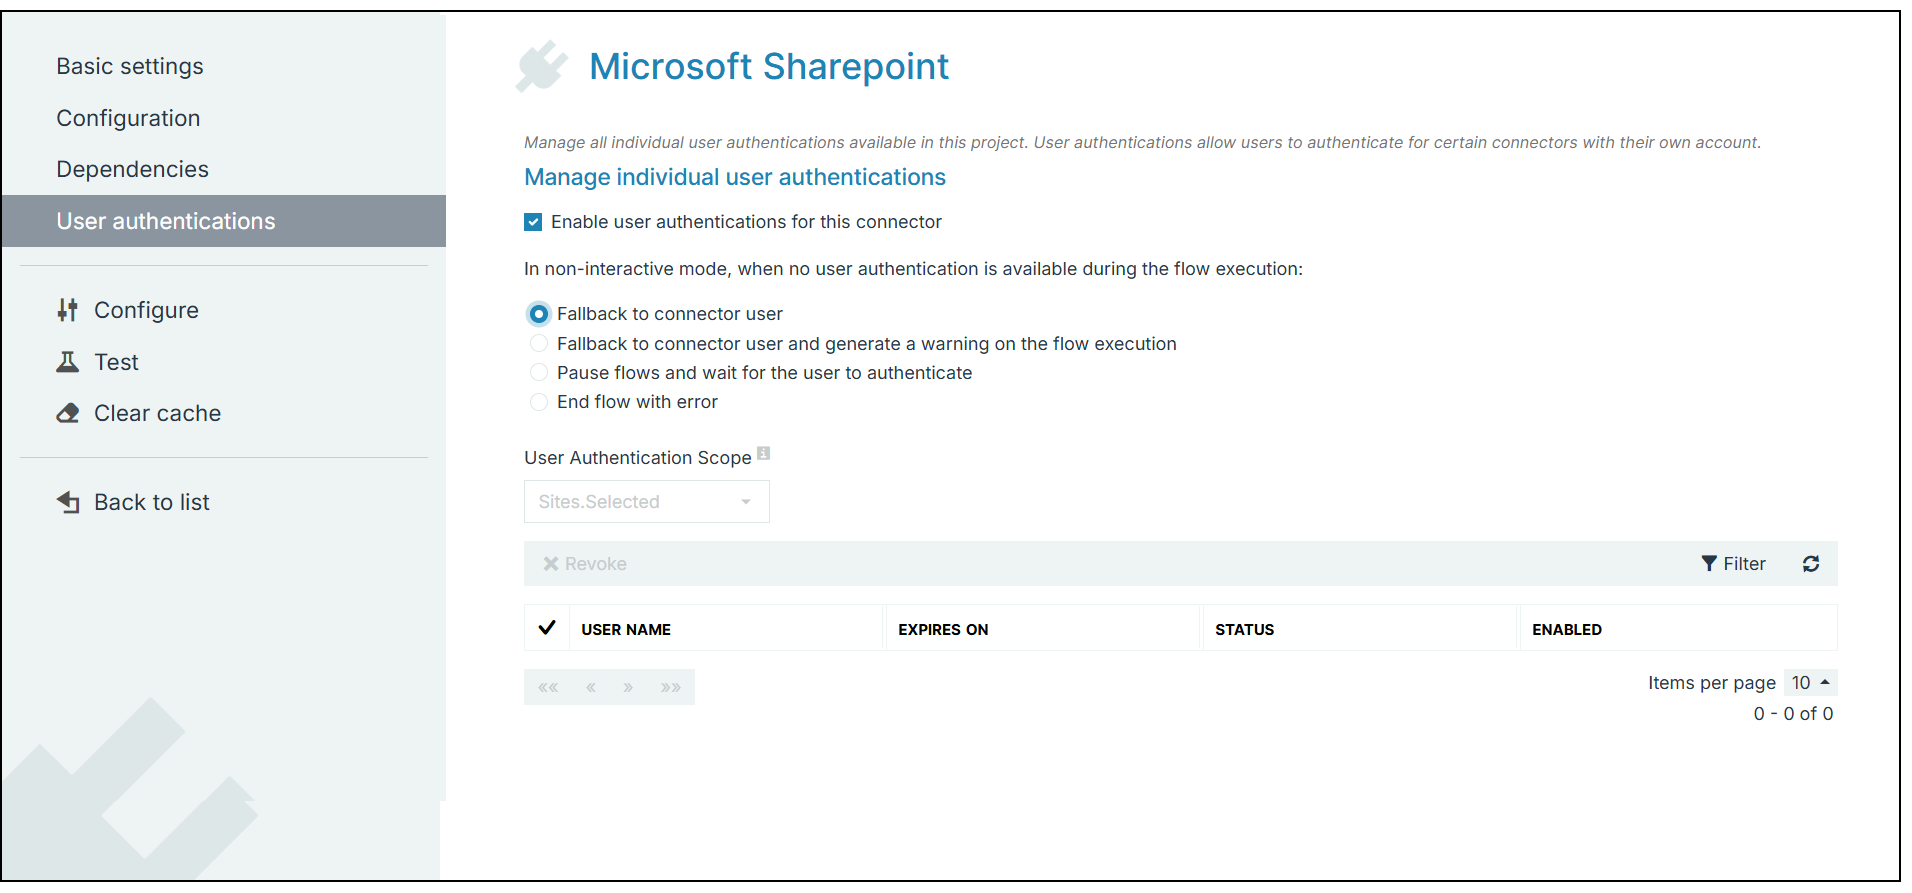
In the left-hand navigation, select the User authentications tab.
-
Next to Enable user authentications for this connector, select the checkbox.
-
Under in non-interactive mode, when no user authentication is available during the flow execution, select an option.
-
In the bottom right, select the Save changes button.
Your connector is now enabled to support user authentications.
Individual User Authentication
Administrators can activate individual user authentication for specific supported connectors. This setting allows users to perform actions related to a given connector under their own identity rather than the connection user's identity (typically a service account).
The following connectors support individual user authentication. However, Administrators must enable the feature in their application. Please refer to Managing Users for more details. For users with User authentication enabled who trigger a flow containing any of the specific flow steps described below, they will need to authenticate the first time they run such a flow. If the refresh token expires, users will need to authenticate again.
When running a flow with user authentication, the system creates a user authentication in Connectors with the owner not being the connector user but the user who did the user authentication.
User authentication impacts various steps, not just document creation. For example, in the Edit Document step in Experlogix Documents, the 'modified by' property of the document will reflect the user who made the change instead of the connector user when the option is enabled. No new documents are created in this step.
-
Salesforce
-
SharePoint
-
Supported Connections
-
SharePoint Online (OAuth)
-
SharePoint Server (OAuth)
-
User Authentications are disabled for SharePoint Server (Username/Password).
-
Docusign
-
Experlogix Documents
-
Store in Experlogix Documents Content Manager
-
-
Microsoft Dynamics 365 CE
User Experience
First Time Use
When individual user authentication is enabled, users will be prompted to sign in to the connector the first time they attempt to run a flow that includes one of the above steps. The currently logged-in Smart Flows user will only be asked to authenticate if they do not already have a user authentication (i.e., their Smart Flows account has not yet been linked to an account in the target environment, such as Experlogix Documents).
Once the user completes authentication, the flow continues executing using the authenticated user's identity. If the user does not authenticate, the flow pauses with the status "Authentication needed." The flow resumes once the user completes authentication.
Authentication Tokens
Individual user authentication uses tokens with a configurable expiration date. Once a user logs in, a timer starts for the authentication token's expiration.
Authentication Token Renewal
When the user triggers a flow action for the authenticated connector, their authentication token refreshes. So, as long as users trigger a new action on the authenticated connector before it expires, the system does not prompt them to log in again.
Authentication Token Expiration
If users do not log in and the configured time period passes, their authentication token expires. The next time they trigger an action for the authenticated connector, the system prompts the user to log in again. After they complete authentication, their token renews automatically.
Managing My connected apps
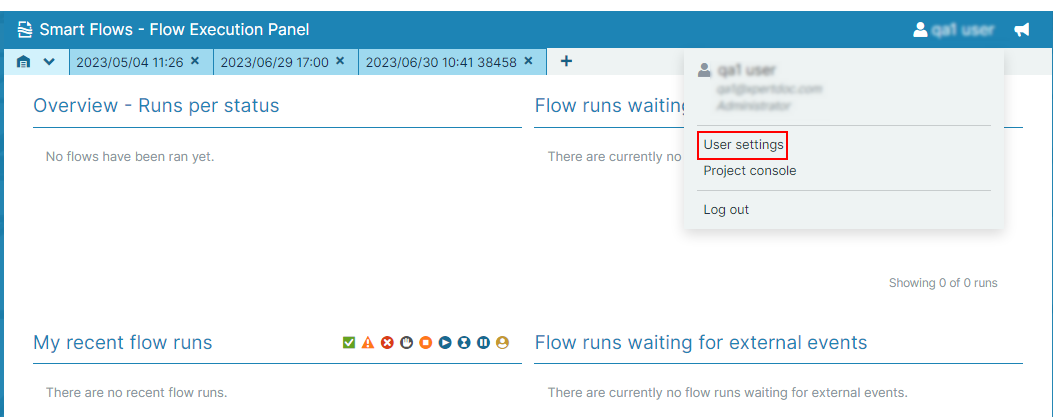
Users can manage their authentication using My Connected apps, available under the Flow Execution Panel's User settings. This section provides an overview of the connectors that support individual user authentications and their current status. Here, users can also disconnect or connect their authentication.
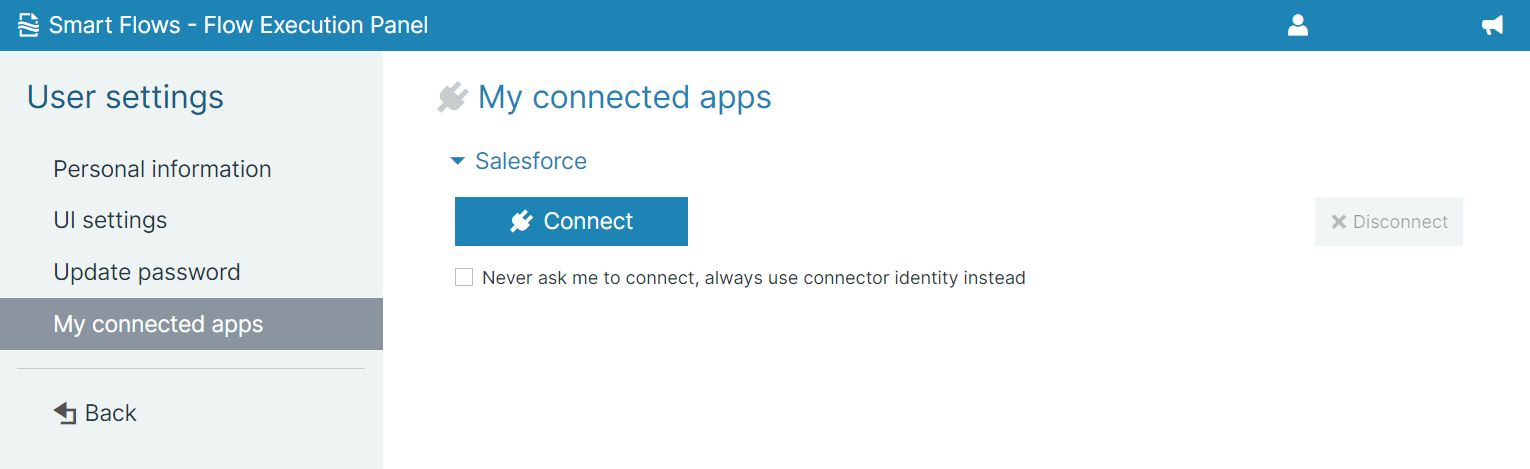
Managing connected apps
-
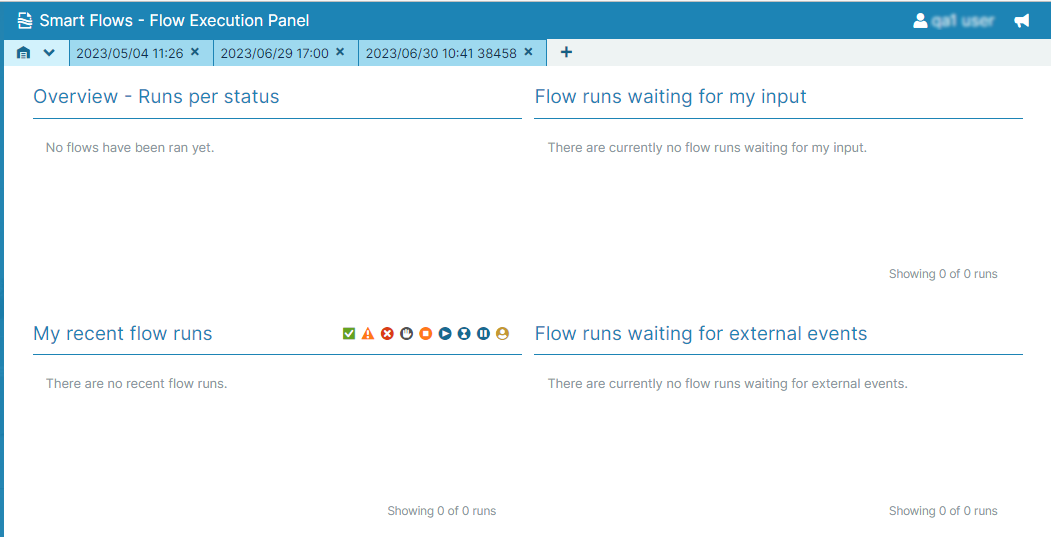
In Project Console, select Flow Execution Panel.
-
Input your credentials to log into Flow Execution Panel.
-
Select the User > User settings.
-
Select My connected apps.
The available connector that supports individual user authentication displays.
-
Select the Connect button to authenticate to the connector.
-
Select the Disconnect button to revoke the current authentication token.
-
Managing Azure Smart Flows User Permissions
During the authentication of the Smart Flows Microsoft Dynamics 365 CE connector, Microsoft Azure will ask the IT administrator to configure the user consent settings for the app. Smart Flows will not function for non-admin users when creating a Microsoft Dynamics 365 CE connector if the system configuration does not allow application user consent.
A user must be a Global Administrator or a Cloud Application Administrator to consent to Smart Flows. The Need Admin approval dialog will continue to display until an admin account either directly consents or delegates consent.
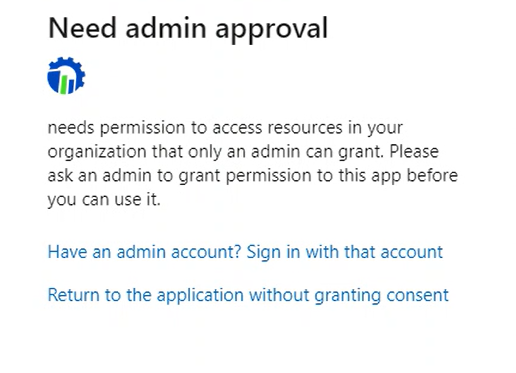
Permissions Required for Smart Flows
For permissions configuration between your system and ours within Azure Active Directory, please see the image below. We require access to the Common Data Service and Windows Azure Active Directory.
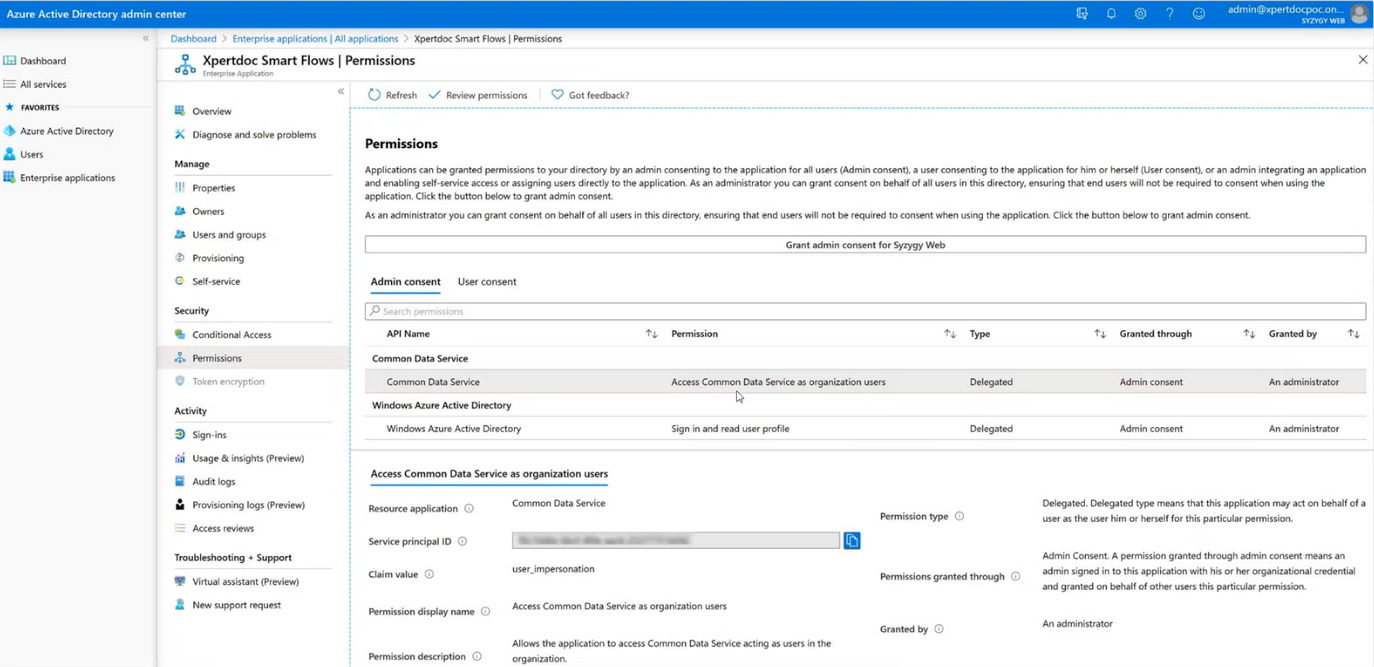
This permission consent is separate from the security roles assigned in Microsoft Dynamics 365 CE. IT Admins have several configuration options available to meet their organizational security requirements. In conjunction with Smart Flows, these approaches can interpreted as an intersection between effort and control.
Configure to Allow Delegation of Consent Based on Existing Groups
IT Administrators can delegate permissions for consent at the app level for Smart Flows. See Grant Admin consent for more information. For additional control, you can configure delegation consent to only allow delegation to users with a role in Smart Flows and Microsoft Dynamics 365 CE.
Create and Assign Smart Flows Consent to an Azure Group
Assigning consent permissions to a group allows organizations to tightly control what apps can access their Dynamics data and who can provide that consent.
-
In Microsoft Azure, navigate to Home/Enterprise applications/Xperdoc Smart Flows.
-
Set Assignment required to Yes.
-
Create a group for Smart Flows users.
-
Search for and select the created group.
-
Assign that group the permissions to consent for the ExperlogixSmart Flows application.
Dependencies in Smart Flows
Dependencies represent the relationships between objects in Smart Flows. Each object may have outbound dependencies—other objects that are required for it to function—and inbound dependencies—other objects that rely on it. For example, a template might have a data set and a connector as outbound dependencies, while a flow that uses the template would be an inbound dependency.
Intersection of Optimizer and Dependencies Tabs
The Dependencies tab and the Data Set Optimizer tab in your data sets work together to provide a holistic view of your project's data structure. While the Dependencies tab displays the relationships between objects (both inbound and outbound), the Optimizer tab focuses on refining your data set by removing unused fields based on these dependencies. Optimizing your data set ensures that only the necessary fields those actively referenced by flows and templates are retained. For detailed procedures on optimizing data sets, see Data Set Optimizer Tab.
Procedures
This section details the procedures related to managing dependencies within Smart Flows.
Transferring User Dependencies
A single user may have many dependencies. If such a user leaves the company, their dependencies are lost. In order for these dependencies to stay in the company, you can transfer dependencies from one user to another user.
You must be at same or higher role than the user who's dependencies you are transferring or moving.
-
In the Project Console, select Control panel > Users.
-
In the Users page, select a user.
-
On the left-hand navigation, select Dependencies.
The list of the user's dependencies is shown.
-
To transfer all dependencies to another user, select Transfer.
-
From the Move user dependencies dialog, select a user to transfer the dependencies.
-
Select Transfer.
-
From the Relink inbound dependencies dialog, select Confirm.
All the dependencies have been transferred out to the new user. No dependencies are left with the user.
Optimizing your Data Set
Data set optimization involves letting Smart Flows analyze and remove any unused fields in your project. Removing these unused fields results in faster project performance by eliminating unnecessary content during data retrieval for previews and during flow execution if the field reducer is disabled.
You can see the improvement in your project performance before and after optimization by reviewing your analytics data on the Advanced tab.
Open the Data set Optimizer tab
-
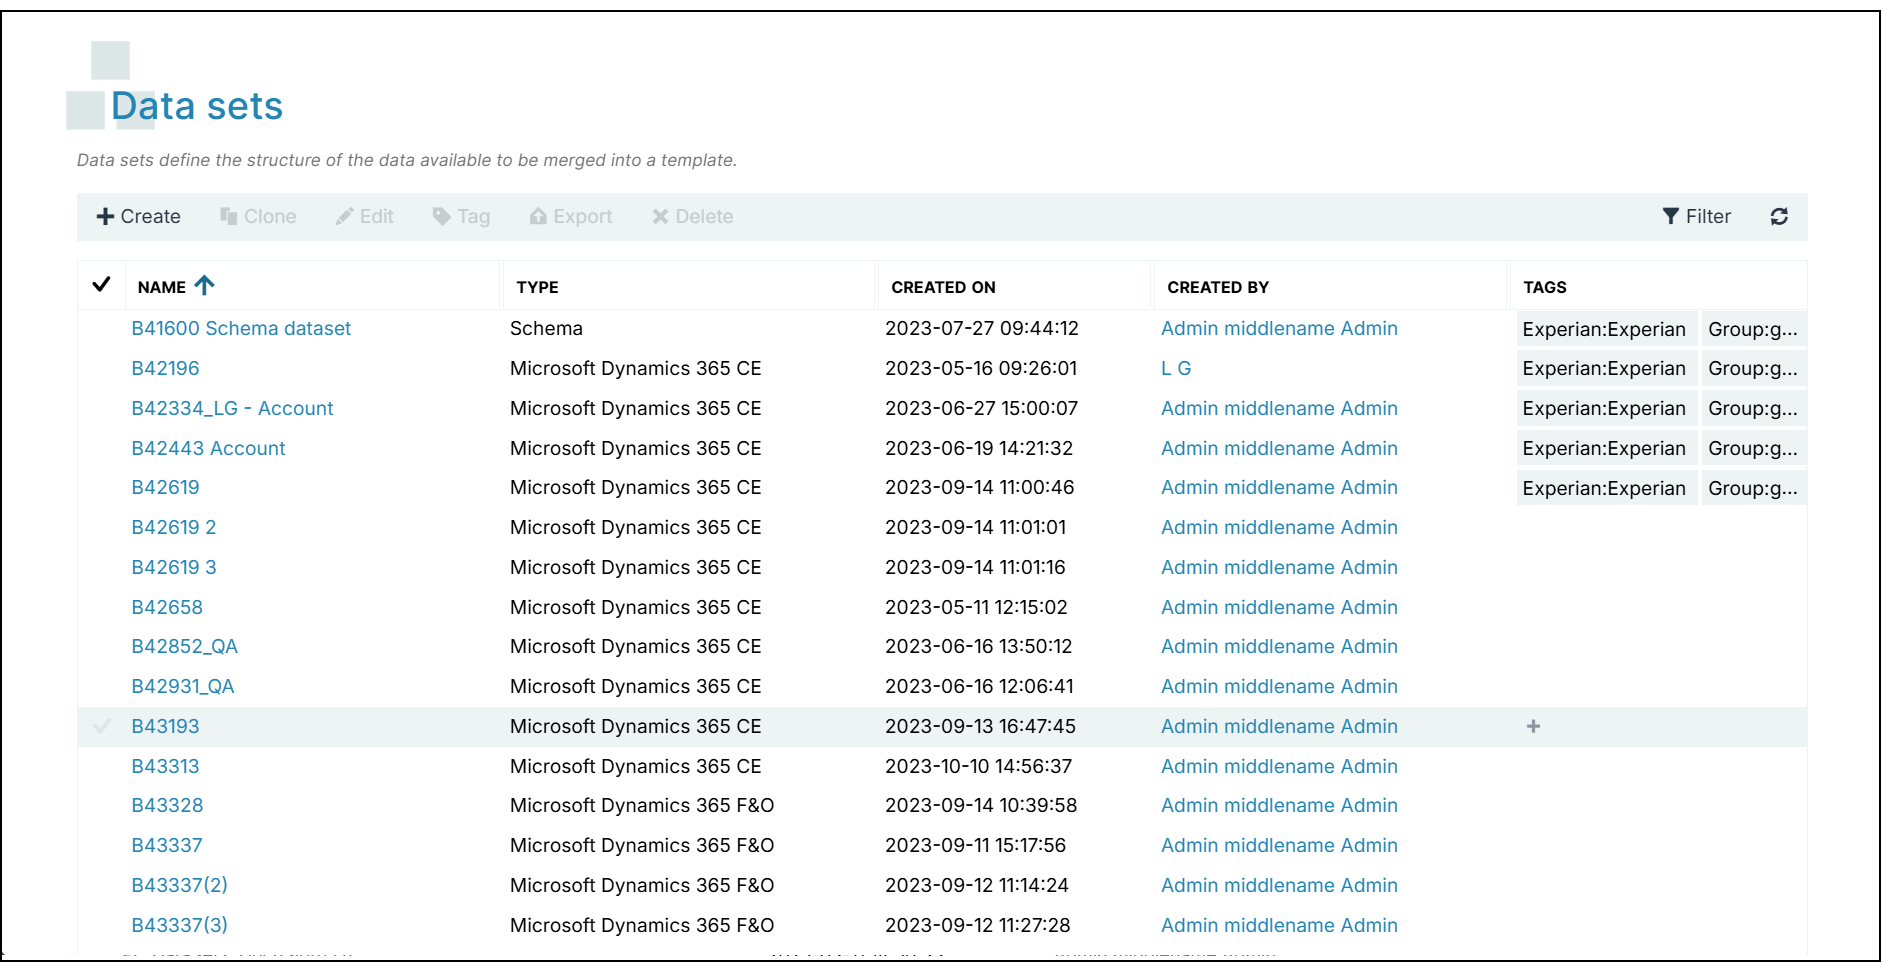
Log in to your Project Console and select Data sets.
-
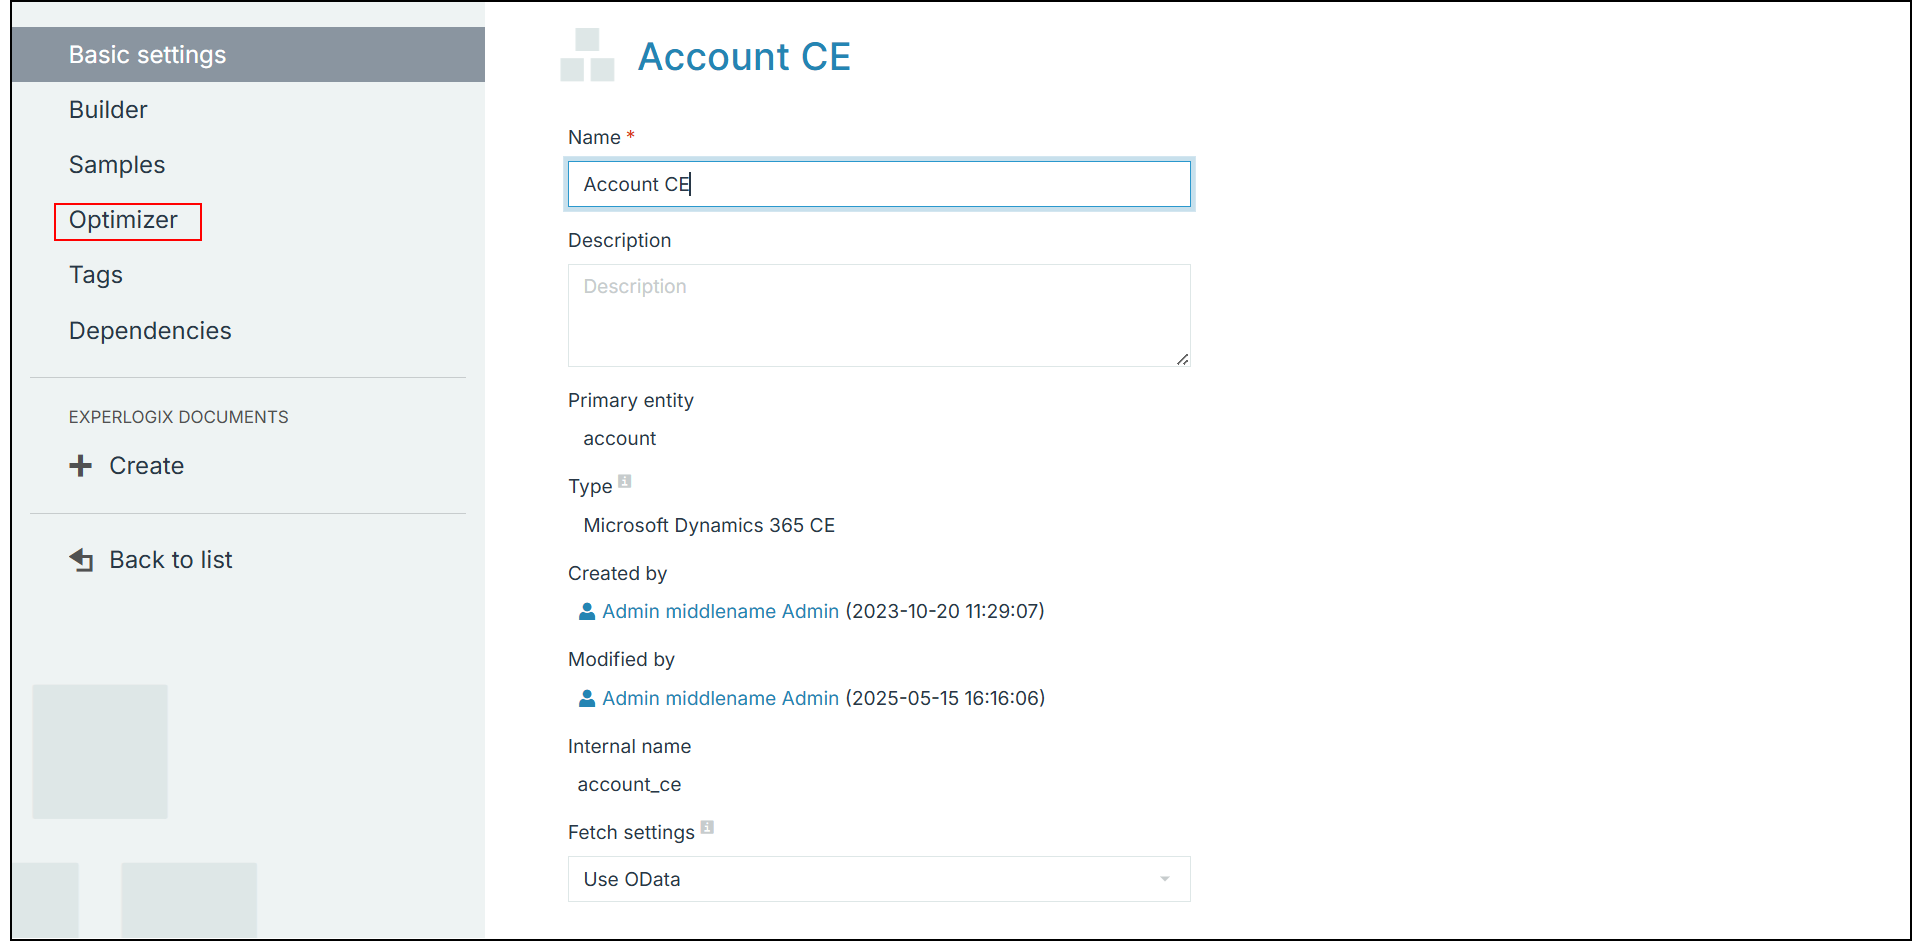
In the Data set List view, select a data set.
The Data Set Builder displays.
-
Select the Optimizer tab.
Analyze data set dependencies
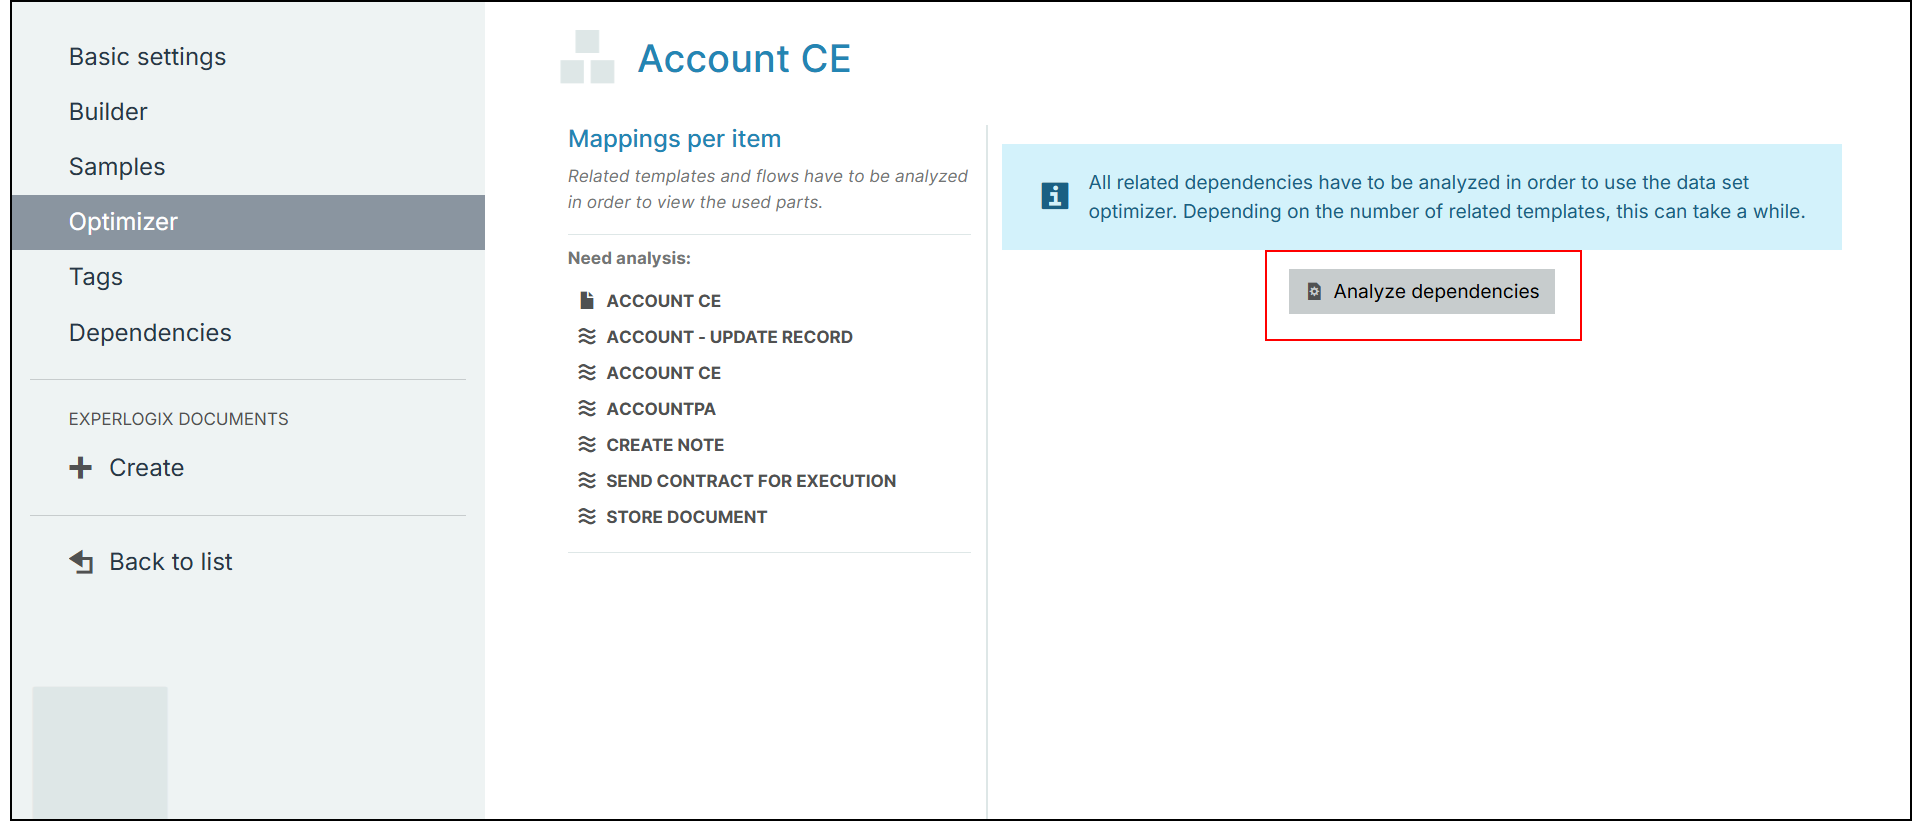
Before optimizing your data set, you must analyze the dependencies to identify the unused fields.
-
Select Analyze dependencies.
The page refreshes with the results of the analysis.
Complete Optimize data set modal
Now that you have analyzed the data sets, you can use the Optimize data set modal to remove some or all unused fields.
-
Select the Optimize data set > Optimize.
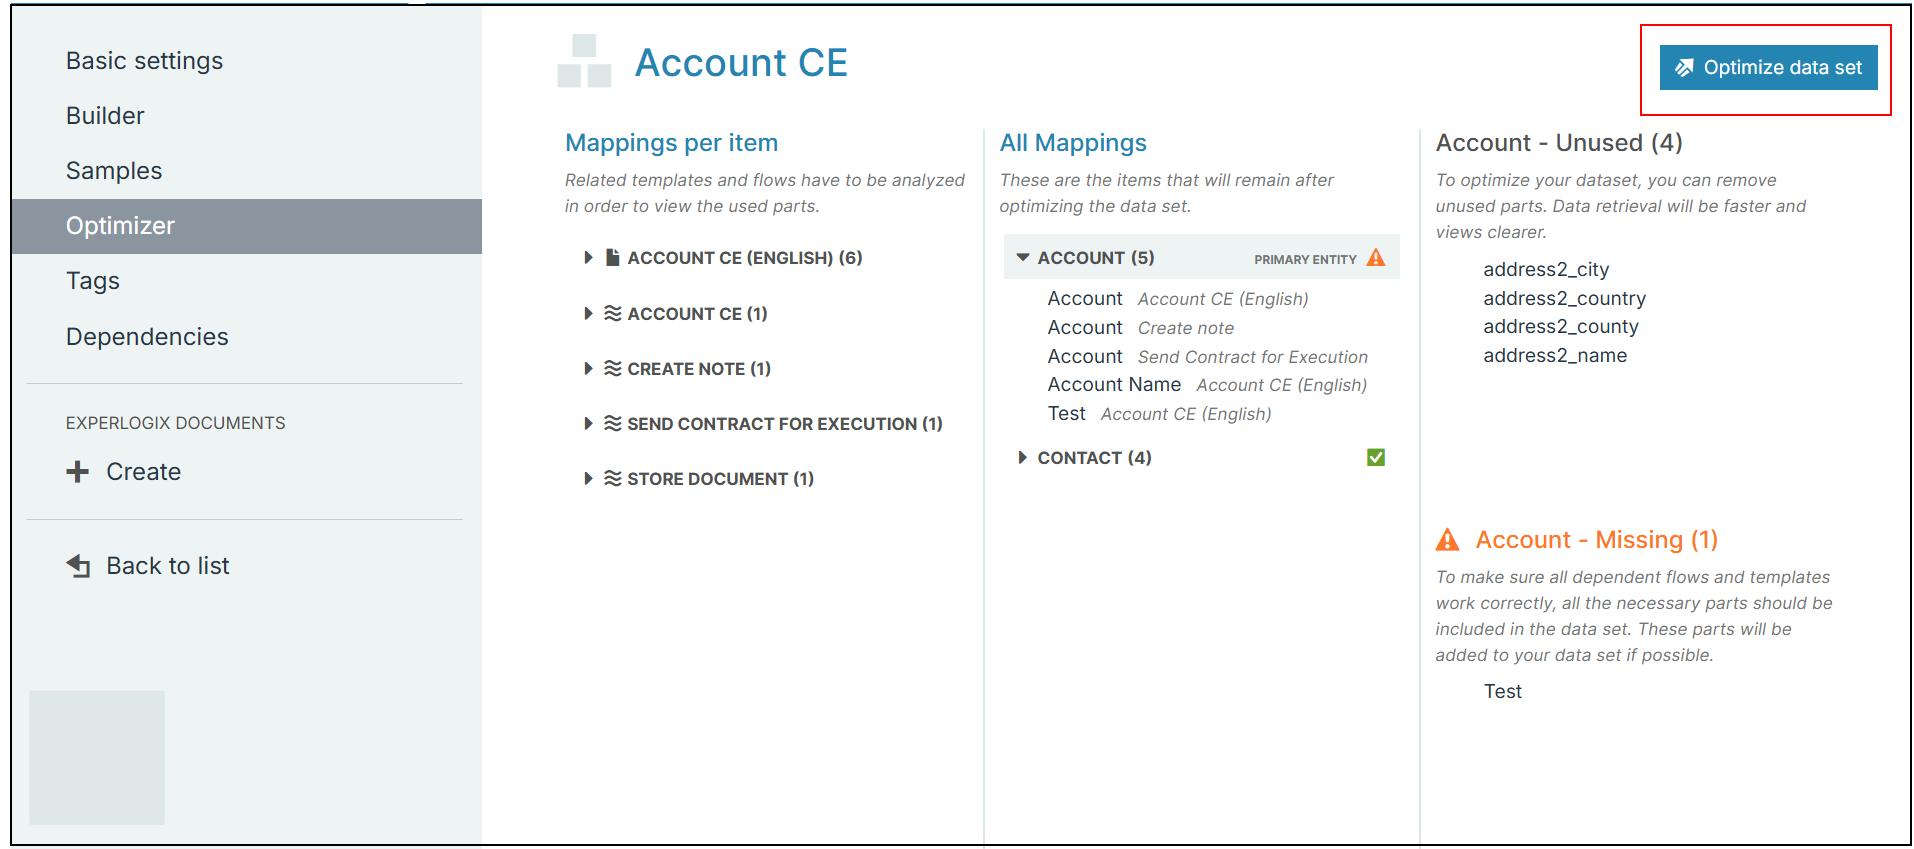
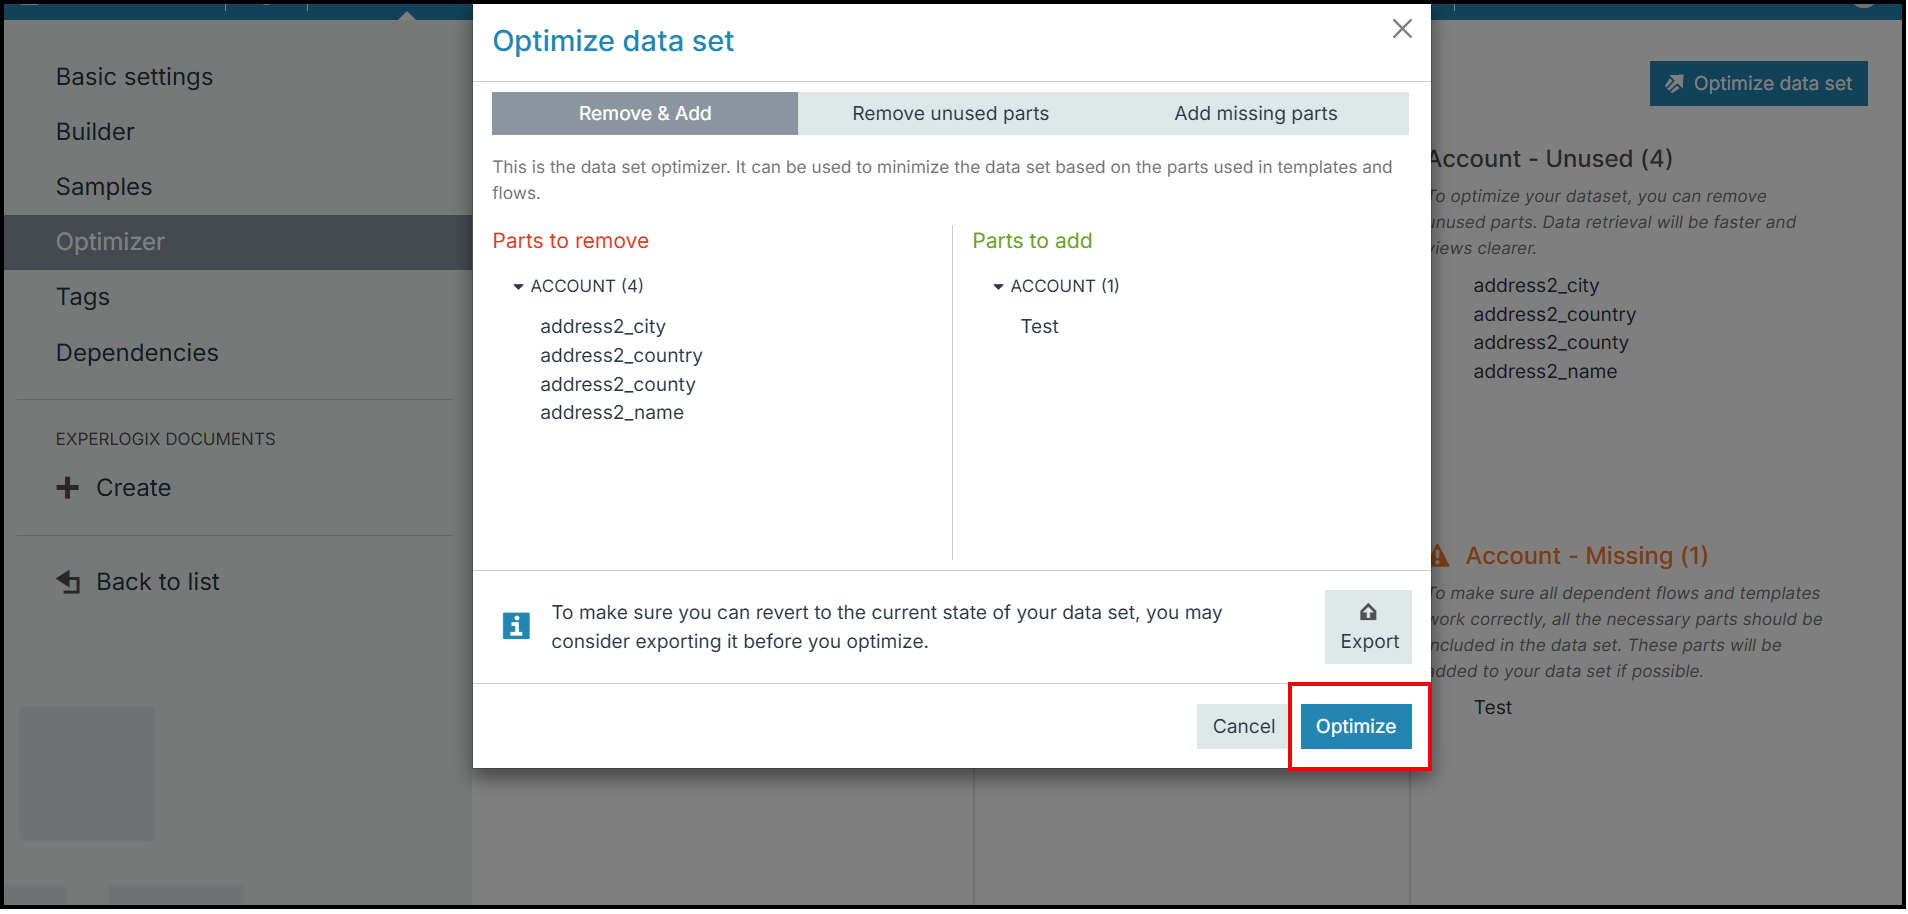
The page refreshes, and the Mapping- Unused(#) section no longer displays. The check mark next to PRIMARY ENTITY displays green. Your data set is now optimized.