
Get Smart Flows up and running for your organization. Topics in this section cover installing components, initializing your project, and choosing between cloud and on-premises deployment.
Requirements for on-premise deployment of Smart Flows
To support a deployment of Smart Flows, your servers must meet minimum hardware and software specifications. This section covers requirements for both the Smart Flows application server and the associated SQL database server.
Smart Flows Server Hardware Requirements
Although it's possible to run Smart Flows and its database server on one machine, for performance reasons it is always preferred to separate the components. Generally, only customers with a small implementation and one environment can install on one machine.
When using multiple environments (Production, Development, TEST, UAT, etc), we recommend a separate server for non-production environments.
Experlogix Smart Flows Server Minimum Requirements
|
Component |
Hardware Requirement |
|---|---|
|
Operating System |
Windows Server (2016, 2019, 2022, 2025) |
|
CPU |
Dual-Core or better |
|
RAM |
8GB or more |
|
Disk capacity |
minimum 500GB |
Experlogix Smart Flows Server Software Minimum Requirements
|
Software Requirement |
|---|
|
Java: Java SE Development Kit 21 or higher |
We recommend using the AdoptOpenJDK 21 LTS build using the Hotspot VM, select here to download.
Please contact Experlogix Support if you need help in updating Java.
Smart Flows Database Requirements
Experlogix Smart Flows Database Server Minimum Requirements
|
Component |
Hardware Requirement |
|---|---|
|
Operating System |
Windows Server (2016, 2019, 2022, 2025) |
|
CPU |
Dual-Core or better |
|
RAM |
8GB or more |
|
Disk capacity |
minimum 500GB |
Experlogix Smart Flows Database Server Software Minimum Requirements
|
Software Requirements |
|---|
|
SQL server version 2017 or later |
Initializing your Smart Flows Project
Once you confirm that the Smart Flows service is ready for login, you can start with project initialization and customization steps, such as adding project name and admin users.
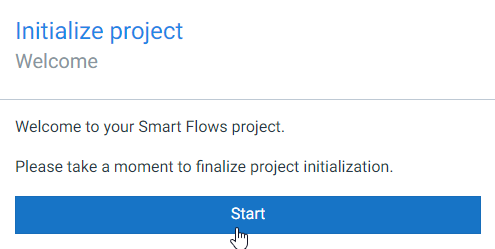
Configuring Smart Flows Project
-
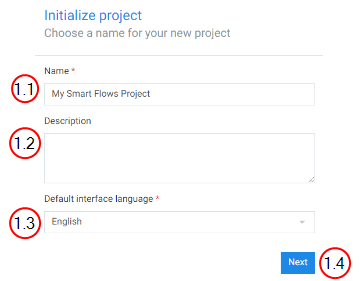
Choose the Project Name.
-
In the Name field, input the name of the project.
-
(Optional) In the Description field, input a description for the project.
-
In the Default interface language field, select the language for the project, and select Next.
-
-
Install the Microsoft Dynamics 365 CE solution, the Sugar app, or the Salesforce button, and apply Smart Flows roles.
-
(Optional)Sync users.
Refer to the following links to implement connectors in your Smart Flows project:
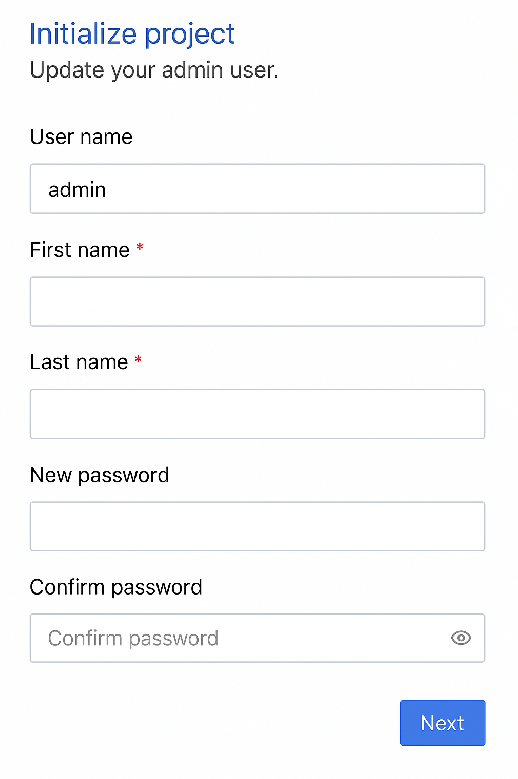
The password must contain at least an uppercase letter, a lowercase letter, a number, and one special character.
-
Update the Admin User.
-
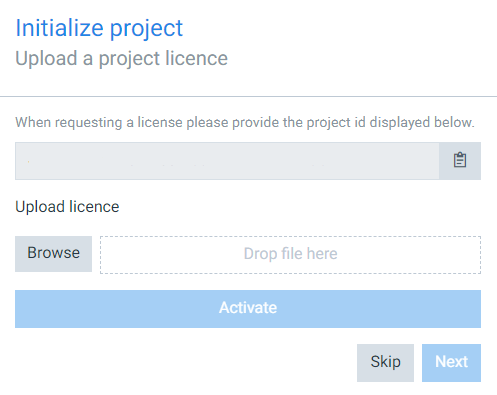
Request a License.
During initialization, you are asked to upload a license. This step is optional; you can upload a license later using the Control panel tab. To generate a valid license, you need the project ID. To get the license Contact our Client Success Team.
-
(Optional)Set up the primary connector.
You can connect any of our available support connectors, depending on your license. Your license determines which connectors you can add—such as Microsoft Dynamics 365 CE, Sugar, or Salesforce. While you can use multiple connectors, only one of each type is supported. The setup wizard guides you through the connection process. See Connectors for coverage on all of our supported connectors.
Deploy Smart Flows On-Premises
Deploying Experlogix Smart Flows in an on-premises environment enables organizations to maintain full control over their infrastructure, data security, and integration layers. This section provides all the resources needed to plan, install, configure, and manage Smart Flows in self-hosted environments, including both traditional installations and container-based (Docker) setups.
Smart Flows on-prem deployments require careful consideration of prerequisites such as network accessibility, DNS configuration, certificate handling, and infrastructure sizing. Detailed guidance is provided on configuring your application, setting up SQL Server, managing licensing, and ensuring compatibility with enterprise authentication and connector systems such as Microsoft Dynamics 365 CE.
Whether you are setting up your first on-prem project or managing a multi-environment architecture (Development, Test, and Production), these topics will help ensure that your system is installed securely, configured correctly, and ready for scalable document automation.
Topics Covered in This Section Include:
-
Prerequisites (SSL, ports, domain, certificates)
-
System and database requirements
-
Traditional and Docker-based installation methods
-
Creating the application configuration (application.properties)
-
Configuring authentication, connectors, and JWT handling
-
Managing services and testing deployments
-
Setting up and securing SQL Server for Smart Flows
-
Starting and validating the Smart Flows service
Prerequisites for Smart Flows On-Premises Installation
Before installing Smart Flows on-premises, ensure your environment meets key infrastructure requirements. This section outlines the networking, port, and SSL certificate configurations necessary for a successful deployment.
Networking Requirements
Your Experlogix Smart Flows server needs to be accessible in your network through a browser and be able to communicate with the license server.
Domain Name Configuration
Your server requires a Fully Qualified Domain Name (FQDN).
-
You will need to be able to make DNS changes for your organization's domain
-
The FQDN must resolve and translate to your server IP from the internet
Smart Flows Port Numbers
The default port numbers are 80 for HTTP or 443 for HTTPS. Your selection is dependent upon whether you are using TLS encryption, TLS encryption requires HTTPS
You should always use the default ports unless it is restricted. The use of Transport Layer Security (TLS) is necessary for proper communication with Microsoft services such as Microsoft 365 and Microsoft Dynamics 365 CE .
WARNING : Make sure your firewall allows traffic on these ports.
For servers with multiple roles, allow your traffic on multiple ports:
Smart Flows On Premise Port Numbers, e.g.
|
Port # |
Function |
|---|---|
|
443 |
Production |
|
1443 |
Development |
|
2443 |
Test |
Installation Folder Path
Create the installation folder: e.g. C:\Experlogix -Smart Flows .
TLS Certificate Setup
The use of TLS encryption is required for the Smart Flows system to function. To enable TLS encryption, you need a TLS Certificate that matches your FQDN.
If you install multiple projects on one server, you can also use a wildcard certificate for the CN . For example *.base.domain.com with *base.domain.com and base.domain.com as alternative names. The "*base" component of the address serves as a "fill in the blank" to properly direct to all versions of the address that end in ".domain.com"
SSL Certificate Format Guidelines
-
The recommended format is PFX
-
The Certificate must be valid
-
You must have the PFX password available
Store the PFX file inside the installation folder (e.g. C:\Experlogix-Smart Flows).
Smart Flows System and Software Requirements
To support a deployment of Smart Flows, your servers must meet minimum hardware and software specifications. This section covers requirements for both the Smart Flows application server and the associated SQL database server.
Smart Flows Server Hardware Requirements
Although it's possible to run Smart Flows and its database server on one machine, for performance reasons it is always preferred to separate the components. Generally, only customers with a small implementation and one environment can install on one machine.
When using multiple environments (Production, Development, TEST, UAT, etc), we recommend a separate server for non-production environments.
Experlogix Smart Flows Server Minimum Requirements
|
Component |
Hardware Requirement |
|---|---|
|
Operating System |
Windows Server (2016, 2019, 2022, 2025) |
|
CPU |
Dual-Core or better |
|
RAM |
8GB or more |
|
Disk capacity |
minimum 500GB |
Experlogix Smart Flows Server Software Minimum Requirements
|
Software Requirement |
|---|
|
Java: Java SE Development Kit 21 or higher |
We recommend using the AdoptOpenJDK 21 LTS build using the Hotspot VM, select here to download.
Please contact Experlogix Support if you need help in updating Java.
Smart Flows Database Requirements
Experlogix Smart Flows Database Server Minimum Requirements
|
Component |
Hardware Requirement |
|---|---|
|
Operating System |
Windows Server (2016, 2019, 2022, 2025) |
|
CPU |
Dual-Core or better |
|
RAM |
8GB or more |
|
Disk capacity |
minimum 500GB |
Experlogix Smart Flows Database Server Software Minimum Requirements
|
Software Requirements |
|---|
|
SQL server version 2017 or later |
Installing Smart Flows Server On Premises
To download the server component (a zip file), you will need a Freshdesk account. You can request access through our Client and Support Operations team, or you will get it after purchasing the license. In Freshdesk, go to 'Knowledge base' -> Experlogix Smart Flows -> Smart Flows Downloads. Here is a direct link: https://support.experlogix.com/en/support/solutions/articles/12000098262-smart-flows-downloads. The two most popular methods of installing Smart Flows are:
-
The traditional install that installs Smart Flows on your computer
-
Using containers, such as Docker Desktop, which allows you to install Smart Flows in a container environment
We recommend using the AdoptOpenJDK 21 LTS build using the Hotspot VM, select here to download.
Please contact Experlogix Support if you need help in updating Java.
Install Smart Flows Using Traditional Method
Download the ZIP file. In File Explorer, Right-click the ZIP file. Then go to Properties. In the General tab, if there is a message here that says 'This file came from another computer and might be blocked to help protect this computer', then check 'Unblock' and press 'OK'.
Extract Server Installation Files
-
Unpack the ZIP file in the installation folder (C:\Xpertdoc-SmartFlows\).
The name of the folder should reflect the intended role such as: project-test, project-prod… e.g. resulting in “C:\Xpertdoc-SmartFlows\project-prod”.
-
Rename the folder to be meaningful.
Create the application.properties file
In the example below, the saved location is project-prod.
-
In the project folder, create a blank text file and save it with the name application.properties.
After upgrading or installing Smart Flows to version 4.24.0 or higher, the JDBC Driver will be on version JDBC Driver 12.6. This causes some changes in how you configure the JDBC properties in the application.properties file compared to previous versions:
-
trustServerCertificate=true is now optional and should only be used when a trusted certificate is unavailable.
-
Use encrypt=true whenever possible to ensure secure connections.
-
Verify that your application.properties file includes a valid connection string as outlined in the official Microsoft documentation.
project.datasource.jdbc-url=jdbc:sqlserver://PRD-V-SQL-DB02;database=XprtDoc;encrypt=true;hostNameInCertificate=*.database.windows.net;loginTimeout=30;lockTimeout=5000;socketTimeout=300000
server.port=443
project.baseurl=https://xsfl-server:443
server.ssl.key-store=../yourpfxfile.pfx
server.ssl.key-store-password=yourpfxpassword
server.ssl.key-store-type=pkcs12
trustServerCertificate=false; should not be included unless the environment requires it.
-
New driver versions do not require this setting unless using self-signed or untrusted certificates.
-
If trustServerCertificate is still needed, it should be explicitly added (trustServerCertificate=true), but only if a trusted certificate is unavailable.
-
project.datasource.jdbc-url=jdbc:sqlserver://PRD-V-SQL-DB02;database=XprtDoc;encrypt=true;trustServerCertificate=false;
project.datasource.jdbc-url=jdbc:sqlserver://PRD-V-SQL-DB02;database=XprtDoc;encrypt=true;trustServerCertificate=false;
hostNameInCertificate=*.database.windows.net;loginTimeout=30;lockTimeout=5000;socketTimeout=300000
project.datasource.username=sa
project.datasource.password=secretsapassword
sample.user.password=secretadminpassword
# Uncomment when using HTTP instead of HTTPS:
# cookie.secure=false
Prerequisite
TLS Certificate SetupThe use of TLS encryption is required for the Smart Flows system to function. To enable TLS encryption, you need a TLS Certificate that matches your FQDN.If you install multiple projects on one server, you can also use a wildcard certificate for the CN . For example *.base.domain.com with *base.domain.com and base.domain.com as alternative names. The "*base" component of the address serves as a "fill in the blank" to properly direct to all versions of the address that end in ".domain.com"SSL Certificate Format GuidelinesThe recommended format is PFXThe Certificate must be validYou must have the PFX password availableStore the PFX file inside the installation folder (e.g. C:\Experlogix-Smart Flows).
-
Update the following parameters according to your setup.
#the address of your Smart FlowsXSF server as seen by the end-user (include port number if not using default port).
project.baseurl=http://exampleurl.be
#Location of the PFX file
server.ssl.key-store=examplepfx.pfx
#Password of the PFX file
server.ssl.key-store-password=enteryourpasswordhere
#Do not change, use this value
server.ssl.key-store-type=pkcs12
#Example JDBC URL
project.datasource.jdbc-url=jdbc:sqlserver://PRD-V-SQL-DB02;database=XprtDoc;encrypt=true;hostNameInCertificate=*.database.windows.net;loginTimeout=30;lockTimeout=5000;socketTimeout=300000
#Username of the database user
project.datasource.username=myusername
#Password of the database user
project.datasource.password=mypassword
#Choose a password for your first login with the native admin user (It will be changed at the initial project setup)
sample.user.password=secretadminpassword
Configure JWT Token Settings
For on-premise clients, we recommend adding the following so that users are not logged out whenever the server restarts. Use the table below for guidance on creating and setting the JWT tokens.
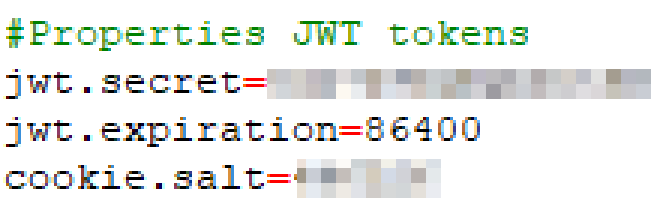
|
Property |
Description |
Required |
Value |
|---|---|---|---|
|
jwt.secret |
The secret is used when signing and validating JWTs provided by Smart Flows. |
No, but highly recommended). When not used, a random secret will be generated on startup. |
Randomly chosen Example: 1e38b0lMFqccDuOA The |
|
jwt.expiration |
The duration in seconds for which a JWT is valid. |
No |
86400 (= 24 hours) |
|
cookie.salt |
The value is used to encode cookie stamp. If not set, it will get generated on startup. This means all user sessions will be invalid on restart of the server. |
No |
Randomly chosen* Example: 797204 The |
For on-premise installation, the following list of properties can be added to the application.properties file.
(Optional) Setup Docusign Connector
If you want to configure Docusign, you need to make changes to the application.properties file. Refer to Docusign (E-sign) connector setup for more details.
Create the Smart Flows service
Create the Smart Flows service. Open the command prompt as Administrator. Go into the installation folder via the cd command.
Run this command to create the Smart Flows service:
C:\...>smartflows-server install
You should see no error message:
The service has been created. You can start and stop Smart Flows here:
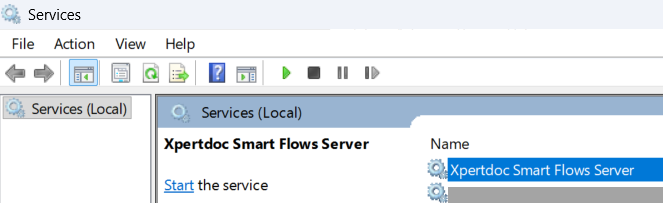
Update smartflows-server.xml Configuration
The file can be found in the project folder. Update the content of the file to reflect the role of the server.
<service>
    <id>smartflows-server</id>
    <name>Xpertdoc Smart Flows Server</name>
    <description>Xpertdoc Smart Flows Server</description>
    ...
</service>
To differentiate multiple Smart Flows servers on the same machine, change the service parameters as follows:
-
Rename the service ID from ‘smartflows-server’ to ‘smartflows-prod’.
-
Rename the service name to ‘Xpertdoc Smart Flows Prod’.
Install Smart Flows using Docker
If you prefer containerized deployment, you can use Docker to install Smart Flows in a more modular and scalable environment. This section walks through editing Docker files and executing Docker build commands.
Prerequisites:
Docker for Windows, Notepad ++
-
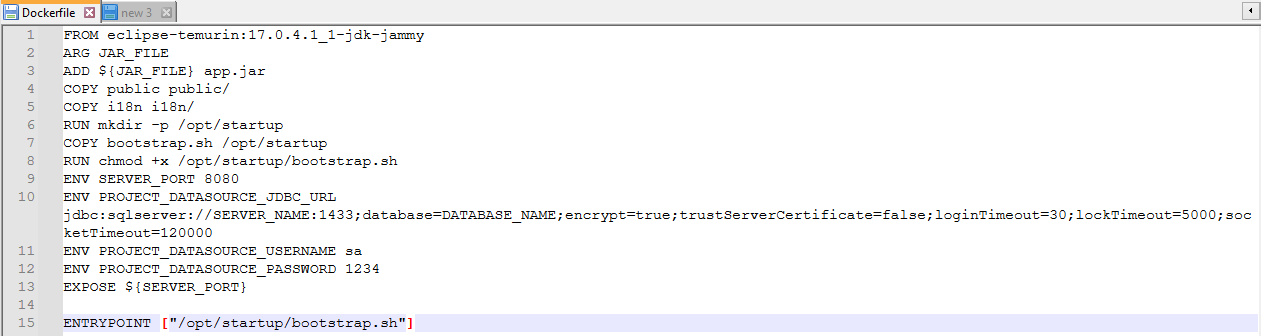
Download the Docker zip file and extract. All properties normally in the application.properties file must now be listed in the Dockerfile.
-
Using Notepad ++, edit the Docker file. Use capital letters and an underscore instead of a period.
You must use capital letters and underscores instead of periods for Docker to read the file.
-
Unzip the server component zip file and place the unzipped files with the Docker files.
-
From the command line, go to your current location and type:
Ensure your Smart Flows server version matches your actual server version.
1
docker build . --build-arg JAR_FILE=smartflows-server-4.19.1.2.jar -t smartflows:4.19.1.2
-
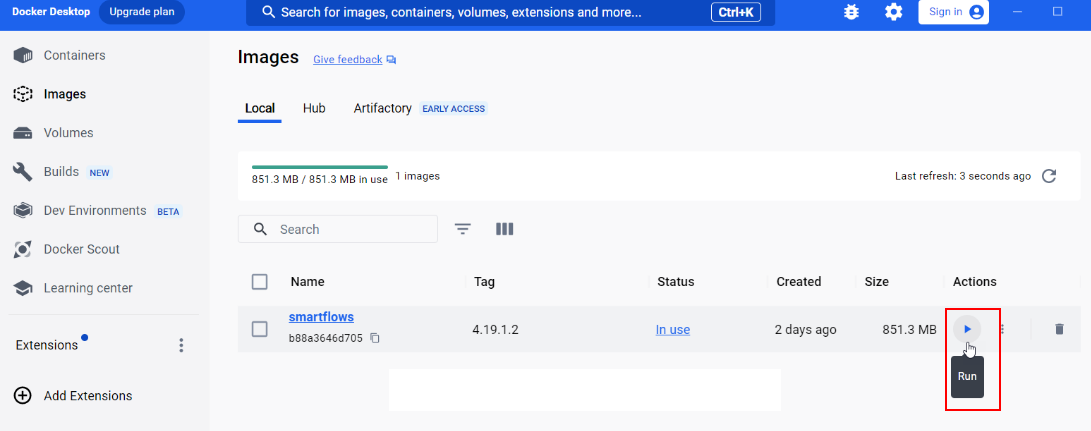
From the Docker Desktop, select Run.
Smart Flows opens in the Docker container.
Start and Validate the Smart Flows Service
When starting your Smart Flows service for the first time, an administrator must confirm the service is active. This topic walks administrators through the process of confirming that your Experlogix Smart Flows service is active and ready for login.
Install and Launch Smart Flows as a Service
-
Open the command prompt as an Administrator.
-
Navigate to the project folder.
-
Run each of the following commands to install & start Smart Flows as a Windows service.
C:\Users\myprofile>cd C:\Xpertdoc Smart Flows\project-prod
C:\Xpertdoc Smart Flows\project-prod> smartflows-server install
C:\Xpertdoc Smart Flows\project-prod> smartflows-server start
Verify that Smart Flows started successfully
Once you’ve executed the install command and started the service, you need to confirm that Smart Flows itself started successfully. This needs to be done via the log file. Your server XML file in the installation folders specifies where you have configured your system to store the log files. To confirm if the Smart Flows is started, you can always check the log files.
-
Navigate to the XML file located in your installation folder.
-
Note where the system indicates where the logs are stored, for example, C:\Xpertdoc Smart Flows\project-prod\logs.
-
Navigate to this log file location.en
-
Open the log file and verify that Smart Flows has started.
4.1. If your log file includes the entry application started, you have successfully started your Smart Flows application. Please continue to Test Smart Flows Service.
4.2. If your log file does not include the entry application started, then please look at the logs and read the errors. Smart Flows is written in Java; a lot of information about all kinds of errors can be found through internet searches. Also, it often helps to re-check all the steps from ‘STEP 1 Confirming Smart Flows service start on page 1’ through ‘STEP 3 Confirming Smart Flows service start on page 1’ to make sure that everything is configured correctly.activat. If you continue to experience issues, please reach out to our Customer Success Team.
Test and Log In Smart Flows Service
Now that your Smart Flows application has started, you can navigate to it in your browser and login to your project for the first time.
You can locate your Smart Flows server URL in your application.properties file. The Smart Flows server value is set by the project.baseurl property.
-
In your browser’s address bar, copy and paste the URL for Smart Flows server.
-
Make sure to add the port number after your Smart Flows server URL if you are not using the default port number of http or https.
The login page for your Smart Flows instance displays.

-
Login with admin credentials stored in your application.properties file.
-
Select the login in with log in with password option.
-
Enter 'admin' for the username.
-
Enter the initial password specified in the sample.user.password property within the application.properties file.
-
Select login.
Upon logging in, the system prompts you to change the admin password.
-
Follow the wizard’s guidance for changing the password.
You’ve successfully started your Smart Flows service, and you can now install the Template Builder Word add-in. Please refer to Installing Template Builder for more information.
Creating the SQL Server Database
This guide explains how to create an SQL Server database for use with Smart Flows. It provides step-by-step instructions for using SQL Server Management Studio (SSMS) and Transact-SQL (T-SQL). Additionally, it covers authentication settings, security best practices, and connectivity configurations to ensure a secure and optimized setup.
The SQL Server database actively stores and retrieves data requested by other applications within your system, even if those applications aren’t on the same machine. Creating the SQL Server database allows Smart Flows to access your existing data. The two most popular ways to configure the SQL Server for Smart Flows are listed below:
After the 4.24.0 release of Smart Flows, we introduced changes to SQL Server compatibility and configuration. Users upgrading from an earlier version must carefully review the Java Database Connectivity(JDBC) connection string updates to ensure the application properties is updated as expected.
Configure SQL Server for Smart Flows
The database's name should reflect the environment's role. The name after Smart Flows (smart flow-database name) indicates the database's name and function.
Use SSMS to Configure SQL Server for Smart Flows
Follow these steps to create a database and a native user using SQL Server Management Studio (SSMS):
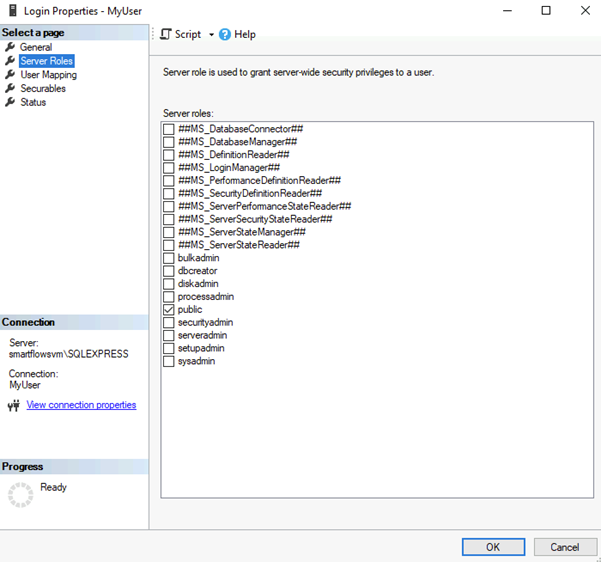
Only the public role membership is necessary.
-
From the Object Explorer, right-click the Databases folder and select New Database.
-
Right-click the Security folder in Object Explorer and select New Login.
-
Create the login with the necessary credentials.
-
To create a database user:
-
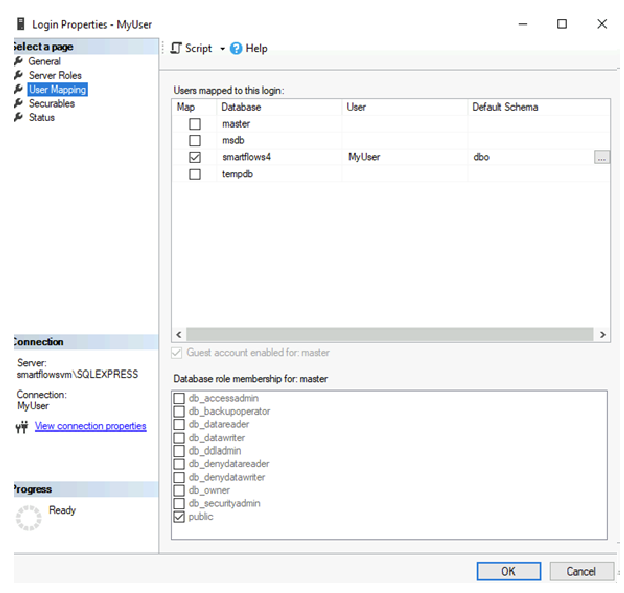
Right-click the Users folder under the target database and select New User.
-
Map the login created for this user by selecting User Mappings and choosing the created database.
Use T-SQL to Configure SQL Server
Alternatively, you can use Transact-SQL (T-SQL) to configure SQL Server:
To create a database:
CREATE DATABASE MyDB;
To create a login:
CREATE LOGIN MyUser WITH PASSWORD = 'MyPassword';
To create a database user:
USE MyDB;
CREATE USER MyUser FOR LOGIN MyUser;
Enabling Connectivity and Authentication
Enable TCP/IP Connection
To enable TCP/IP connections for SQL Server:
-
Open SQL Server Configuration Manager.
-
Expand SQL Server Network Configuration and select Protocols for MSSQLSERVER.
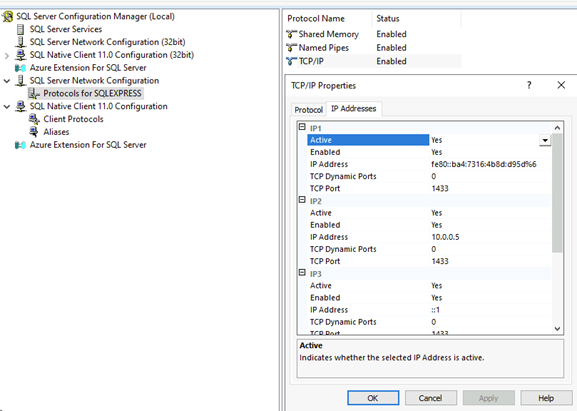
-
Right-click the TCP/IP protocol and select Enable.
-
Right-click again, select Properties, and enter port number 1433 for each listed IP address.
Set Authentication Mode
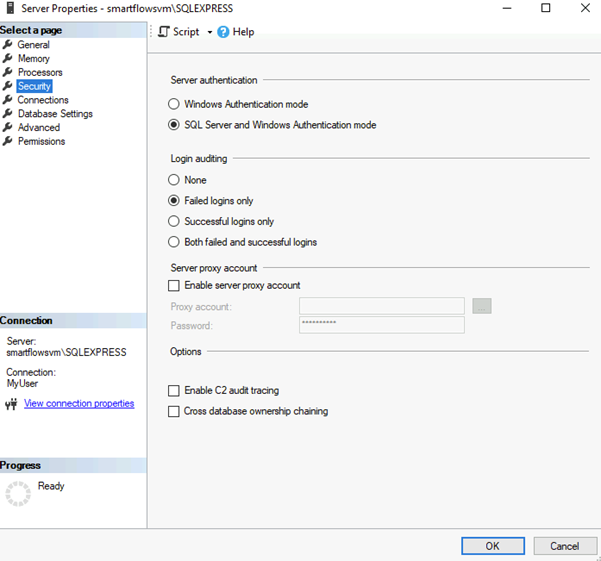
To set authentication mode:
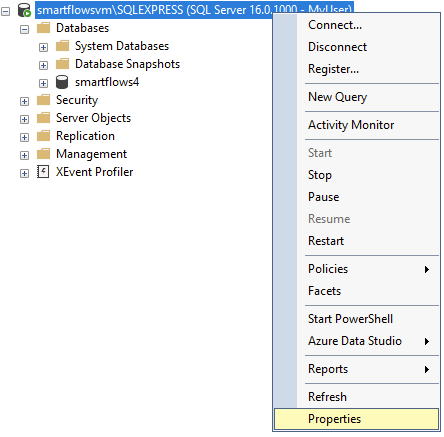
-
In SSMS, right-click on the server instance and select Properties.
-
Go to Security and set Server Authentication to SQL Server and Windows Authentication mode.
Update JDBC Connection String for SQL Server
Ensure your JDBC connection string follows security best practices. With the latest SQL Server driver, using trustServerCertificate is now optional. If you do not possess a trusted certificate, you can still establish a secure connection using trustServerCertificate=true, but only when necessary. Whenever possible, prioritize using a trusted certificate instead.
In the example below, the encrypt=false parameter is used because encryption is not enabled. Do not use this setting in a production environment or with real data.

trustServerCertificate is removed from the default examples. If you need to use it, add trustServerCertificate=true manually.
encrypt=true is strongly recommended to ensure data-in-transit is secured.
project.datasource.jdbc-url=jdbc:sqlserver://PRD-V-SQL-DB02;database=XprtDoc;encrypt=true;hostNameInCertificate=*.database.windows.net;loginTimeout=30;lockTimeout=5000;socketTimeout=300000
SQL Server Security Best Practices
-
Enable encryption (encrypt=true): Ensures data is encrypted in transit between Smart Flows and the SQL Server.
-
Use Trusted Certificates: Whenever possible, install and use certificates trusted by the client’s machine. This removes the need for setting trustServerCertificate=true.
-
Limit Roles and Permissions: Only assign the required database roles (e.g., ‘public’) to service accounts used by Smart Flows.
-
Remove trustServerCertificate: trustServerCertificate is removed from the default examples. If you need to use it, add trustServerCertificate=true manually.
-
Enforce Encryption: encrypt=true is strongly recommended to ensure data-in-transit is secured.
-
Do Not Use Unencrypted Connections: In the example below, the encrypt=false parameter is used because encryption is not enabled. Do not use this setting in a production environment or with real data.
SQL Server Compatibility Considerations
Upgrading to the latest SQL Server driver may require adjustments to existing connection strings. To avoid connectivity issues, verify that your application.properties file or equivalent configuration reflects the updated JDBC parameters—especially regarding encryption and the optional trustServerCertificate parameter. If you previously relied on trustServerCertificate=true without a properly trusted certificate, be aware that you must either add a trusted certificate or explicitly set the parameter to true to maintain the same behavior.
Login
To access Project Console or Flow Execution Panel, you must authenticate to Smart Flows (at least the first time). If you are integrating with a connector such as Microsoft Dynamics 365 CE, you can access Smart Flows using the same credentials as your connector system.
The first time you access Smart Flows, the screen looks as shared below:

User Types
Based on the method you use to authenticate, Smart Flows identifies you as one of two user types:
-
Connected User: A user who accesses the system using connector credentials
-
Native User: A user who accesses the system using Smart Flows credentials
Connected User
In the example below, the Smart Flows environment is configured for integrations with several different connectors. This is why you see the option to Log in with Microsoft Dynamics 365 CE and other systems. Logging in using these systems makes you a Connected User.
Current Connected User with Smart Flows Security Role Assigned in Connector
If you select Log in with your connector such Login with Microsoft Dynamics 365 CE) and you do not have a native Smart Flows user account, the user account will be created for you and you will be logged in immediately, provided you have a Smart Flows role assigned in your connector. If no role is assigned to your user in the connector, you will receive an error message saying you don't have a role assigned in the connector.
If you are already logged into your connector, selecting the log in button will log you into Smart Flows without you being required to enter your credentials.
If your connector Smart Flows security role does not match Smart Flows, Smart Flows will update to your match your connector security role and overwrite the Smart Flows role. This behavior is the default behavior for projects created after version 4.23.0 and can be managed via User Management settings. See Settings for more information.
The following connectors support users' automatic user creation at login:
-
Microsoft Dynamics 365 F&O
-
Microsoft Dynamics 365 CE
-
Module for Sugar
-
Salesforce
An Administrator must create the connector in Project Console and enable automatic sync and user creation in Settings to enable this functionality.
New User with Smart Flows Security Role Assigned in Connector
If a user account does not exist in 'Smart Flows', assigning a Smart Flows security role to that user within a connected host system results in automatic creation of the connected user during their 'login' to 'Smart Flows'.
The following connectors support users' automatic user creation at login:
-
Microsoft Dynamics 365 F&O
-
Microsoft Dynamics 365 CE
-
Module for Sugar
-
Salesforce
An Administrator must create the connector in Project Console and enable automatic sync and user creation in Settings to enable this functionality.
No Security Role and Not a Current User
If you don't have the required Smart Flows security role or you are not a current user, you will need to provide your connector credentials. If your connector user is not configured in Smart Flows or you are attempting to access a resource that you do not have permissions for, such as a Smart Flows User accessing Project Console, you’ll receive an error message stating that your user is not recognized as a Smart Flows user.
If you are not already logged into the connector, you will need to provide your connector credentials. If your connector user is not configured in Smart Flows (i.e., the user has not been synchronized with a Smart Flows role), you'll receive an error message stating that your user is not recognized as a Smart Flows user.
Native User
You can access Smart Flows as a Native user by selecting "Log in with password". To authenticate, provide the username and password and select login.
If the credentials are valid, you will be redirected to Smart Flows. Depending on your project’s configuration for what interface to show at login, you may be redirected to Project Console or Flow Execution Panel. You can modify the default landing for users via Settings.
Security / CAPTCHA
Smart Flows detects brute force or suspicious login attempts. prompting users with a CAPTCHA response. The system also provides a CAPTCHA response to users who fail to enter valid credentials multiple times.