
Tags organize your flows, templates, data sets, and users in Smart Flows. They allow administrators and designers to categorize project assets, filter items easily, and control flow visibility for end users.
Tags are collected into tag groups (for example, a Department tag group containing tags like Sales, Marketing, HR, and Finance).
Tag Groups
Smart Flows categorizes tag groups based on their type:
-
Standard tag groups are created by administrators and categorized by their Purpose:
-
Categorization: For organizing, grouping, and filtering project items.
-
Flow Visibility: For controlling end-user access to flows in the Flow Execution Panel.
-
System tag groups are managed by connectors and categorized by their Function:
-
Access: For mapping CRM security roles and permissions.
-
Availability: For controlling where and how flows appear in CRM interfaces.
Standard Tag Groups
Standard Tag Group Purposes
When creating or editing a standard tag group, administrators select its Purpose. Smart Flows supports two tag group purposes:
-
Categorization: Used to group, organize, and filter items in tag browsers across the Project Console and Flow Execution Panel.
-
Flow Visibility: Used to control which flows end users can see and run in the Flow Execution Panel.
Note: Tag groups created prior to version 4.29 are assigned the Categorization purpose by default, but administrators can change their purpose at any time by editing the tag group.
How Flow Visibility Works
Flow Visibility tags allow administrators to restrict flow execution without changing user security roles:
-
A Flow Visibility tag (e.g.,
Sales-US) is created under a tag group with the Flow Visibility purpose. -
The tag is assigned to specific flows.
-
The same tag is assigned to specific users.
-
In the Flow Execution Panel, a user can only see and execute flows that match their assigned Flow Visibility tags (or flows that have no visibility tags applied).
-
Flow Visibility tags do not appear in tag browsers or filter dropdowns, keeping the end-user interface clean and uncluttered.
Managing Standard Tag Groups
You can create and manage tag groups in Control panel > Tags, or create new tag groups directly while editing an item (such as a flow, template, data set, or user).
Creating a Standard Tag Group
To create a new tag group:
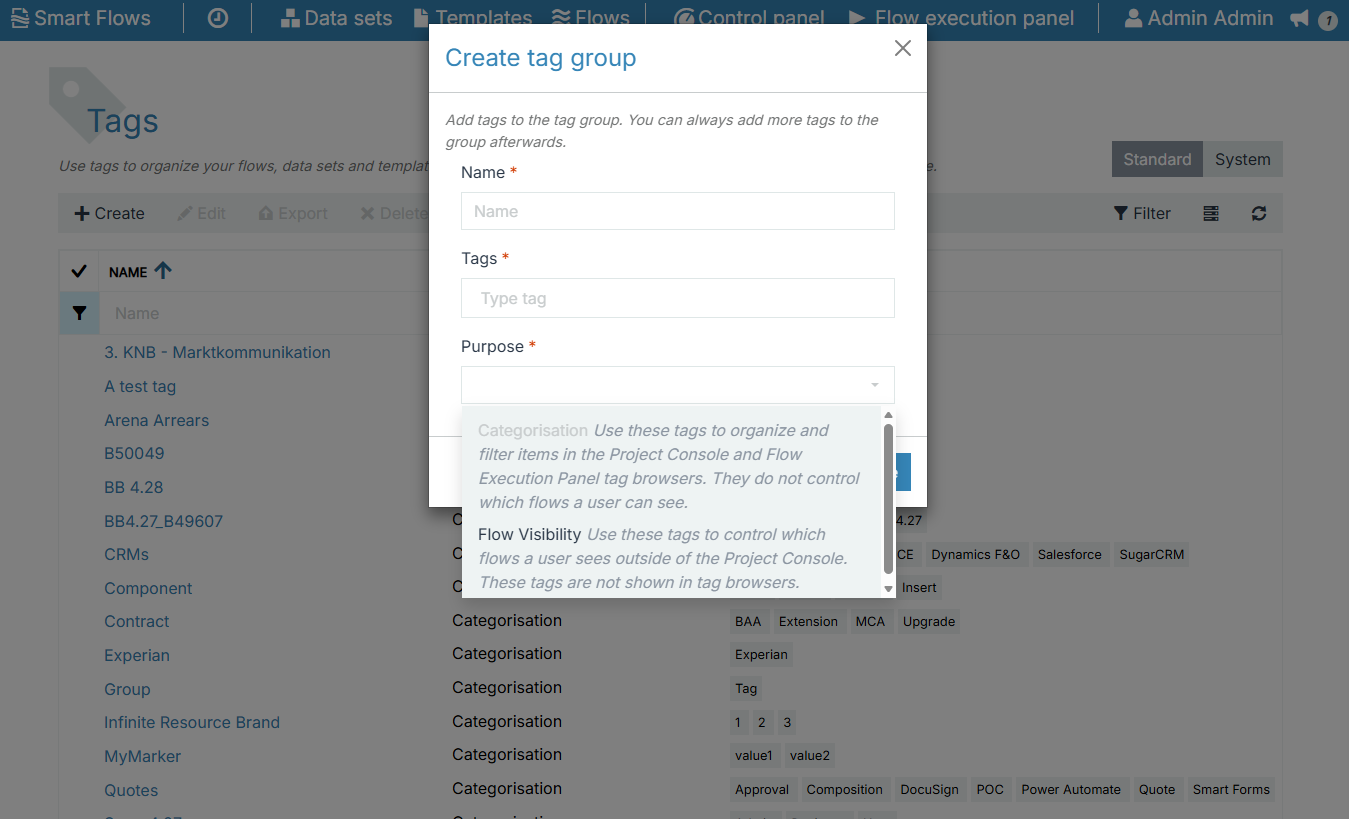
-
In the Smart Flows Project Console, open Control panel > Tags.
-
Select + Create.
-
In the Name field, enter a name for the group.
-
In the Tags field, enter the tag names to include in the group. Select Enter after each tag.
-
In the Purpose field, select Categorization or Flow Visibility:
Categorization: Used to group and filter items in tag browsers.
Flow Visibility: Used to restrict which flows users can see and run in the Flow Execution Panel. -
Select Create.
or
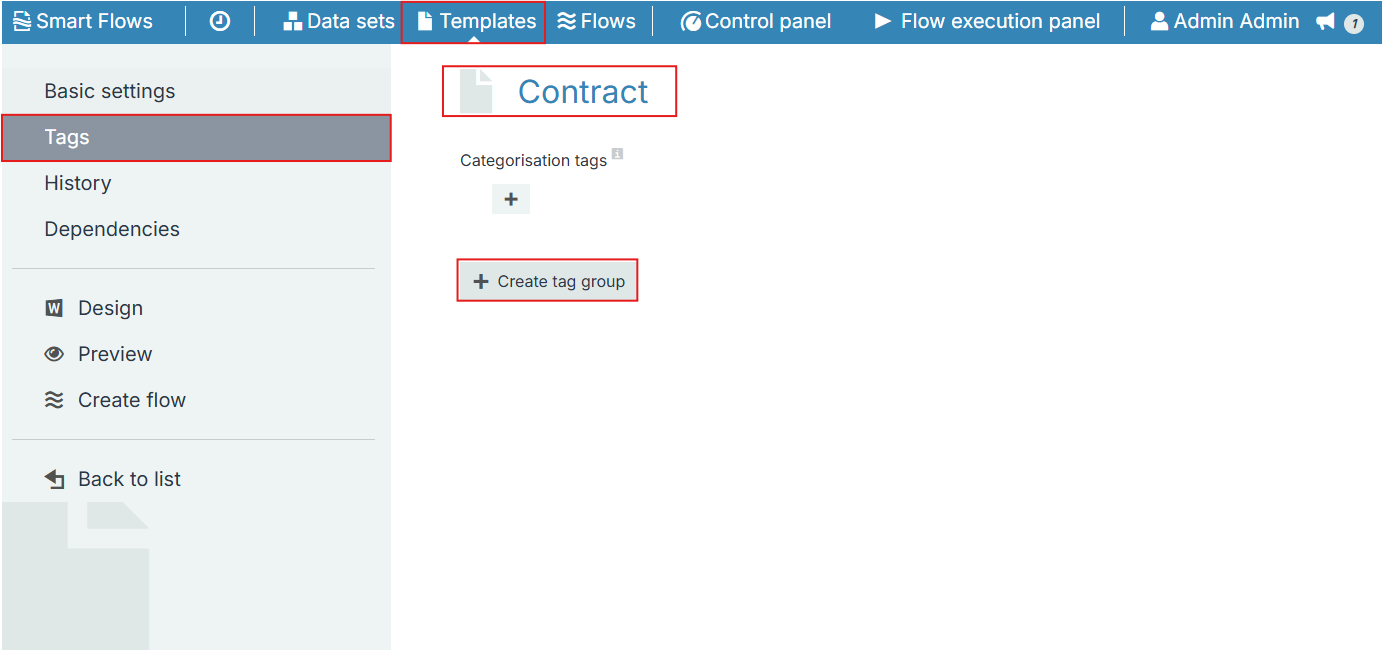
To create a tag group from inside an item:
-
Open the item's Tags section.
-
Select Create tag group
Editing a Standard Tag Group
To edit an existing tag group:
-
Open Control panel > Tags.
-
Select the target tag group from the list.
-
In the Basic settings tab, update the Name, Description, or Tags.
-
Select Save changes.
Note: System tag groups cannot be edited.
Deleting a Standard Tag Group
Deleting a tag group removes the group and its tags from the project. Tagged items are not deleted, but they will no longer carry the removed tags.
-
Open Control panel > Tags.
-
Select the checkbox next to the tag group(s) you want to delete.
-
In the toolbar, select Delete.
-
Confirm the deletion prompt.
System Tag Groups
System tag groups are created and managed automatically by external connectors (such as Microsoft Dynamics 365, Salesforce, SugarCRM, or CPQ). Unlike standard tag groups, system tag groups cannot be created, edited, or deleted manually.
The two main system tag groups are Access and Availability.
Access System Tag Groups
The Access system tag group synchronizes security roles and permission sets from your connected CRM (e.g., Salesforce Permission Sets or Dynamics 365 Roles).
-
Purpose: Controls user authorization based on host system security.
-
Logic: Assigning an Access tag to a flow ensures that only users with matching CRM roles/permissions can execute that flow.
Availability System Tag Groups: Flyout, Flyout (run in the back)
The Availability system tag group determines where and how a flow appears inside the connected CRM interface (such as Microsoft Dynamics 365 or SugarCRM).
Common tags in the Availability group include:
|
Tag |
Behavior in CRM |
|---|---|
|
Flyout |
Makes the flow available in the CRM fly-out menu on record pages, allowing users to launch the flow interactively. |
|
Flyout (run in the back) |
Makes the flow available in the CRM fly-out menu, but executes the flow automatically in non-interactive (background) mode without opening the step-by-step wizard. |
Tagging Items with Standard or System Tags
Tags can be assigned to flows, templates, data sets, and users either directly from an item's editor or from any list view (for single or multiple items).
Tagging Items from the Item Editor
-
Open the editor for the target item (Flow, Template, Data set, or User).
-
Navigate to the Tags section/tab.
-
Under Categorization tags or Flow Visibility tags, select Edit tags (the edit icon).
-
In the selection window, choose the required tags.
-
Select Confirm, then save your item changes.
Tagging Items from a List View
You can assign or change tags for one or more items directly from list views without opening their editors:
-
Open the list view for Flows, Templates, Data sets, or Users.
-
Select the checkbox next to one or more item(s).
-
In the list toolbar, select Tag.
-
Select or clear the tags in the selection window.
-
Select Confirm.
Viewing Tagged Items
To see which items currently use tags from a specific tag group:
-
Open Control panel > Tags and select the tag group.
-
Open the Tagged items tab.
The tab displays a list of all flows, templates, data sets, and users that carry tags belonging to this tag group.
Using Tags as Filters
Tags allow users and administrators to filter assets quickly across Smart Flows.
In the Project Console
In the list views for Flows, Templates, Data sets, and Users:
-
Open the list view.
-
Select Browse on the view’s ribbon on the right to open the Tag browser sidebar.
-
Select one or more tag groups or tags to filter the list to only items matching the selected tags.
In the Flow Execution Panel
When end users log into the Flow Execution Panel:
-
The left-hand panel displays tag filters based on Categorization tag groups.
-
Selecting a tag filters the flow list to display only flows matching that tag.
-
Flow Visibility tags and System tags are hidden from the filter panel to keep the interface focused.
Setting Default Tag Behavior (Tag Defaults)
Administrators can configure default tags that are automatically applied to every newly created flow in the project.
To configure default flow tags:
-
Open Control panel > Settings.
-
In the left navigation, select Tag defaults.
-
Under Categorization tags or Flow Visibility tags, select the + (plus) button.
-
In the selection window, select the tags that every new flow should carry by default, then select Confirm.
-
Select Save changes.
Tip: If the tag group you need does not exist yet, select + Create tag group at the bottom of the page to create it without leaving the settings.