Knowledge Base - Smart Flows

Settings

Project Settings

Configure how your Smart Flows project behaves. Topics here cover core project configuration, data retention, certificates, and plugin settings. Requires Smart Flows Administrator rights.

Settings options in Project Console's Control panel allow you to make changes to the way your project functions, such as

  • Change the basic settings of your project

  • Add project cleanup schedule

  • Add standard tag groups and system tag groups

  • Add certificates to verify if Smart Flows can trust them. Also, you can import the certificates by testing URLs

  • Schedule for automatic user synchronization

  • Update success message timeout

  • Define the date and time formatting for the project

  • Change plug-in settings

Accessing the Settings Page

If you have Smart Flows Administrator rights, you can access the Settings page from the Project Console’s Control Panel.

  1. In Project Console, select the Control panel > Settings.

The Settings page is divided into the following sections.

Settings home page.png

Basic Settings

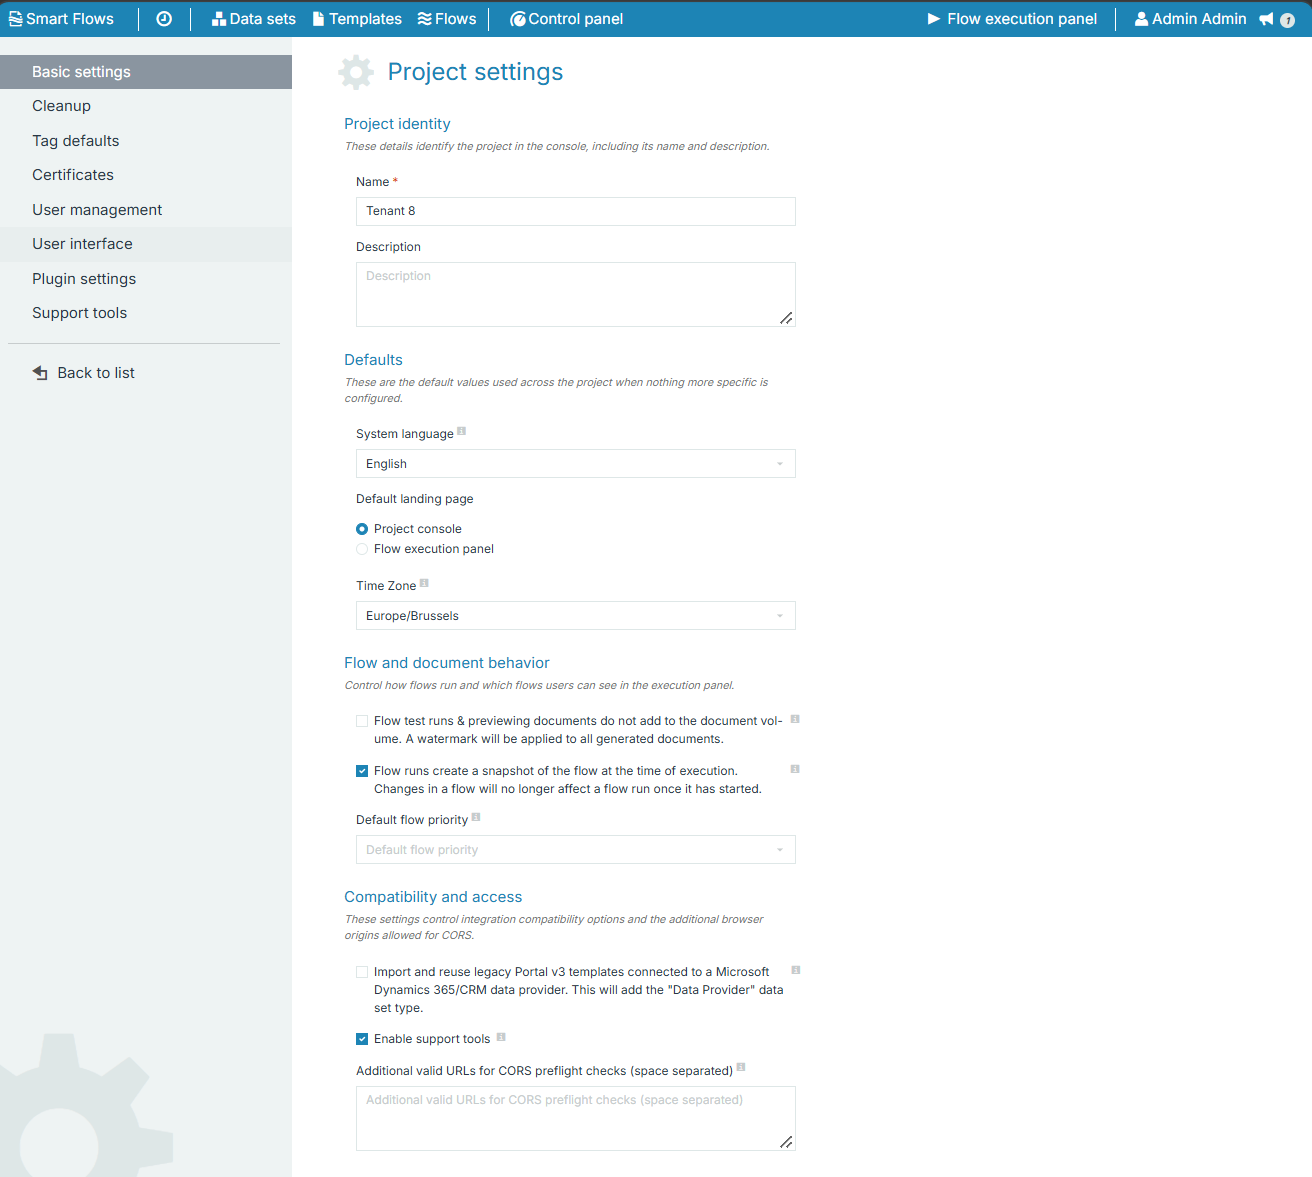
Basic settings contain the project settings details such as project name, description, time zone, language, flow priority, landing page, document previewing options, Portal 3 templates, and so on.

Basic Settings Functions

Field

Description

Name

This field displays the project's name, which is visible on the Project Console's home screen. It is editable, so you can change the name of your project.

image2018-10-23_14-53-53.png

Description

(Optional) Displays the description of the project.

Time Zone

(Optional) Defines the default time zone when using date/time in a flow.

System language

(Optional) Defines the language for the user interface. The dropdown menu displays the following options:

  • English

  • français (French)

  • Nederlands (Dutch)

Default flow priority

Defines the default priority assigned when flows start. The lowest priority value is 0, and the highest value is 9. If you have not set any value, the default value is 4.

Default landing page

Displays the default landing page for accessing Smart Flows, either Project Console or Flow Execution Panel.

Parameter

Description

Project Console

You can go directly to the Project Console by adding "/project".

Flow Execution Panel

You can go directly to the Flow Execution Panel by adding "/client".

Flow test runs & previewing documents do not add to the document volume. A watermark will be applied to all generated documents.

If checked, a watermark will be applied to documents generated in a test run and to documents generated by Template Builder. Documents generated this way will not count in your document volume.

image2020-5-21_12-1-58.png

Import and reuse legacy Portal v3 templates connected to a Microsoft Dynamics 365/CRM data provider. This will add the "Data Provider" data set type.

If you have templates developed using Templates, hosted on Portal 3, and executed using the legacy document output for Microsoft Dynamics 365 CE. You can execute these templates in Smart Flows. To leverage the existing Data Providers, enable this setting to access that type of Data Set in Smart Flows.

Import legacy Portal 3 template builder.PNG

Additional valid URLs for CORS preflight checks (space separated)

Displays a list of additional valid URLs for CORS preflight checks. For more details, please refer to Manually Allowlist a URL.

Additional Valid URLs.PNG

Cleanup

We recommend cleaning to prevent the project from gathering data that is no longer in use. For instance, you may want information about yesterday's faulty flow, but no longer need information about a flow from two years ago. The best practice that users can follow is scheduling a monthly cleanup.

image2020-5-28_10-54-42.png
Cleanup Scheduling

You can schedule Cleanup via three categories: Finished runs, Unfinished runs, and Other. Please refer to the table below for details.

Schedule

Description

Finished runs

Use Finished runs to schedule cleanup to remove data for completed flows.

Unfinished runs

Use Unfinished runs to schedule cleanup to remove data for flows in the waiting stage or for flows that do not complete.

Other

Use Other cleanup schedules to remove documents generated using an API call to the documents endpoint (api/v1/Documents).

Setting the Cleanup Schedule and Data Retention

You can configure the cleanup schedule and set the duration for data retention.

Setting the cleanup run for a single time

  1. In Project Console, select the Control panel > Settings.

  2. Select Cleanup.

    Cleanup page.PNG
  3. In every field, select the Month.

    1. Select the Day and Time to schedule your cleanup every year.

You can schedule the cleanup for short-term and long-term for the finished flows, depending on your preference—for instance, every month on the first day at 3:00.

Cleanup every month.PNG

Settings the clean-up to run multiple times per occurrence

b. In the Cleanup page, select Ctrl or Shift to select multiple values.

You can select multiple values to schedule your cleanup for every Day, Week, Month, and Year—for instance, schedule cleanup daily at 4:10, 4:20, 8:10, and 8:20.

Multiple values for cleanuo schedule.png

Setting data age retention

When a cleanup check happens, it removes all data older than a certain age. You can set your flow run's maximum data retention period per status. You can specify the age to retain the data and documents generated by the flow run.

By default, we set all finished runs to clean up if they're older than 90 days.

Cleanup updated page.PNG

Tag Defaults

You can automatically assign tags when you create a new flow using the Tag defaults settings. All the selected tags apply to new flows. You can automatically assign tags when you create a new flow using the Tag defaults settings. All the selected tags apply to new flows.

Setting Default Tag Behavior

You can change which tags are applied to a new flow by default in the Control Panel.

  1. In Project Console, select Control Panel > Settings > Tag defaults.

    Control Panel_Basic Settings.png
  2. Search and select any tags you wish to apply to flows by default.

  3. Select Save changes.

    image2018-10-26_15-22-7.png

Certificates

In some cases, Smart Flows doesn't trust an external resource due to an invalid, self-signed, and expired web certificate. Network calls done by the Smart Flows server to such a domain will fail. To address this, we created Certificates within Smart Flows to allow an administrator to explicitly allow certain domains.

The Certificates tab displays a list of trusted certificates. In the List view, you can add, Test, View, Download, or delete a Certificate in Smart Flows.

Certificate.PNG
Testing a certificate

Testing a certificate lets you input a URL to see if Smart Flows trusts it by default. If Smart Flows does not trust the URL, you can then add a certificate for that domain via download or import.

  1. Select Test.

The Test a certificate by URL dialog displays.

Certificate.PNG
  1. Enter the URL of the site you want to test.

  2. Select Test.

Test a certificate by URL.PNG

A confirmation message, "The url is trusted," displays for a valid URL.

image2020-5-28_10-25-46.png

An error message, "The url is not trusted" displays for an invalid URL.

image2020-5-28_10-46-54.png

For each certificate, you can download the certificate file by clicking Download or directly import the certificate by clicking Import.

Adding a Certificate
  1. In Project Console, select the Control panel > Settings.

  2. In the left-hand navigation, select Certificates.

  3. Select +Add.

    Adding a Certificate.png
  4. In the Name field, enter the name for the certificate.

Add Certificate Wizard.PNG
  1. (Optional) In the Description field, enter the description for the certificates.

  2. In the Certificate file field, browse for the certificate file. For example, MyCertificate.pfx file.

The Smart Flows supports .pfx and .cer files for certification.

  1. Select Add.

User Management

If you’re using a connector to synchronize users, you can activate automatic user synchronization and configure individual user authentication settings. For more details, please refer to Users.

User Management.PNG

Setting

Description

Options/Fields

Enable automatic user syncing

Configure automatic user synchronization with the primary connector

Enable automatic user syncing checkbox.

Syncing schedule (set interval in hours).

Individual user authentication settings

Configure notifications for token expiration

When checked, notifies users when authentication expires.

Notification schedule (number of days before expiration).

User deletion settings

Manage how users are deleted when they have dependencies

When checked, retains the original user’s name on resources after dependency transfer. When unchecked, dependency transfers update the resource with the new user’s name.

Individual user synchronization

Manage the synchronization of users when they log in

On creation of the user, the role in the host system will be assigned to the user based on the Smart Flows role (checkbox). If the checkbox is selected, the role in the host system will be checked during login and, if there’s a mismatch, the Smart Flows role will be updated to correspond to the role in the host system.

For new projects after Smart Flows version 4.23.0, this setting is enabled by default.

Not all roles can access all components of Smart Flows. For example, if you are assigned a User role in Smart Flows, you won't be able to log in to the Project Console. If you attempt to use the sync user at login functionality to access a component Smart Flows that isn't allowed by your role, you'll receive an error message.

Enabling Automatic User Sync
  1. In Project Console, select the Control panel > Settings > User management.

    User Management.PNG
  2. Select the Enable automatic user syncing checkbox.

    User syncronization.PNG
  3. Set the Syncing schedule time using per hour(s).

  4. Select the checkbox Notify users when their authentications expire.

  5. Set the Notification schedule for 'n' number of days.

    Individual user authentication settings.PNG

User Interface

User Interface Updated.png
User Interface Functions

The User interface tab allows you to configure settings that affect the user interface and experience.

Field

Description

Success message timeout

The success message notification display in green. Controls how long the time in milliseconds (ms) for the message to display on the screen.

Date and time format

You can specify backup settings using the User interface tab if you've not defined the date and time format.

You can also define the date and time format by clicking the user in the top-right navigation and setting the date under User settings.

image2018-10-26_15-43-37.png

Clear view cache

Restores the lists and data set views to their default state. You can use this button when you make some changes in CRM and expect new results or when you want to clear the cached data in the server memory.

Show a message when something was successfully created, updated or deleted

If selected, a success message displays if something is created, updated, or deleted. By default, this checkbox is not selected and the success message does not display.

Plugin Settings

Plugin settings allow you to configure settings related to plugins. Only plugins for which you have a license display on this tab.

Plug-in Settings.png
Plugin Settings Functions

Dynamic field

Description

Folder structure entity for Microsoft SharePoint document locations path pattern (pick by example)

Define the folder structure of document locations path for Microsoft SharePoint.

Sugar field

Description

Use fields of type "relate" as N:1 relations

By default, relate field is visible as regular field in the data set builder. You can use the checkbox to change the behavior and move the fields to the N:1 relations.

Use fields of type "flex relate" as N:1 relations

By default, flex relate field is visible as regular field in the data set builder. You can use the checkbox to change the behavior and move the fields to the N:1 relations.

Manually Allowlist a URL

The Allowlist or Whitelist is a list of foreign applications that are allowed to connect with Smart Flows. Allowlisting the URLs used by your organization can serve as a workaround for CORS connection errors. If your app is not part of this list, you will not be able to do any API calls to us. Adminstrators can manually add foreign application URLs in the Project Console.

Before the Xpertdoc Smart Flows 4.12.0 release, Smart Flows cross origin resource sharing used an "allow all" approach. As long as the URL was associated with the Connector URL, it would be allowed to access entities within Smart Flows and the connector. However, after the 4.12.0 release, URLs will require both enterprise name and the connector naming.

Add a URL to the Allowlist

  1. Navigate to the Project Console > Control panel > Settings.

  2. At the bottom of the page, in the Additional valid URLs for CORS preflight checks field, copy and paste the URLs here. Save the changes.

    S3-S4.png

Adding a Trusted CRM Certificate

To configure connectors, an admin must upload a CRM certificate issued by the trusted authority. This CRM certificate verifies that the connection to the specific site is secure. If the certificate is not trusted, the system generates an error message. This page describes how to add the trusted CRM certificate to the Project Console.

How to add a trusted CRM certificate

  1. In the Address Bar, select the lock icon to view the site information.

The About xpertdocone.crm4.dynamics.com window displays.

  1. Select Connection is secure.

    Connection is secure window.png
  1. Select Show certificate to view the CRM trusted certificate.

    Connection is secure.PNG
  2. Select Details.

  3. Select Copy to File.

    Certificate window.PNG

The Certificate Export Wizard displays.

  1. Select Next.

    Certificate Export Wizard.PNG
  2. In the Export File Format window, select Base-64 encoded X.509 (.CER) format to export the certificate and select Next.

    Export File Formate.PNG
  3. Use the Browse button to specify the File name and select Next to complete the Certificate Export Wizard.

    Specify the file name.PNG

"The export was successful" message displays.

  1. Select Ok.

The Certificate Export Wizard no longer displays.

  1. In the Project Console, go to Control Panel > Settings > Certificates and select + Add.

  2. In the Name field, input the name for the certificate.

  3. (Optional)In the Description field, input a description for the certificate.

  4. In the Certificate file field, select Browse.

Use File Explorer to locate your Certificate file.

  1. Select Add to upload the certificate.

    Add certificate.PNG

You can now view the uploaded certificate in Project Console List view.

Upgrading your Existing Projects

Download the latest version of Smart Flows from the Support Portal.

The credentials for this page were provided in the first installment of Smart Flows. If you lose your credentials, you can initiate a password reset on the login page. If you do not have an account, please contact our Customer Success Team to request one.

  1. Stop Smart Flows Server

    1. In the Service Management Console of your server, find the Smart Flows Server service and stop it.

      z.png
  2. Create a Backup

    Just in case something goes wrong during the upgrade, it is reassuring to have a backup of your project in its current state.

    1. Backup your SQL Server database(s)

    2. Move the following folders and files to a backup directory

    3. C:\Xpertdoc Smart Flows\project-prod\public\client

    4. C:\Xpertdoc Smart Flows\project-prod\public\project

    5. C:\Xpertdoc Smart Flows\project-prod\smartflows-server-.jar

  3. Update the Service

    1. To retrieve the folder in which the Experlogix Smart Flows Server service is installed, right-click 'Smart Flows Server' and select Properties.

      zz.png
    2. On the General tab, the path to the executable indicates the service's install folder.

      zzz.png
  4. Create a Copy of your Settings

    1. Navigate to the Installation Folder you retrieved and create a local copy of these two files:

      • application.properties

      • smartflows-server.xml

    2. Save the copies of these files somewhere safe. They contain your specific project settings; you don't want to overwrite these files in the upgrade process.

  5. Download and Unzip the latest version of Smart Flows Server

    1. Download the zip file with the target version as disclosed by Experlogix upon release of a new version. If you haven't received any updates and you believe you are eligible to receive them, please contact our Customer Success Team.

    2. Unzip the archive to a regular folder: Right click -> "Extract here"

  6. Replace the Installation Folder

    1. Replace the Installation Folder with the folder you have just unzipped and copy your original application.properties and smartflows-server.xml files back into the new Installation Folder.

    2. Update the smartflows-server.xml to have the last element refer to the correct unpacked jar file (smartflows-install-.jar)

  7. Restart Smart Flows Server

    1. Restart the " Smart Flows Server" service. This operation may take some time.

      Experlogix Smart Flows will automatically update your database.

In the logs you should see one of these entries:

2020-04-15 18:29:39.759   INFO 4076 --- [https-jsse-nio-10.118.32.4-443-exec-44] o.f.core.internal.command.DbMigrate: Migrating schema [dbo] to version 67.1 - DocGenHistory
2020-04-15 18:29:39.801   INFO 4076 --- [https-jsse-nio-10.118.32.4-443-exec-44] o.f.core.internal.command.DbMigrate: Migrating schema [dbo] to version 69 - PartialRevertV64
2020-04-15 18:29:39.847   INFO 4076 --- [https-jsse-nio-10.118.32.4-443-exec-44] o.f.core.internal.command.DbMigrate: Successfully applied 72 migrations to schema [dbo] (execution time 00:04.759s)

Setting the Cleanup Schedule and Data Retention

Setting the Cleanup Schedule and Data Retention

You can configure the cleanup schedule and set the duration for data retention.

Setting the cleanup run for a single time

  1. In the Project Console, select Control panel > Cleanup.

  2. In the Every field, select the Month.

    1. Select the Day and Time to schedule your cleanup every year.

      You can schedule the cleanup for short-term and long-term for the finished flows, depending on your preference—for instance, every month on the first day at 3:00.

    2. In the Cleanup page, select Ctrl or Shift to select multiple values.

      You can select multiple values to schedule your cleanup for every Day, Week, Month, and Year—for instance, schedule cleanup daily at 4:10, 4:20, 8:10, and 8:20.

  3. In the Project Console, select the Control panel > Settings.

Cleanup page.PNG
Cleanup every month.PNG

Settings the clean-up to run multiple times per occurrence

Multiple values for cleanuo schedule.png

Setting data age retention

When a cleanup check happens, it removes all data older than a certain age. You can set the maximum data retention period for each flow run status. You can specify the age to retain the data and documents generated by the flow run.

By default, we set all finished runs to clean up if they're older than 90 days.

Cleanup updated page.PNG