
The Send to Docusign flow block sends a document to Docusign, allowing users to output a signed document. This signed document can then be linked into subsequent steps.
Flows with both a Retrieve Data flow block and a Send to Docusign flow block automatically select the Docusign data set for the Send to Docusign flow block. From Smart Flows release 4.24.0 onwards, only users with the correct Docusign license will be able to access ID verification and ID check. For more information on ID verification and how Docusign supports it, please see ID Verification.
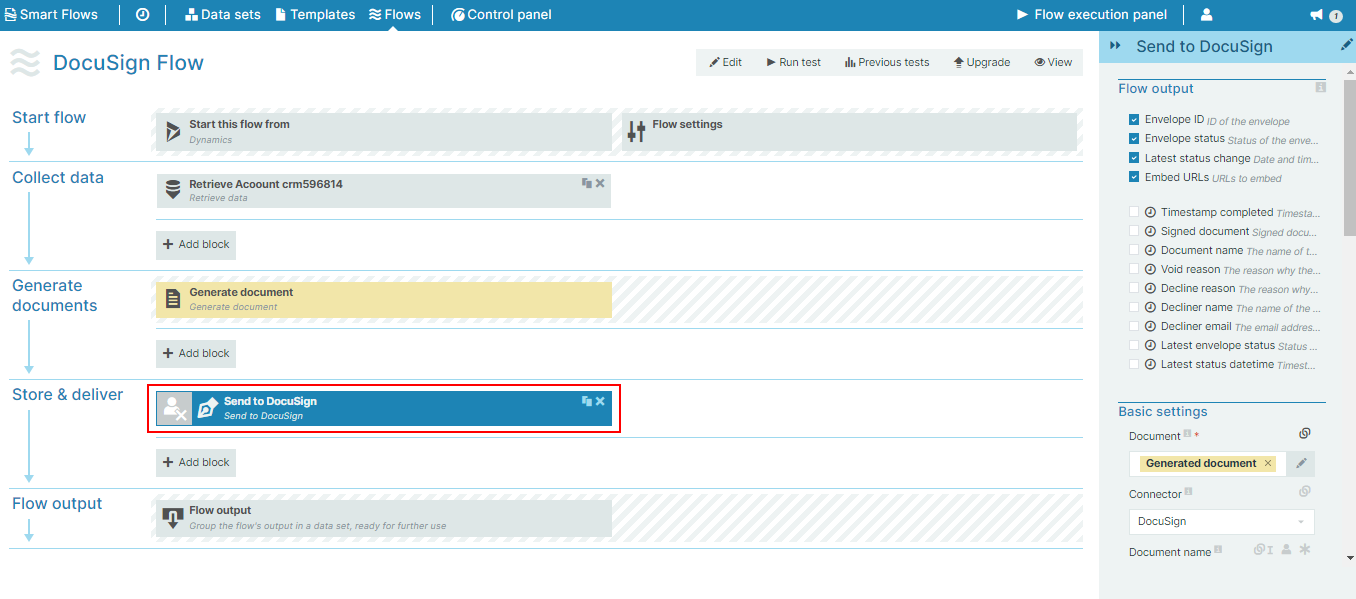
Flow Block Parameters
The dropdown menus below provide all of the flow block's configuration options with detailed information and recommendations to help you configure your flow block.
Flow block customization buttons
You can further customize your flow block's parameters in several ways
-

-

-

Flow output
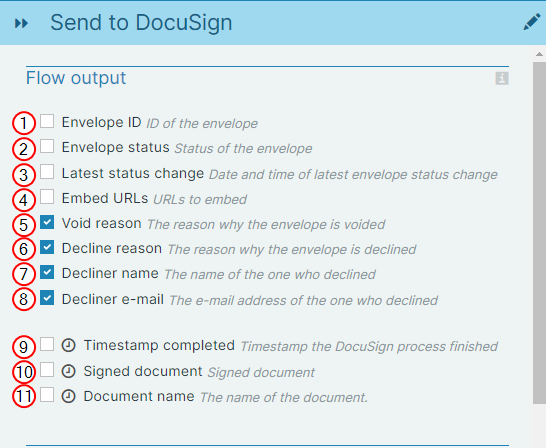
The Flow Output section shows all the output parameters that are available for the block. When checked, the value of the output parameter is presented to the user who is executing the flow. Each setting that composes this output information is described in detail below:
|
Index No. |
Field name |
Description |
|---|---|---|
|
1 |
Envelope ID |
When checked, theEnvelope ID value displays for the user during the flow block output step. |
|
2 |
Envelope status |
When checked, the status of the document displays for the user during the flow block output step. For more information, refer to Docusign statuses. |
|
3 |
Latest status change |
When checked, the date and time of the latest status change displays for the user during the flow output step. |
|
4 |
Embed URLs |
When checked, the system creates the links to the document for embedded signing and displays them during the waiting stage of the flow execution. Embed URLs and Retrieve URLs that can be used for embedding must be checked in order for link creation feature to work. |
|
5 |
Void reason |
When checked, displays the reason why the envelope is voided. |
|
6 |
Decline reason |
When checked, displays the reason why the signer has declined the envelope. |
|
7 |
Decliner name |
When checked, displays the name of the signer who declined the envelope. |
|
8 |
Decliner e-mail |
When checked, displays the e-mail address of the signer who declined the envelope. |
|
9 |
Timestamp completed |
When checked, the system displays the timestamp indicating when the Docusign envelope completed. |
|
10 |
Signed document |
When checked, the document will be shown to the end user in the flow output |
|
11 |
Document name |
When checked, the system displays the name of the document during the flow output. |
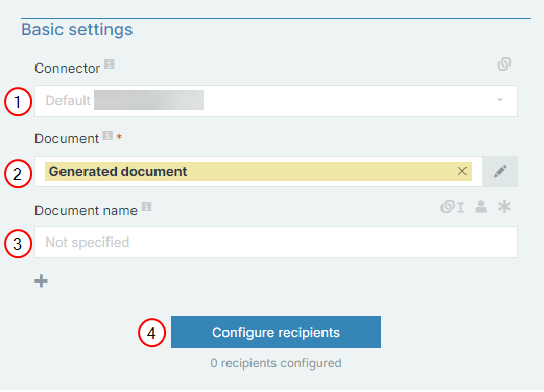
Basic settings
|
Index No. |
Field name |
Description |
|---|---|---|
|
1 |
Connector |
Defines the connector the system should use. If none is selected, the system uses the default connector. |
|
2 |
Document |
Defines the primary document to send to Docusign. If this document requires signatures, its template must contain E-signatures configured using Template Builder. |
|
3 |
Document Name |
The name of the document. |
|
4 |
Configure recipients |
Opens the dialog to map signer roles and notifications. For supplementary documents, recipient mapping is optional. |
Including Additional Documents
In addition to the primary document generated by Smart Flows, you can attach supplementary documents to the Docusign envelope (such as collateral, terms and conditions, or files retrieved from preceding flow blocks):
-
Under Basic settings, select Add document (the + icon).
-
Select or link the document from a preceding flow block (such as a generated document, HTTP request output).
-
(Optional) Select Configure recipients if you need to restrict document access to specific signers.
Unmapped Supplementary Documents (Version 4.29+)
Starting in version 4.29, assigning recipient roles to supplementary documents is optional:
-
No recipient mapping required: You can include documents without mapping specific signers or roles (0 recipients configured).
-
Available to all signers: Any supplementary document added without specific recipient mappings is automatically included in the envelope and presented to all signers alongside the primary document.
Configure recipients
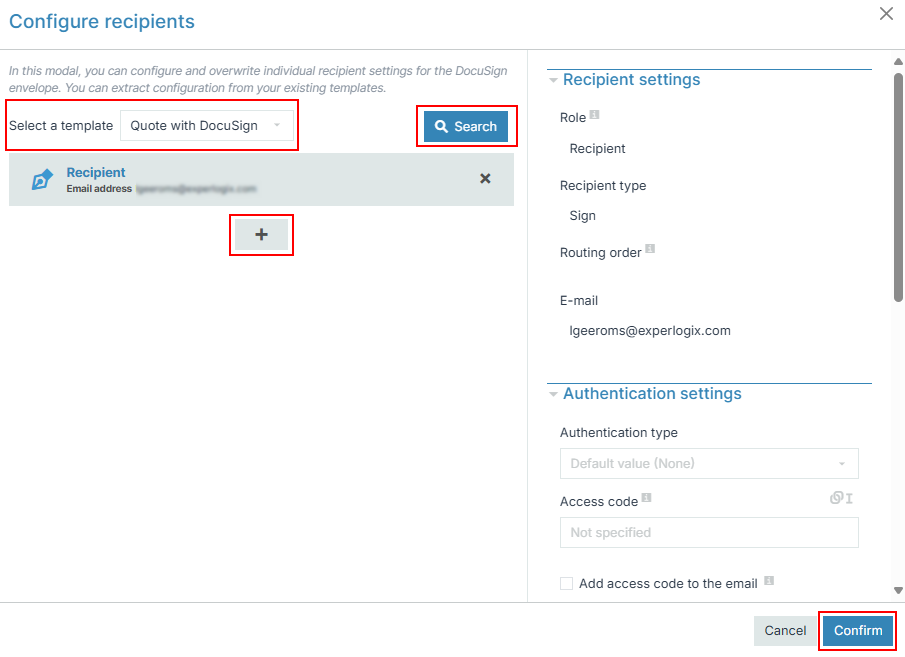
Designers can select the Configure recipients button to open the Configure recipients dialog, where they can map the recipient(s) of an e-mail defined in (Undefined variable: SFVariables.Product Name 2) within Flow Builder based on the e-mail recipient's role, overwriting the e-mail recipient(s) defined in (Undefined variable: SFVariables.Product Name 2).
Designers can select:
-
The Search button to search for signers within the template. A list of the signers is displayed after the user selects the Search button
-
The + button to configure additional recipients
-
all the templates used in a flow from the Select a template dropdown, if recipients have not been configured
Designers can configure the following settings for multiple e-mail recipients in the Configure recipients dialog:
-
Recipient settings
-
Authentication settings
-
E-mail settings
Designers must select the Confirm button to confirm that all required parameters are accurately configured and transmitted.
Recipient settings
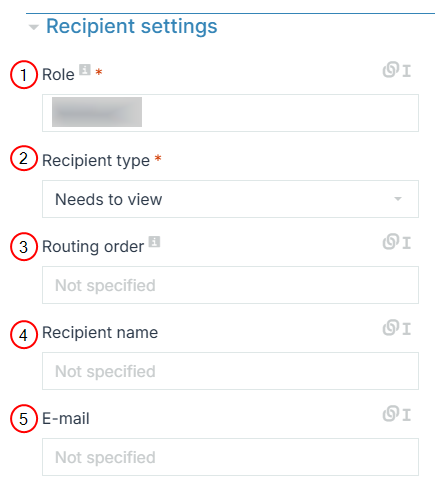
|
Index No. |
Field name |
Description |
|---|---|---|
|
1 |
Role |
Identifies the different types of recipients (for example, seller, buyer, and notary) who need to sign the document. |
|
2 |
Recipient type |
|
|
3 |
Routing order |
The order in which the recipient(s) are asked to sign or view the document. |
|
4 |
Recipient name |
The name of the recipient of the document. |
|
5 |
|
The e-mail address of the recipient of the document. |
Authentication settings
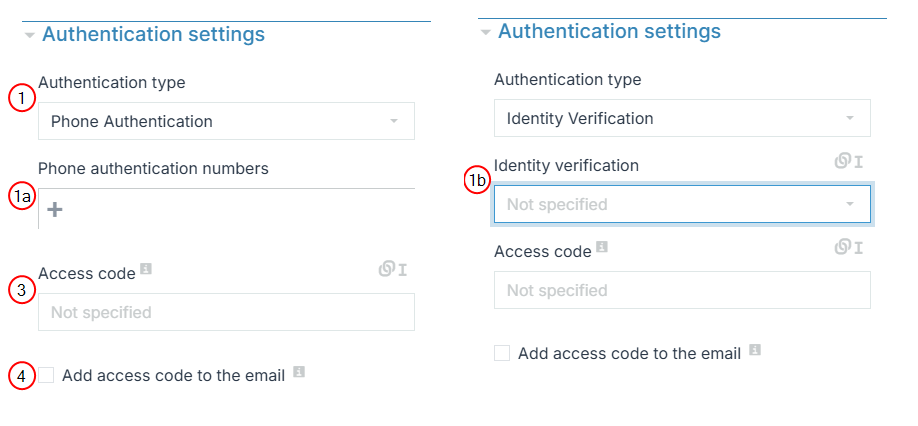
Designers can configure identity verification methods for individual signers in (Undefined variable: SFVariables.PlatformName) when sending documents to Docusign, leveraging Docusign's native identity verification methods.
From Smart Flows release 4.24.0 onwards, only users with the correct Docusign license will be able to access ID verification and ID check. For more information on ID verification and how Docusign supports it, please see ID Verification.
Designers can select the preferred verification method for the signing process from the following authentication settings options. Designers can also enable identity verification or ID Check for individual signers and then choose an identity verification method.
|
Index No. |
Field name |
Description |
|---|---|---|
|
1 |
Authentication type
|
|
|
1a |
Phone authentication numbers |
Displayed only if 'Phone Authentication' is selected. Allows sender to input required phone number(s). |
|
1b |
Identity verification |
Displayed only if 'Identity Verification' is selected.
|
|
2 |
Access code |
The code that the signer must enter before they can sign a document. |
|
3 |
Add access code to the email |
When checked, the access code provided in the previous text box will be part of the e-mail send to the document recipient. |
Email settings
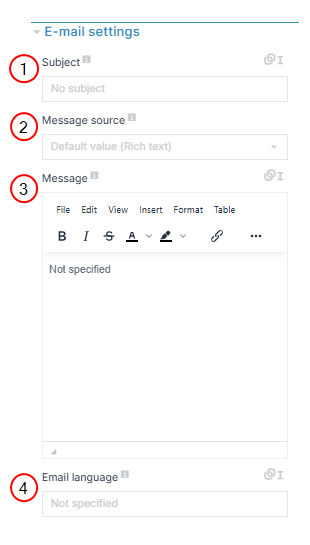
|
Index No. |
File Name |
Description |
|---|---|---|
|
1 |
Subject |
The e-mail subject for recipient e-mails. |
|
2 |
Message source |
|
|
3 |
Message |
The e-mail message in HTML or plain text.
|
|
4 |
Email language |
Defines the language of the e-mail that Docusign sends to the recipient. This setting will not be applied if the document signer has set an alternative preferred language in their Docusign account. |
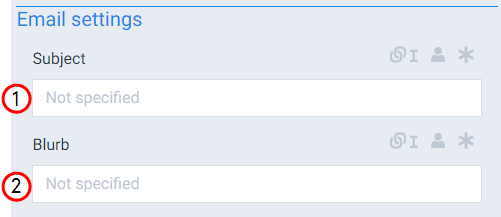
|
Index No. |
Field name |
Description |
|---|---|---|
|
1 |
Subject |
The Subject field allows users to replace the default Docusign email subject. |
|
2 |
Blurb |
Fills in the body of the email. |
Docusign settings & Notification settings
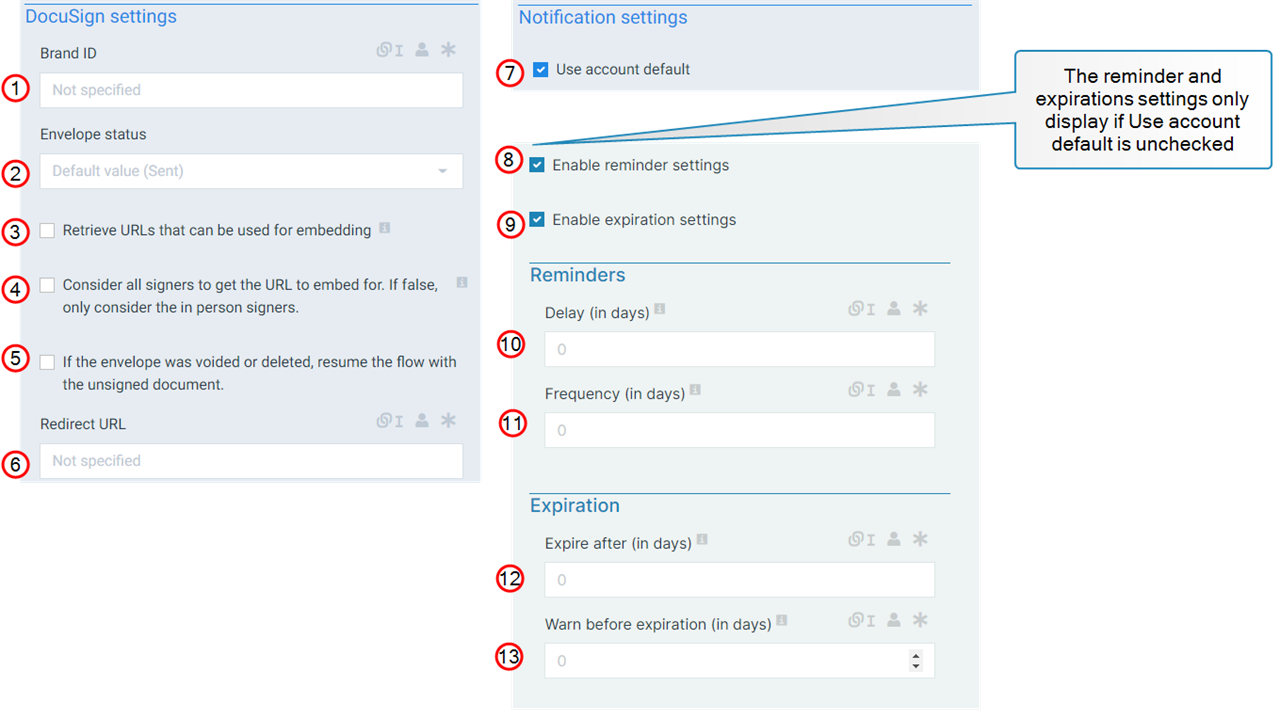
|
Index No. |
Field name |
Description |
|---|---|---|
|
1 |
Brand ID |
Defines the Docusign Brand ID to use for the envelope. |
|
2 |
Envelope status |
Defines the envelope status with the following options: Sent Sends a notification to the recipent. Sent or Draft Creates a draft in Docusign. Sent is the default and we always recommend using the Sent option for the Envelope status. |
|
3 |
Retrieve URLs that can be used for embedding |
When checked, the system creates the embeddable links to the document during the flow output step. Embed URLs and Retrieve URLs that can be used for embedding must be checked in order for link creation feature to work. |
|
4 |
Consider all signers to get the URL to embed for. If false only consider the in person signers |
When checked, all signers for the envelope will be marked as "in person" signers. This means a URL can be retrieved for each signer to sign the document. Depending on the specified routing order, only a subset of the sign URLs will be shown in the flow output. |
|
5 |
If the envelope is voided or deleted, resume the flow with the unsigned document |
When checked, the envelope is voided or deleted, the flow will resume anyway. The status of the agreement can then be used to handle this. If kept unchecked, the flow execution will stop and change to the error state. |
|
6 |
Redirect URL |
Defines the URL to redirect signers to after they have completed the signing process. |
|
7 |
Use account default |
When checked, the system uses the default notification settings from your Docusign account. When unchecked, the system displays additional settings for your to configure notifications. |
|
8 |
Enable reminder settings |
Enables reminder settings. If unchecked, the Reminder settings do not display. |
|
9 |
Enable expiration settings |
Enables the signature expiration settings. If unchecked, the Expiration settings do not display. |
|
10 |
Delay (in days) |
Sets delay in days before the first reminder is sent to the signers. For example if set to 3, the system will send the first reminder in 3 days. |
|
11 |
Frequency (in days) |
Sets how often the system sends reminders after the initial delay. For example, if sent to 2 days the system sends a reminder every 2 days. |
|
12 |
Expire after (in days) |
Sets the date the signing ceremony should expire. For example if set to 3, the signing ceremony expires in 3 days. |
|
13 |
Warn before expiration (in days) |
Sets the number of days before the signing ceremony expires to send a warning of the expiration. For example if you set the Expire after (in days) setting to 10 days, and set Warn before expiration (in days) to 3, the system sends the warning on day 7. Formula: Expire after (in days) value - Warn before expiration (in days) value = day of warning of expiration is sent. |