
Users encompass all the members of your project and their permissions and abilities. Administrators can view all users via The list view in the Project Console's Control panel. However, Administrators can only directly manage native users within the Smart Flows Project Console. To manage Connected users, you'll need admin privileges in your connector system.
Smart Flows comes with several user roles with varying privileges. This helps you manage control of your projects by defining what each person can do within the project. They are also several user types which define how you add and manage the head count of your users within Smart Flows.
User Roles & Permissions
User roles
There are several user roles in Smart Flows. A user role defines a user's privileges and access within Smart Flows.
|
Role |
Function |
|---|---|
|
Experlogix Smart Flows Administrator |
Administrators have access to all components of Smart Flows with no restrictions. They are also able to assign and manage the roles of other users. |
|
Experlogix Smart Flows Designer |
Designers have a reduced number of Project Console abilities with a focused set of permissions related to creating managing templates and flows with permissions for managing your Project Console settings. They can access the Template Builder add-in for designing templates. |
|
Experlogix Smart Flows User |
Users can access Flow Execution Panel and run flows. |
|
Smart Flows Workflow Executor |
Group role that allows non-Smart Flows users to execute Microsoft Dynamics 365 CE Workflows. These users are not synced in Smart Flows. The Smart Flows Workflow Executor user role only exists in Microsoft Dynamics 365 CE. |
User Types
User types define how user profiles are created and managed within Smart Flow. User types define how you added them to Smart Flows. User Roles define what they can do.
There are several user types in Smart Flows:
-
Native: A user created and maintained directly in Smart Flows, who authenticates using local Smart Flows credentials.
-
Connected: A user imported and synchronized from an external connected system (such as Microsoft Dynamics 365, Salesforce). Their account details, roles, and status are managed in the external application.
-
System: An internal built-in system identity (such as the default initial administrator account or automated service account) used for system-level operations and connector maintenance.
-
Deleted: A user identity that has been removed or deleted from the external connected system, but is retained in Smart Flows history for auditing and execution records.
Individual User Settings
The Project Console Individual User Settings tab lets you view and configure a user's settings. You can access these settings in the User List view of the Settings in Project Console by selecting a user from the list.
Basic settings tab
The Basic Settings tab displays user identification details, including name and email address.
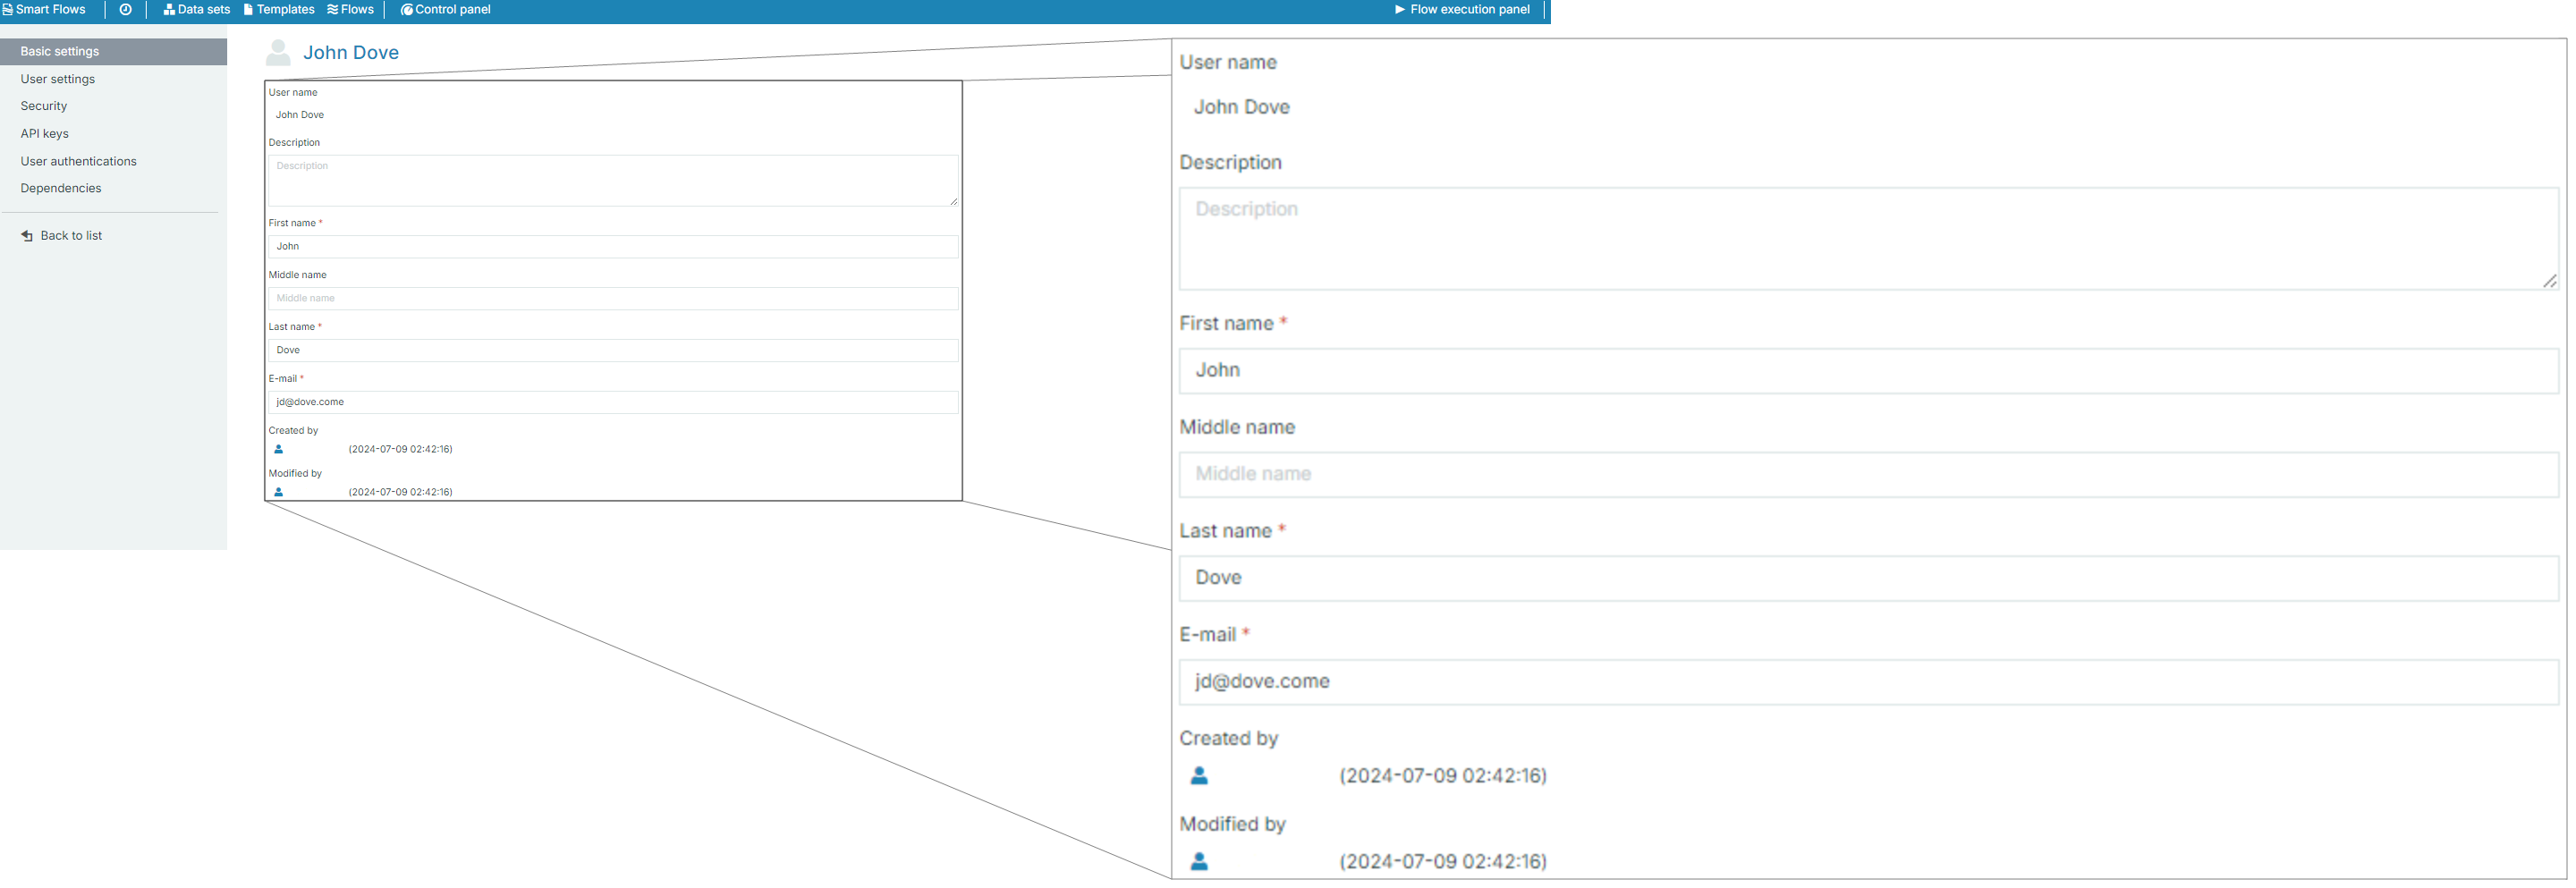
|
Setting |
Field Name |
Description |
|---|---|---|
|
User Information |
User name |
Displays the user's name. |
|
Description |
Optional field for adding a description of the user. |
|
|
First name |
First name of the user. |
|
|
Middle name |
Optional field for the user's middle name. |
|
|
Last name |
Last name of the user. |
|
|
|
Email address of the user. |
|
|
Created by |
Displays the admin who created the user and timestamp. |
|
|
Modified by |
Displays the admin who last modified the user and timestamp. |
User Settings tab
The User Settings tab lets you configure the time and date formats and the interface languages for an individual user.
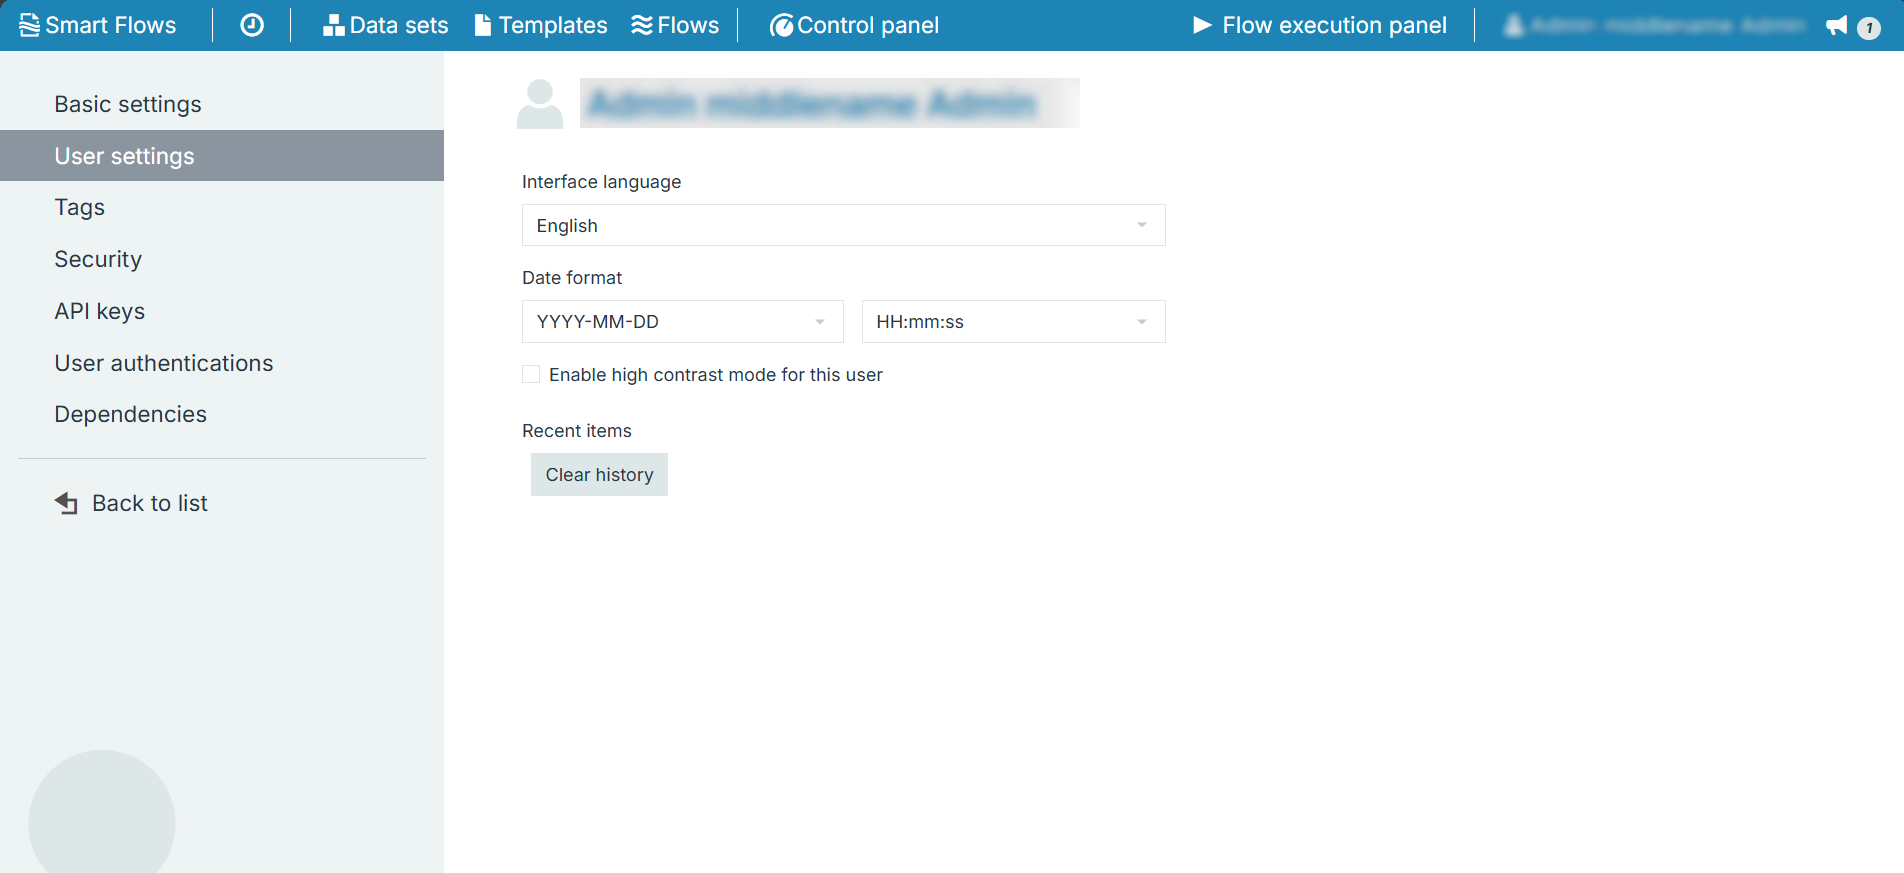
|
Setting |
Field Name |
Description |
|---|---|---|
|
User Settings
|
Interface language |
Set the preferred language for the user interface. |
|
Date format |
Choose the date format to be used by the user. |
|
|
Enable high contrast mode for this user |
Click the option to increase the User Interface contrast for a better visibility. The contrast of a.o. form control borders increases to a minimum ratio of 4.5:1. 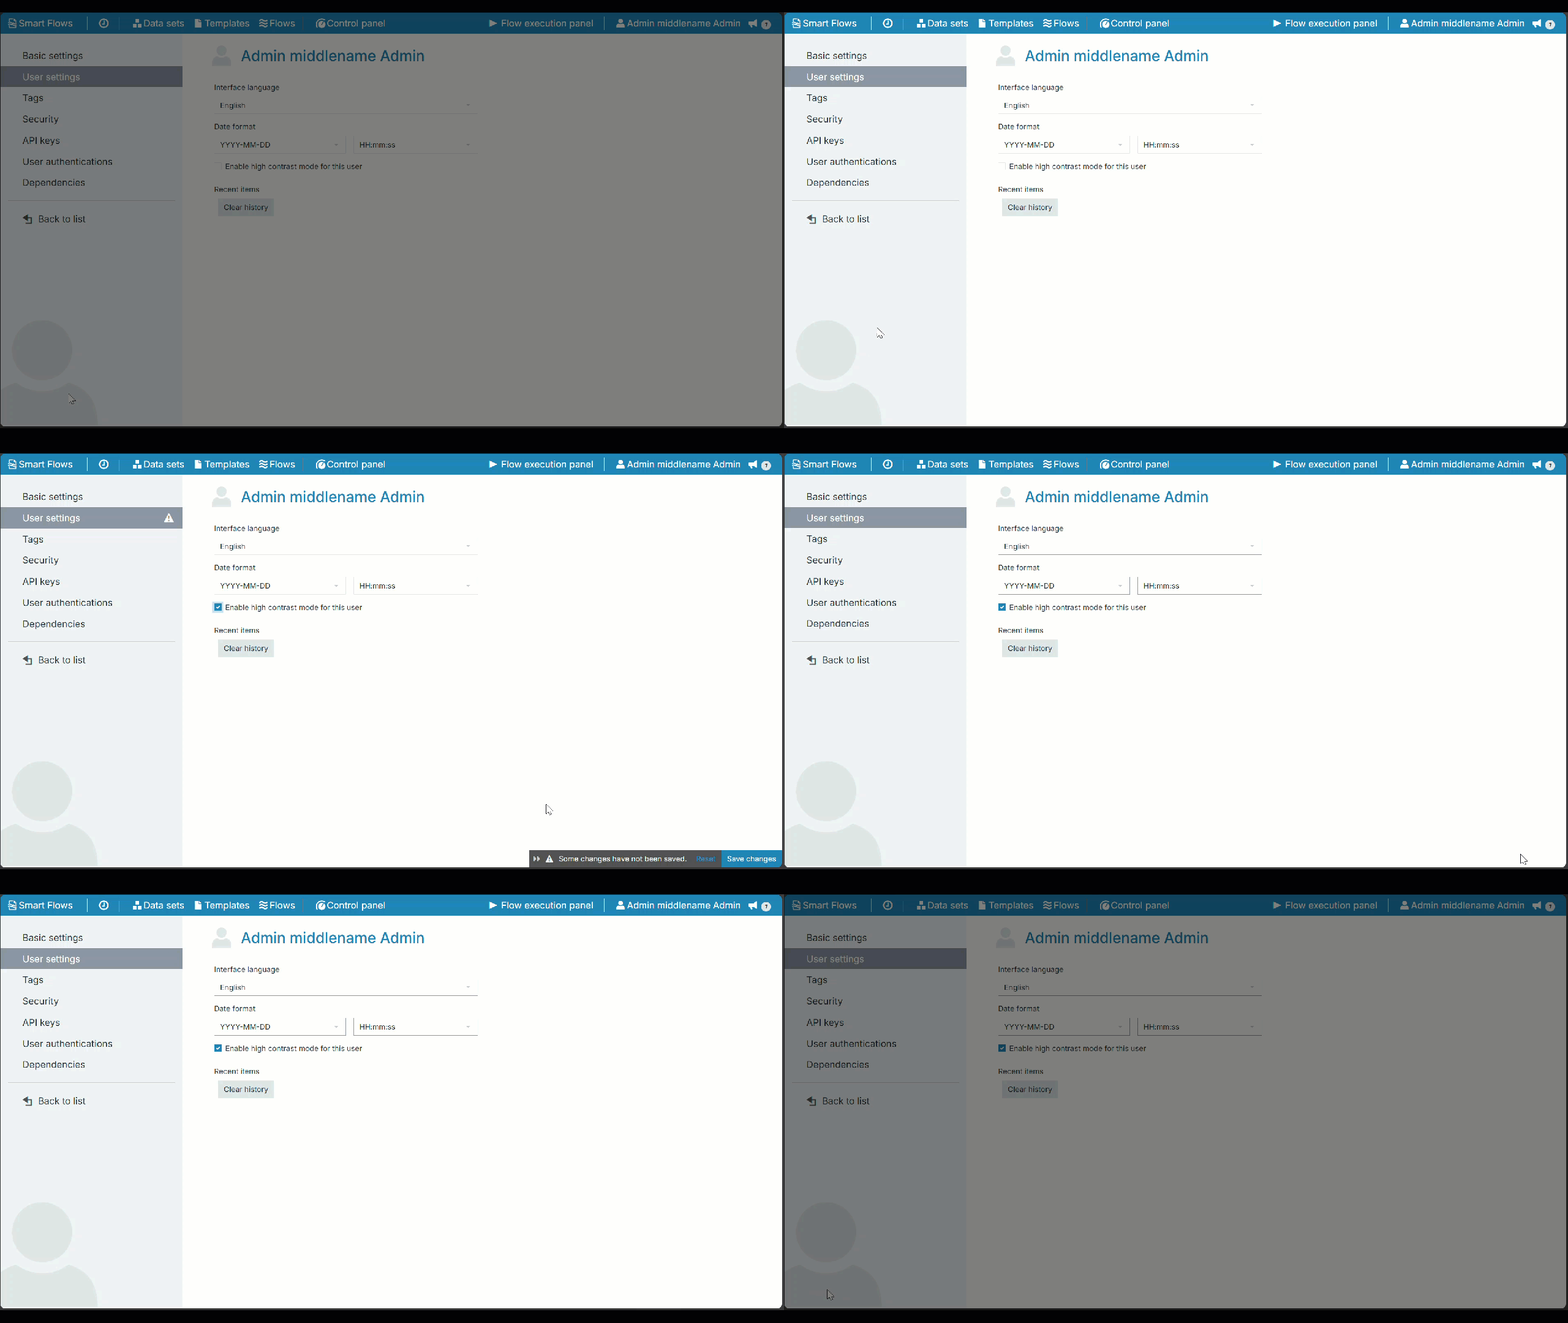
|
|
|
Recent Items |
Click 'Clear History' under the Recent Items section to clear the recent item history for the selected user. |
Please take note that the User Settings will override the settings at Project level.
Security tab
Use the Security tab to update a native user’s password and manage account status.
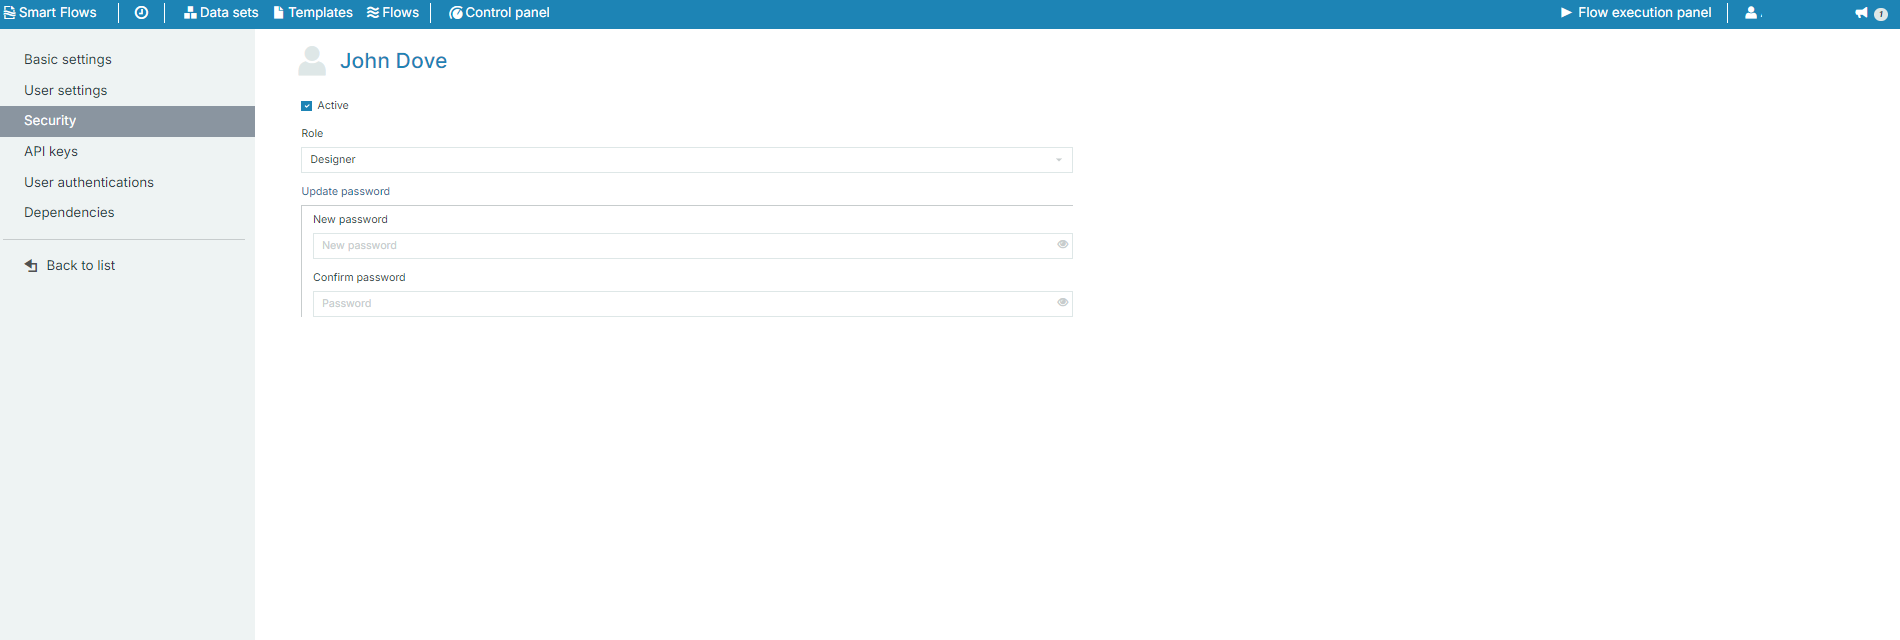
|
Setting |
Field Name |
Description |
|---|---|---|
|
Security |
Active |
Checkbox to enable or disable the user account. |
|
Role |
Displays the user’s assigned role (e.g., Designer, Admin, etc.). |
|
|
Update password |
Allows you to change the user's password. |
API keys tab
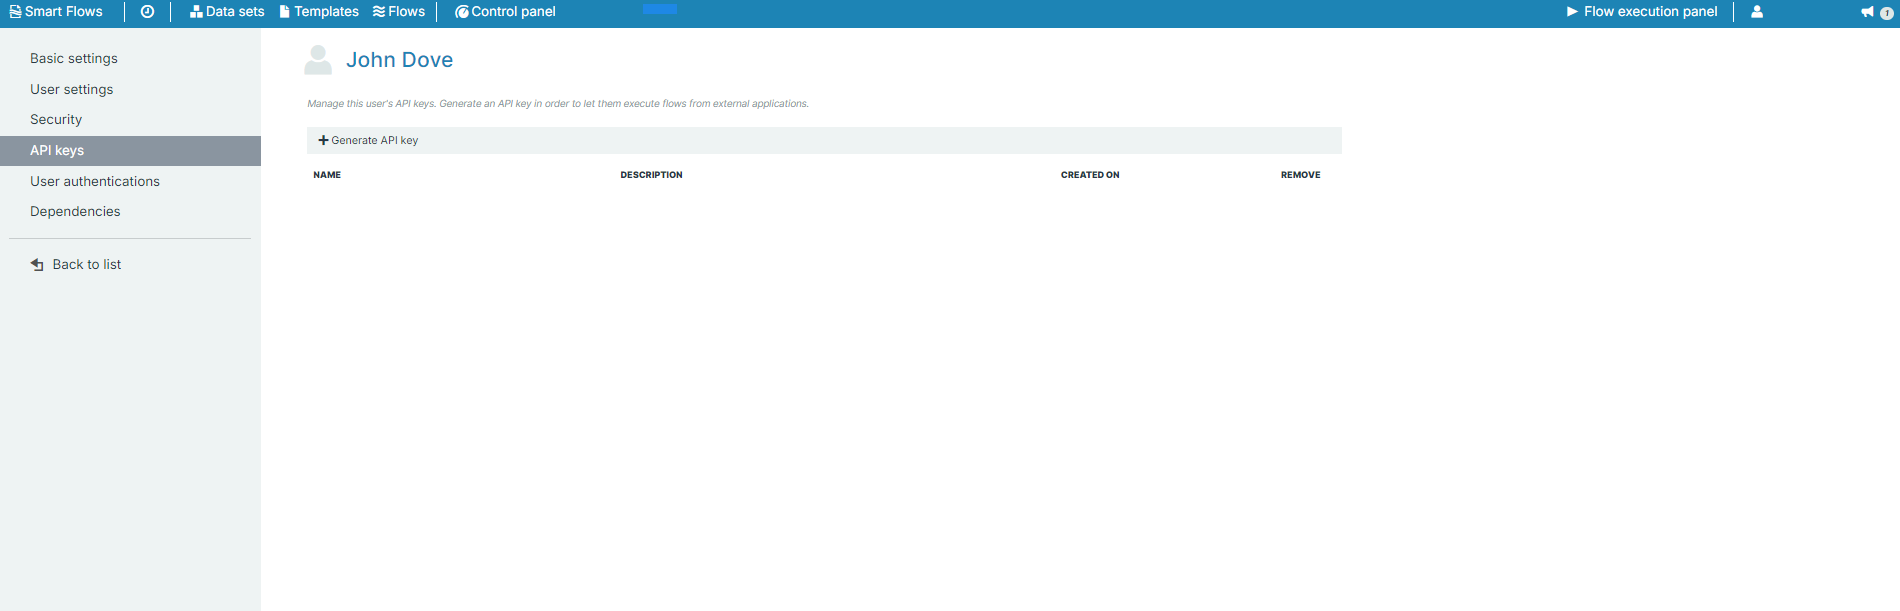
Administrators can use API keys to authenticate API access. See Using the API for more information.
|
Setting |
Field Name |
Description |
|---|---|---|
|
API Keys |
Generate API key |
Button to generate a new API key for external integrations. |
|
Name |
Name of the API key generated. |
|
|
Description |
Description of the API key. |
|
|
Created on |
Timestamp showing when the API key was generated. |
|
|
Remove |
Option to remove the API key. |
User authentications tab
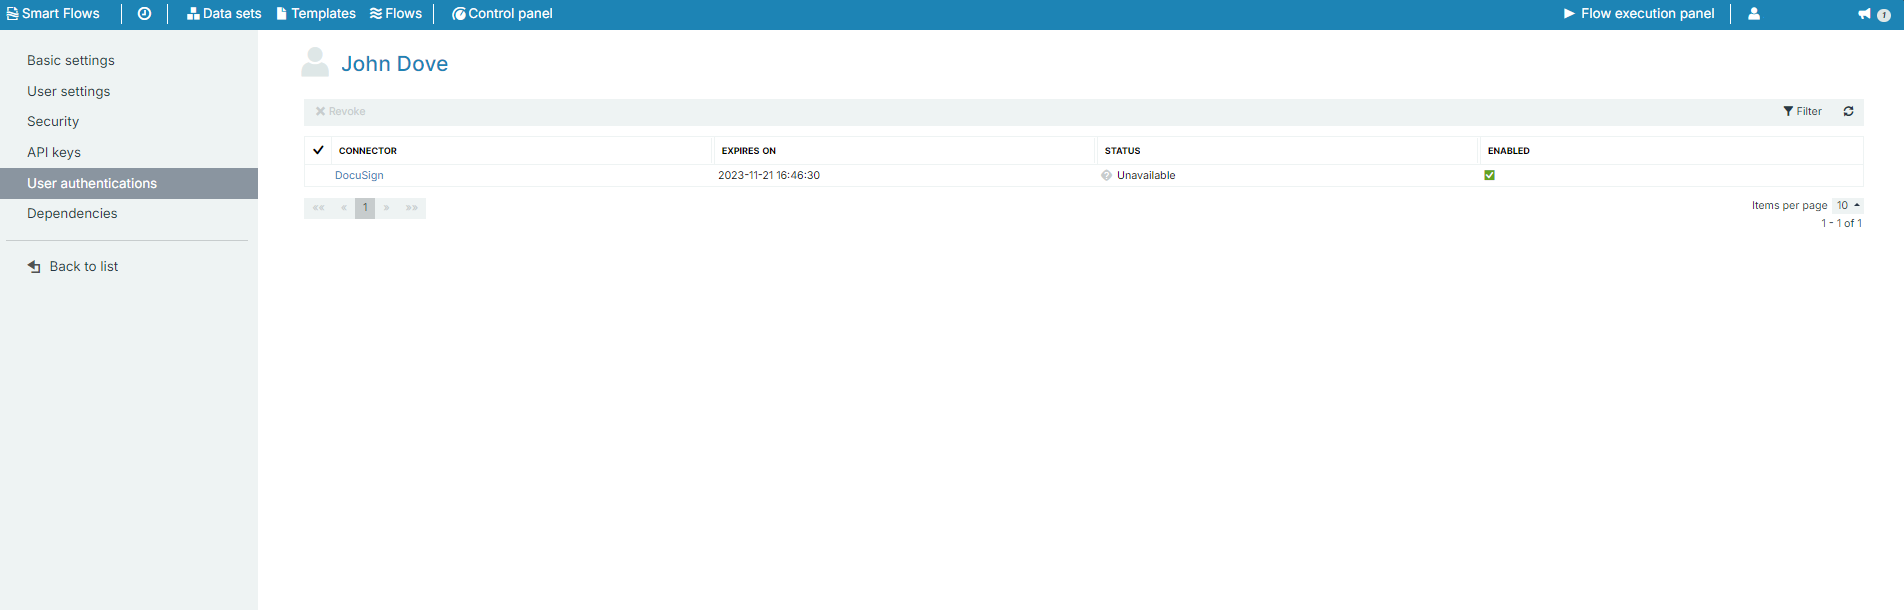
The User Authentications tab displays connectors through which the user is authenticated.
|
Setting |
Field Name |
Description |
|---|---|---|
|
User Authentications |
Connector |
Displays the connector used for user authentication (e.g., Docusign). |
|
Expires on |
The expiration date for the user authentication. |
|
|
Status |
Status of the authentication (e.g., Unavailable, Enabled), disconnected (tokens have expired - the user needs to log in again). |
|
|
Enabled |
Indicates if the authentication is currently enabled. |
Dependencies
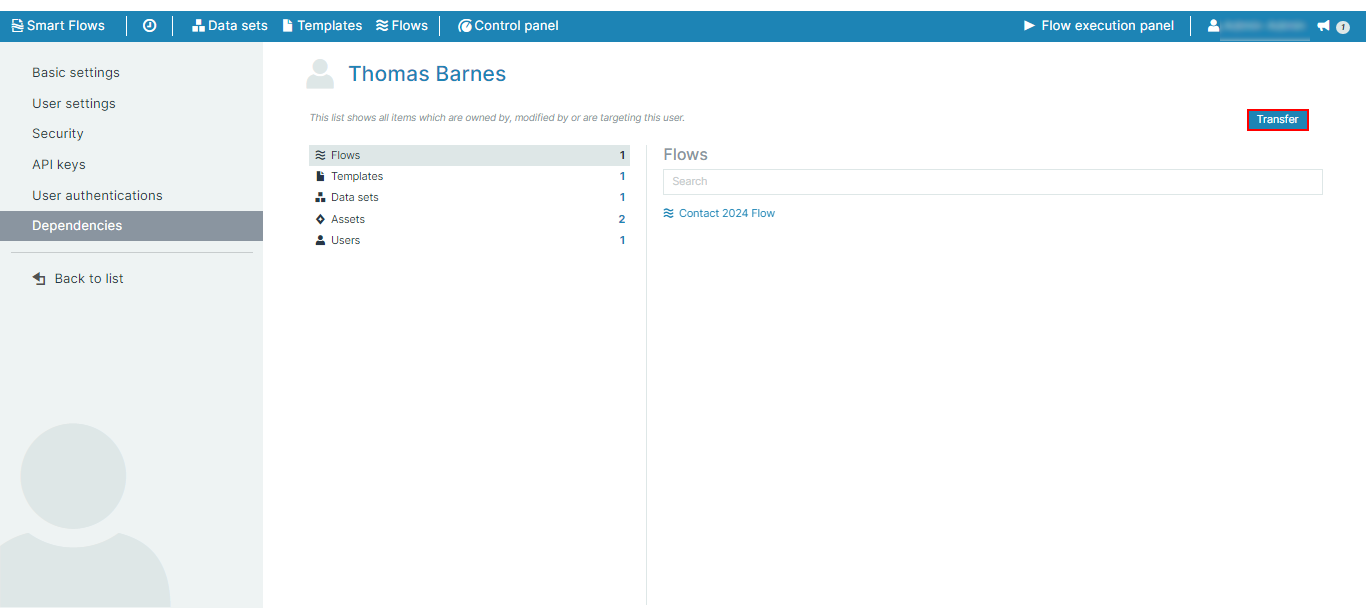
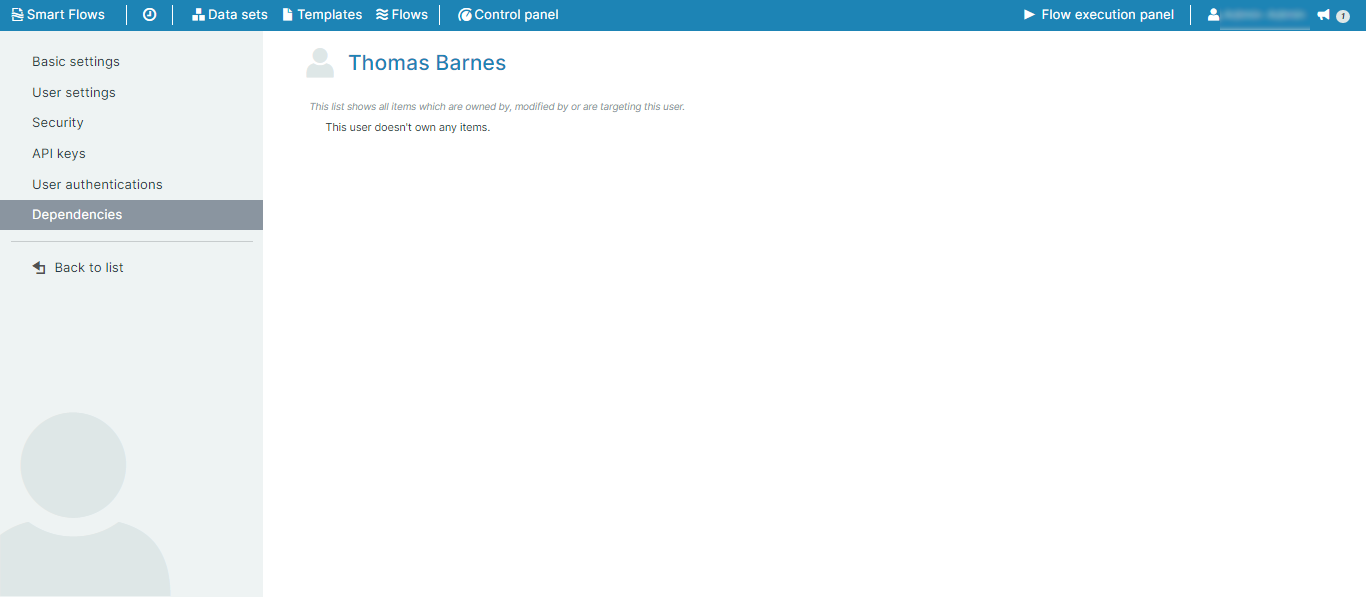
The Dependencies tab displays all dependencies between project items and a selected user. Dependencies can also be transferred to another user.
|
Setting |
Field Name |
Description |
|---|---|---|
|
Dependencies |
Flows |
Lists the flows owned by or assigned to the user. |
|
Templates |
Lists the templates associated with the user. |
|
|
Data sets |
Shows data sets owned or modified by the user. |
|
|
Flow executions |
Displays flow executions the user is involved in. |
|
|
Documents |
Lists documents the user has access to. |
|
|
Samples & data |
Displays samples and data connected to the user. |
Managing Azure Smart Flows User Permissions
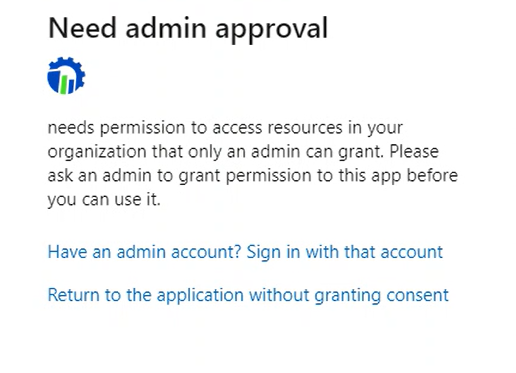
During the authentication of the Smart Flows Microsoft Dynamics 365 CE connector, Microsoft Azure will ask the IT administrator to configure the user consent settings for the app. Smart Flows will not function for non-admin users when creating a Microsoft Dynamics 365 CE connector if the system configuration does not allow application user consent.
A user must be a Global Administrator or a Cloud Application Administrator to consent to Smart Flows. The Need Admin approval dialog will continue to display until an admin account either directly consents or delegates consent.
Permissions Required for Smart Flows
For permissions configuration between your system and ours within Azure Active Directory, please see the image below. We require access to the Common Data Service and Windows Azure Active Directory.
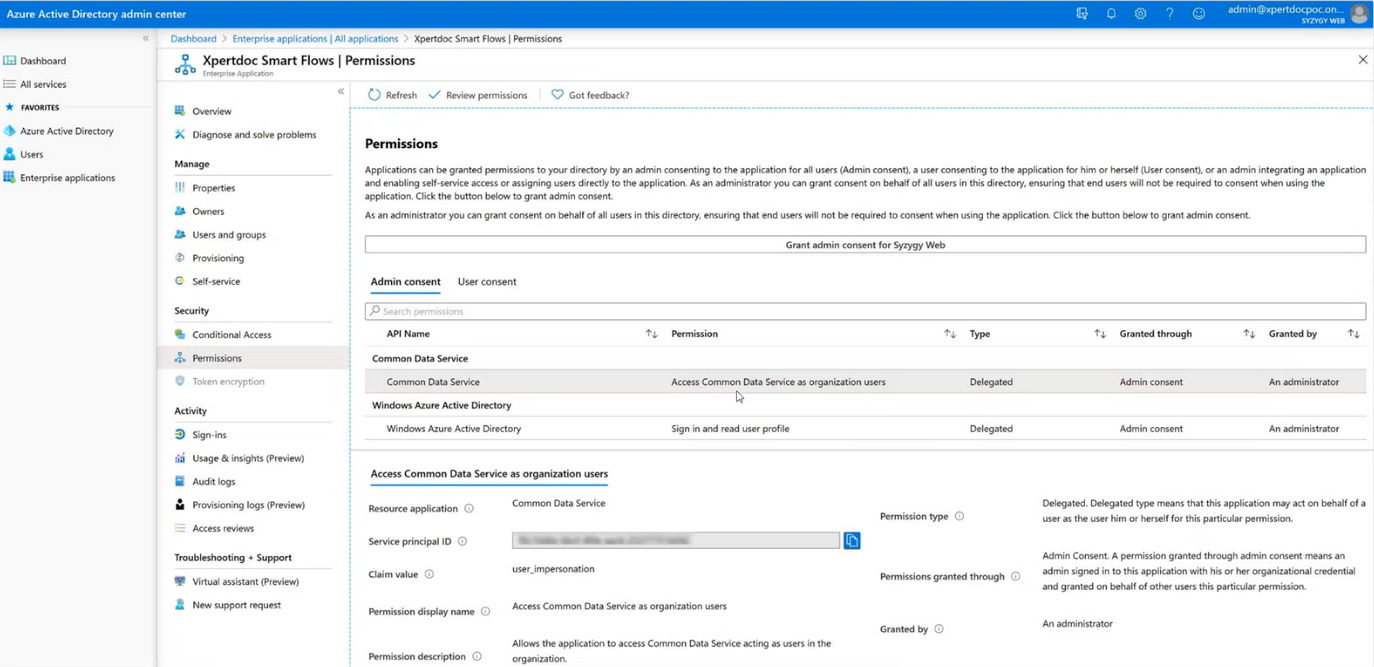
This permission consent is separate from the security roles assigned in Microsoft Dynamics 365 CE. IT Admins have several configuration options available to meet their organizational security requirements. In conjunction with Smart Flows, these approaches can interpreted as an intersection between effort and control.
Configure to Allow Delegation of Consent Based on Existing Groups
IT Administrators can delegate permissions for consent at the app level for Smart Flows. See Grant Admin consent for more information. For additional control, you can configure delegation consent to only allow delegation to users with a role in Smart Flows and Microsoft Dynamics 365 CE.
Create and Assign Smart Flows Consent to an Azure Group
Assigning consent permissions to a group allows organizations to tightly control what apps can access their Dynamics data and who can provide that consent.
-
In Microsoft Azure, navigate to Home/Enterprise applications/Xperdoc Smart Flows.
-
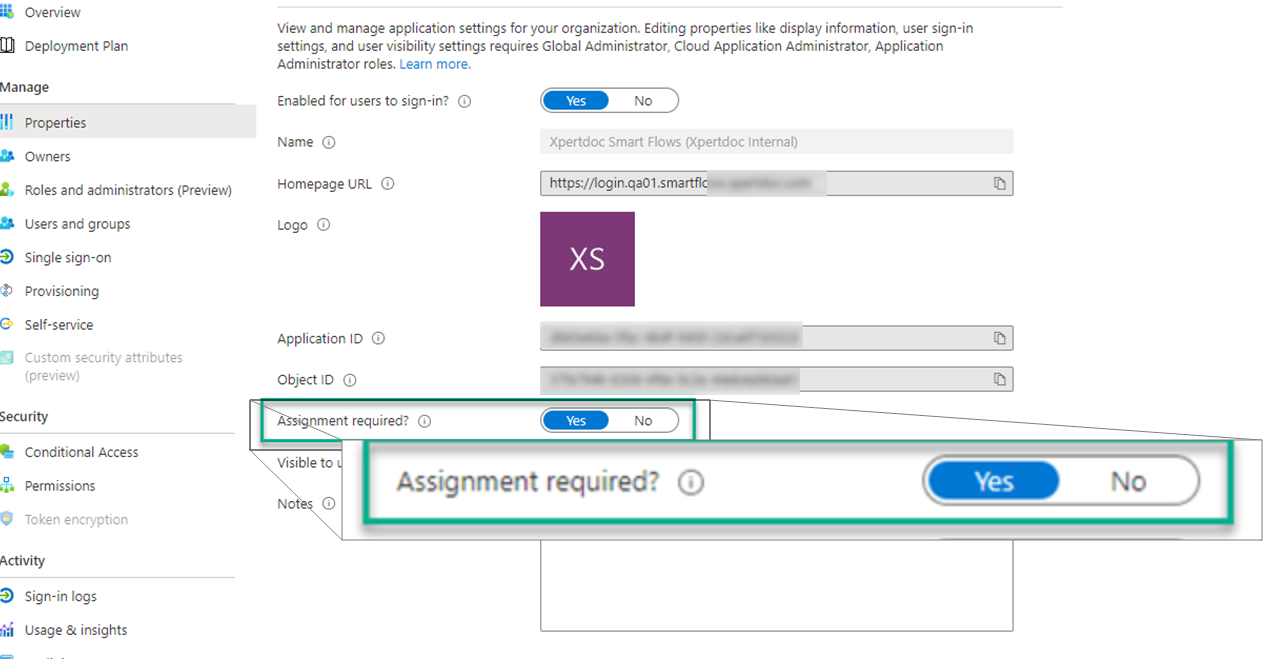
Set Assignment required to Yes.
-
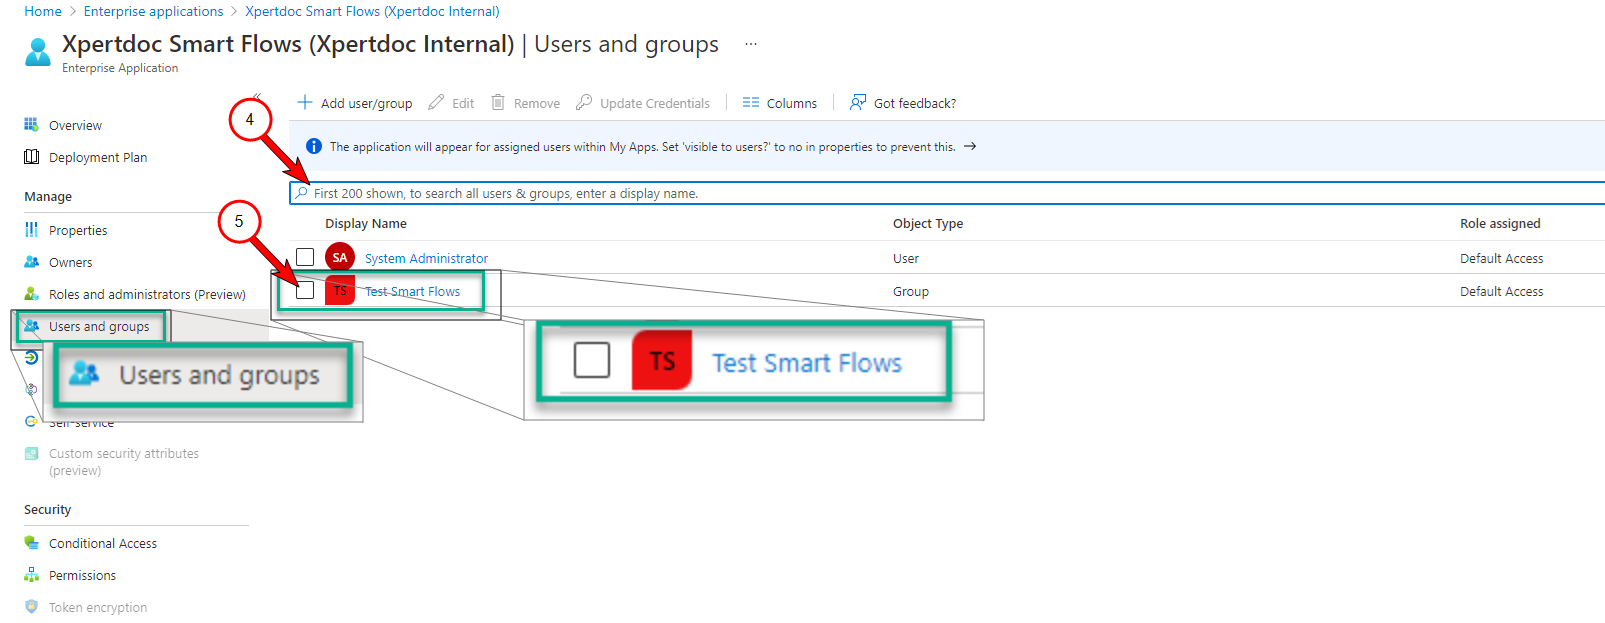
Create a group for Smart Flows users.
-
Search for and select the created group.
-
Assign that group the permissions to consent for the ExperlogixSmart Flows application.
Dependencies in Smart Flows
Dependencies represent the relationships between objects in Smart Flows. Each object may have outbound dependencies—other objects that are required for it to function—and inbound dependencies—other objects that rely on it. For example, a template might have a data set and a connector as outbound dependencies, while a flow that uses the template would be an inbound dependency.
Intersection of Optimizer and Dependencies Tabs
The Dependencies tab and the Data Set Optimizer tab in your data sets work together to provide a holistic view of your project's data structure. While the Dependencies tab displays the relationships between objects (both inbound and outbound), the Optimizer tab focuses on refining your data set by removing unused fields based on these dependencies. Optimizing your data set ensures that only the necessary fields those actively referenced by flows and templates are retained. For detailed procedures on optimizing data sets, see Data Set Optimizer Tab.
Procedures
This section details the procedures related to managing dependencies within Smart Flows.
Transferring User Dependencies
A single user may have many dependencies. If such a user leaves the company, their dependencies are lost. In order for these dependencies to stay in the company, you can transfer dependencies from one user to another user.
You must be at same or higher role than the user who's dependencies you are transferring or moving.
-
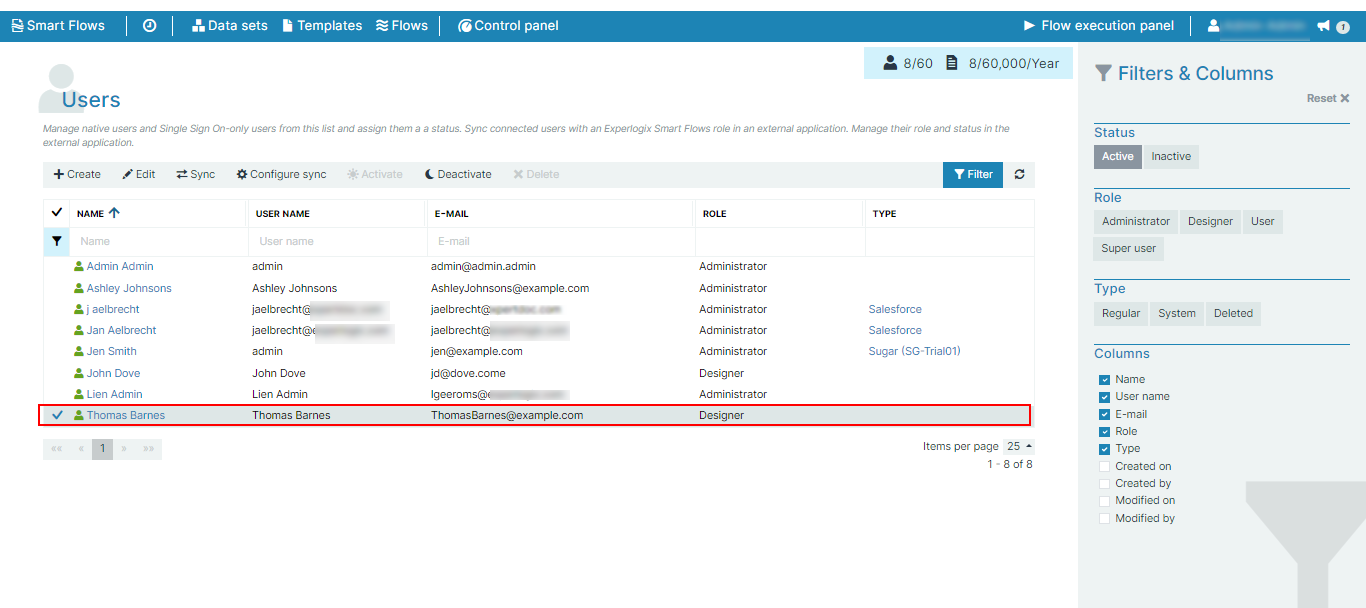
In the Project Console, select Control panel > Users.
-
In the Users page, select a user.
-
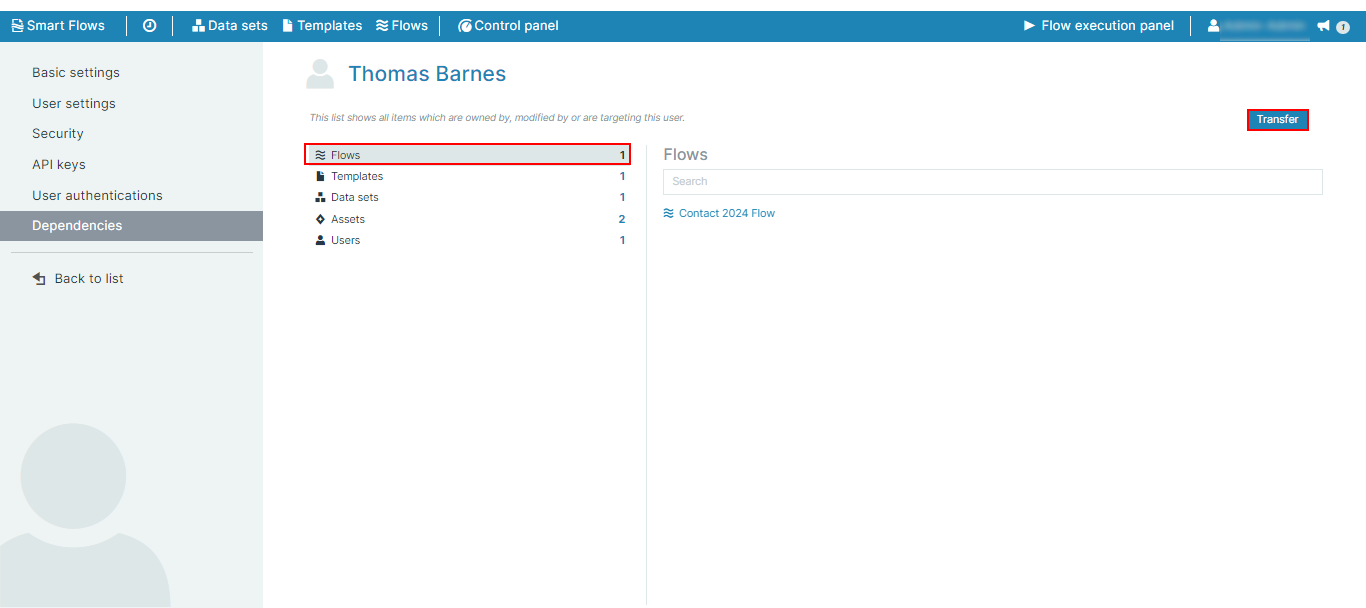
On the left-hand navigation, select Dependencies.
The list of the user's dependencies is shown.
-
To transfer all dependencies to another user, select Transfer.
-
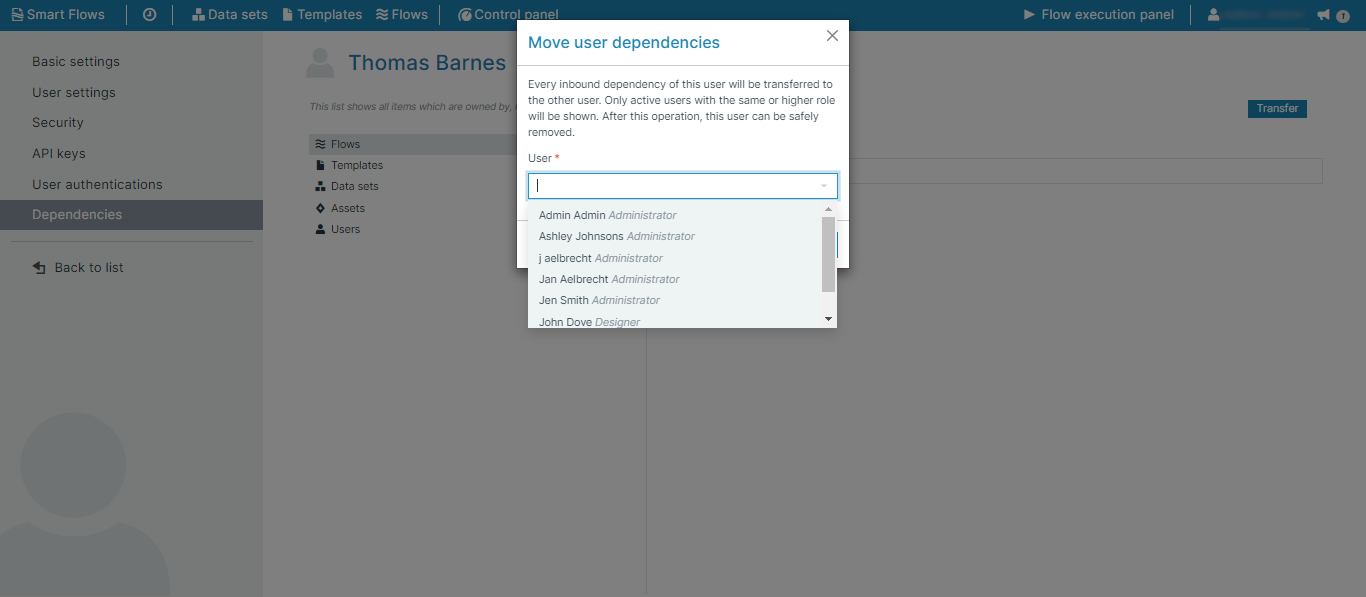
From the Move user dependencies dialog, select a user to transfer the dependencies.
-
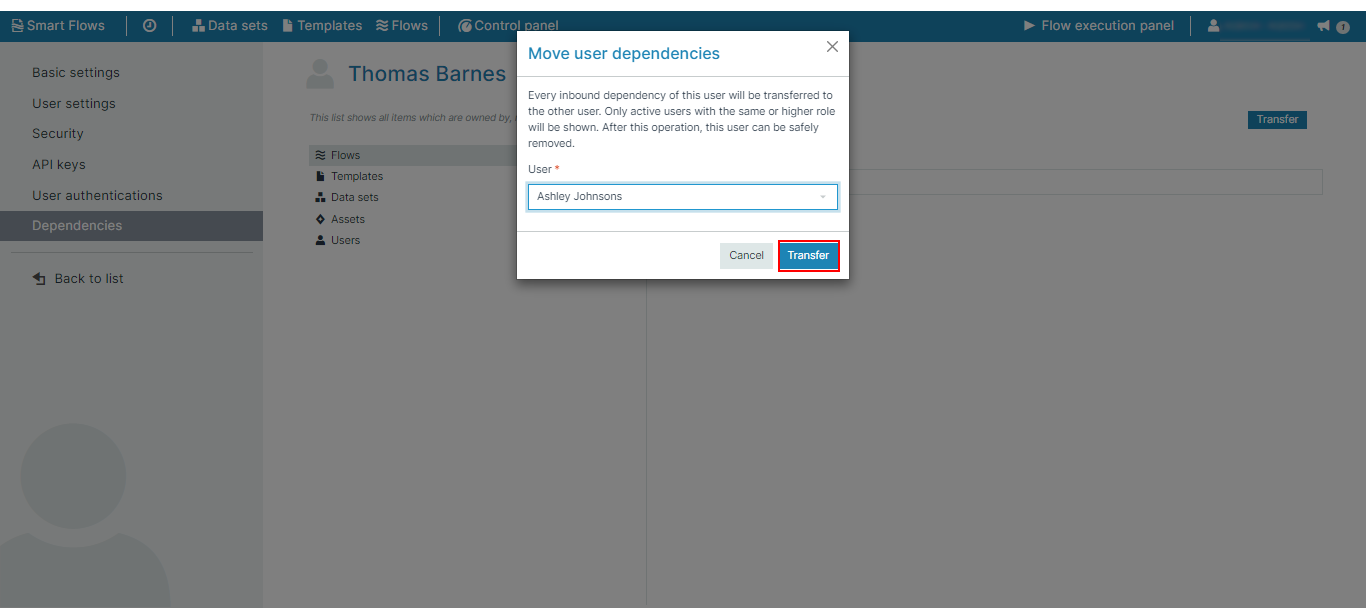
Select Transfer.
-
From the Relink inbound dependencies dialog, select Confirm.
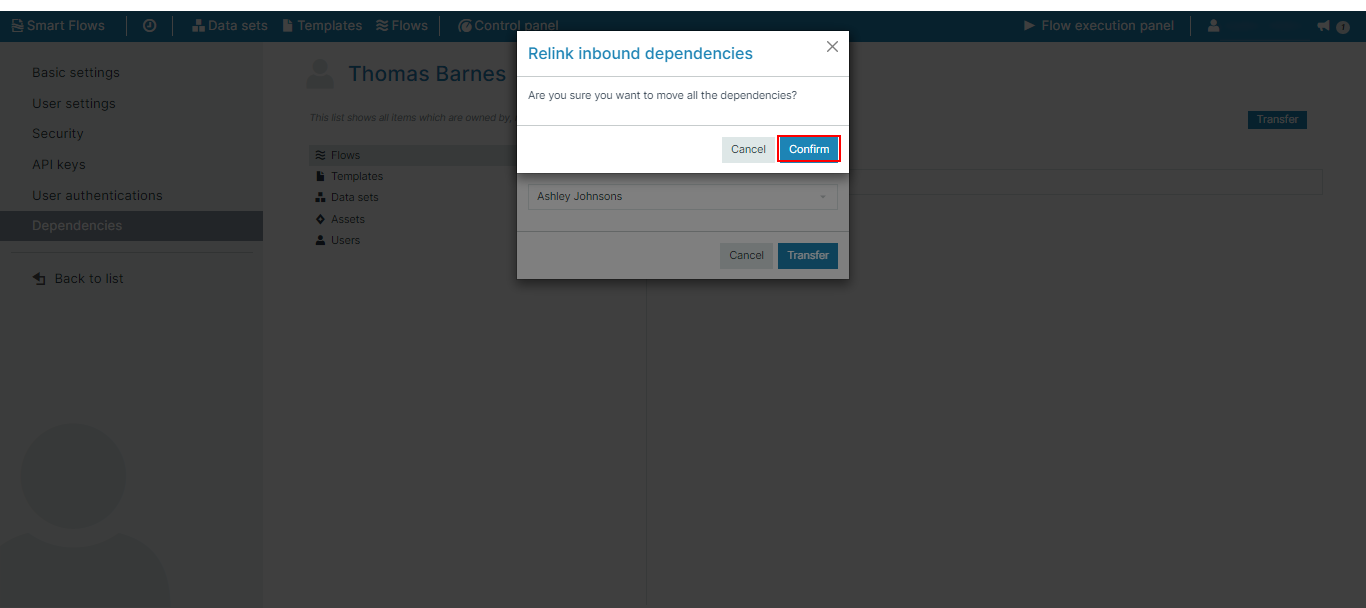
All the dependencies have been transferred out to the new user. No dependencies are left with the user.
Optimizing your Data Set
Data set optimization involves letting Smart Flows analyze and remove any unused fields in your project. Removing these unused fields results in faster project performance by eliminating unnecessary content during data retrieval for previews and during flow execution if the field reducer is disabled.
You can see the improvement in your project performance before and after optimization by reviewing your analytics data on the Advanced tab.
Open the Data set Optimizer tab
-
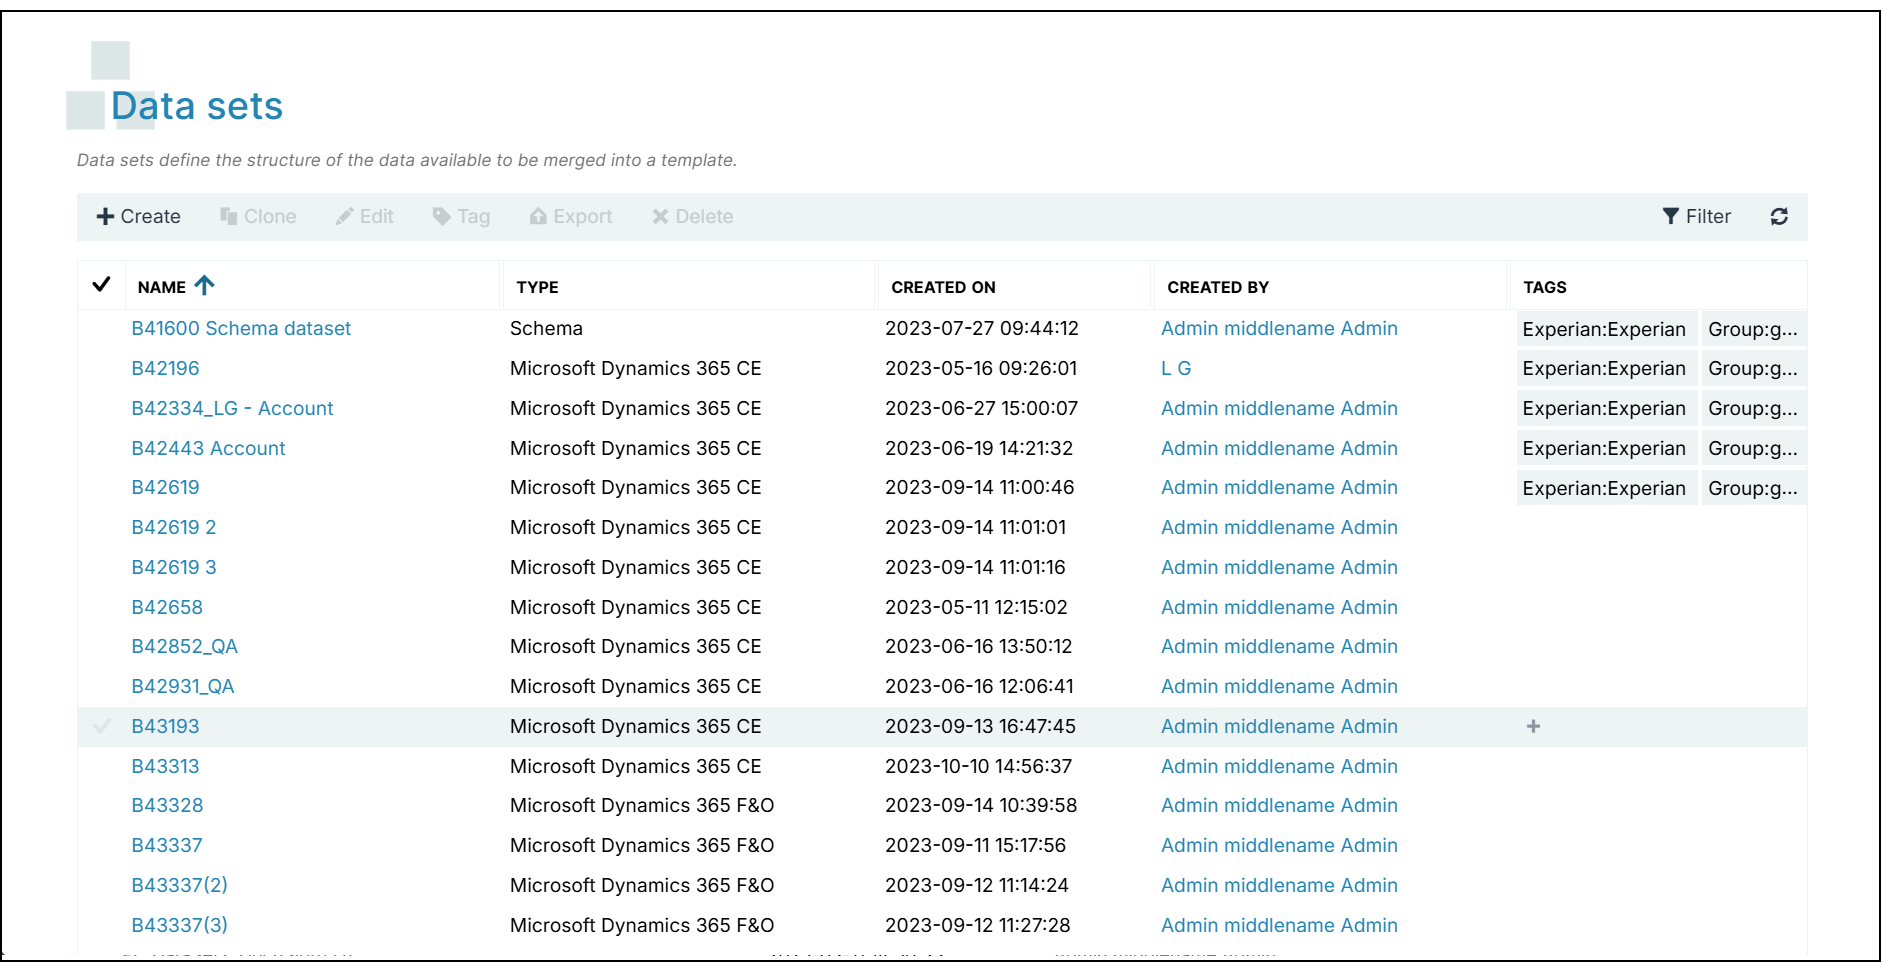
Log in to your Project Console and select Data sets.
-
In the Data set List view, select a data set.
The Data Set Builder displays.
-
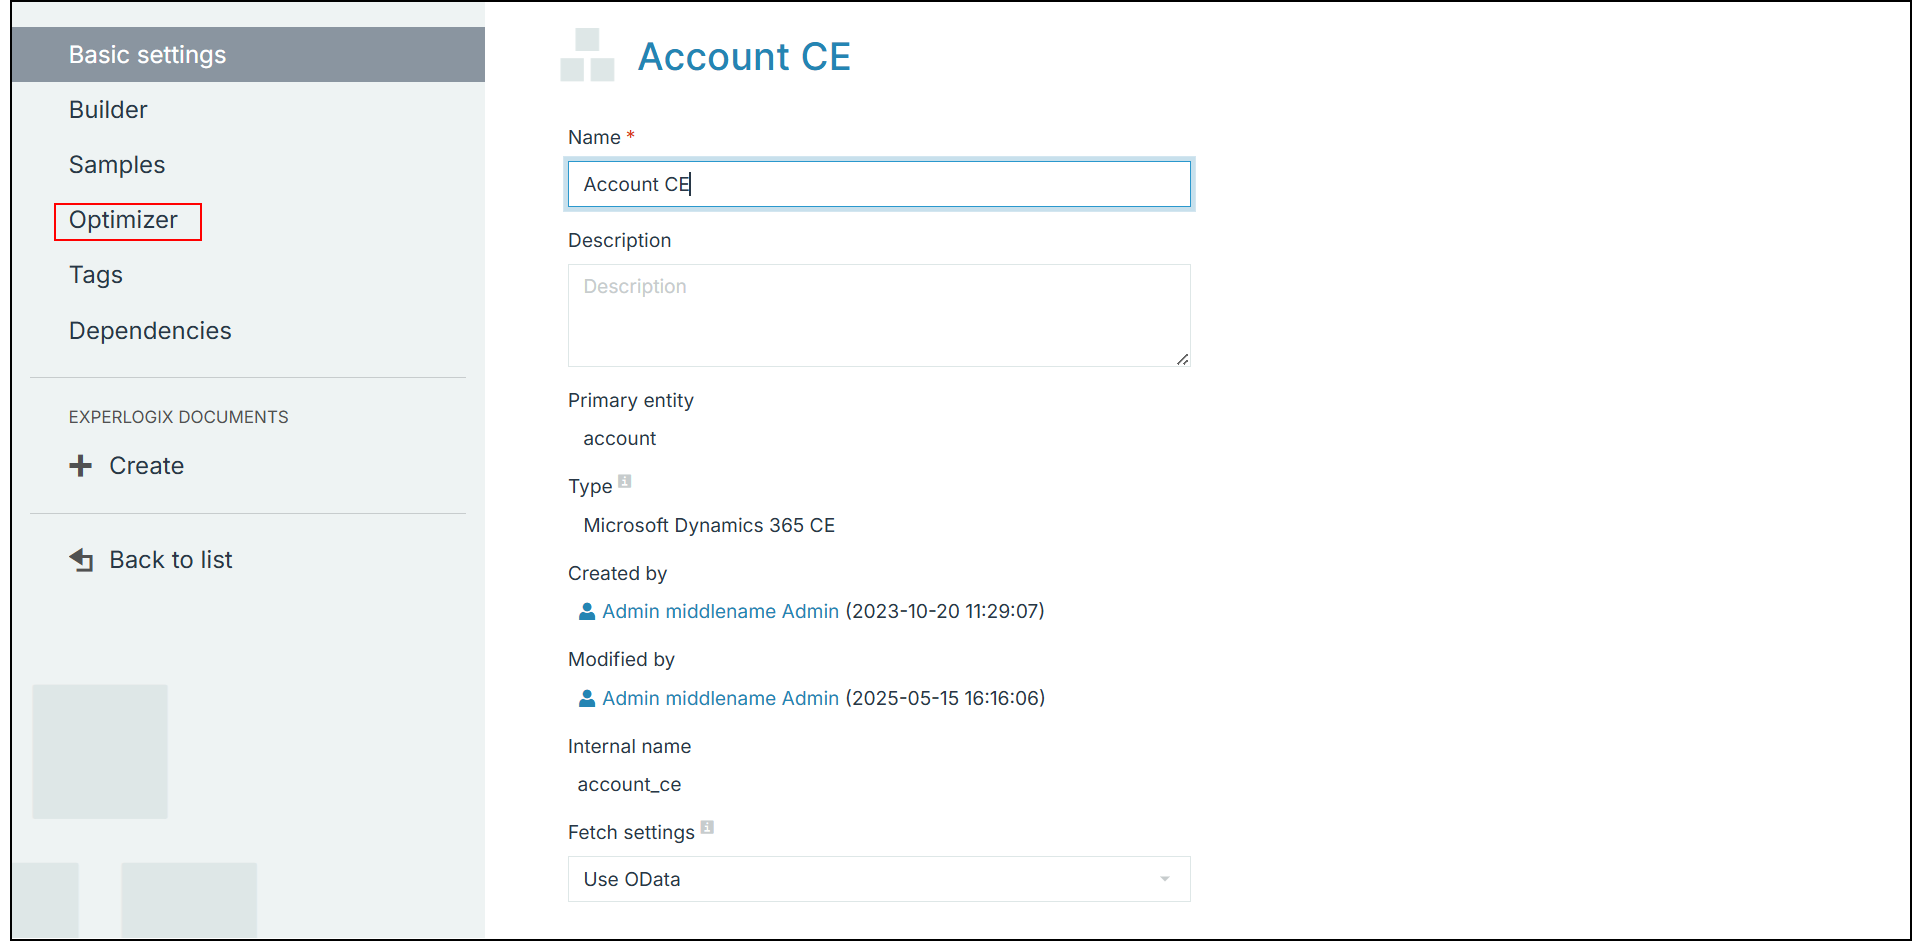
Select the Optimizer tab.
Analyze data set dependencies
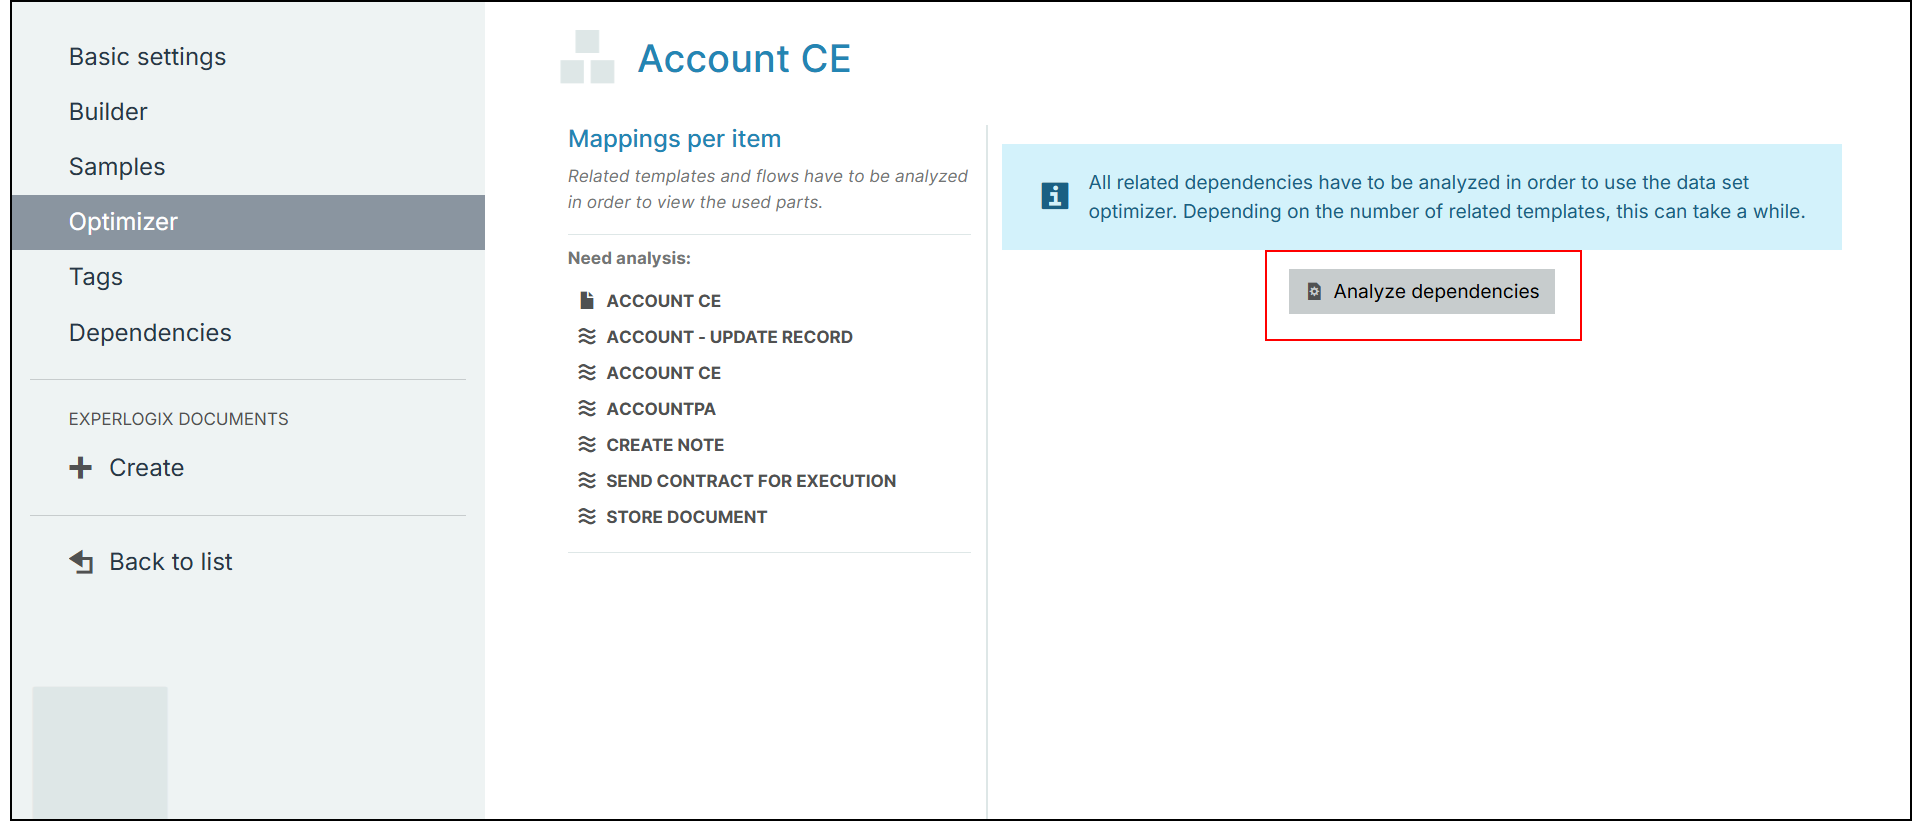
Before optimizing your data set, you must analyze the dependencies to identify the unused fields.
-
Select Analyze dependencies.
The page refreshes with the results of the analysis.
Complete Optimize data set modal
Now that you have analyzed the data sets, you can use the Optimize data set modal to remove some or all unused fields.
-
Select the Optimize data set > Optimize.
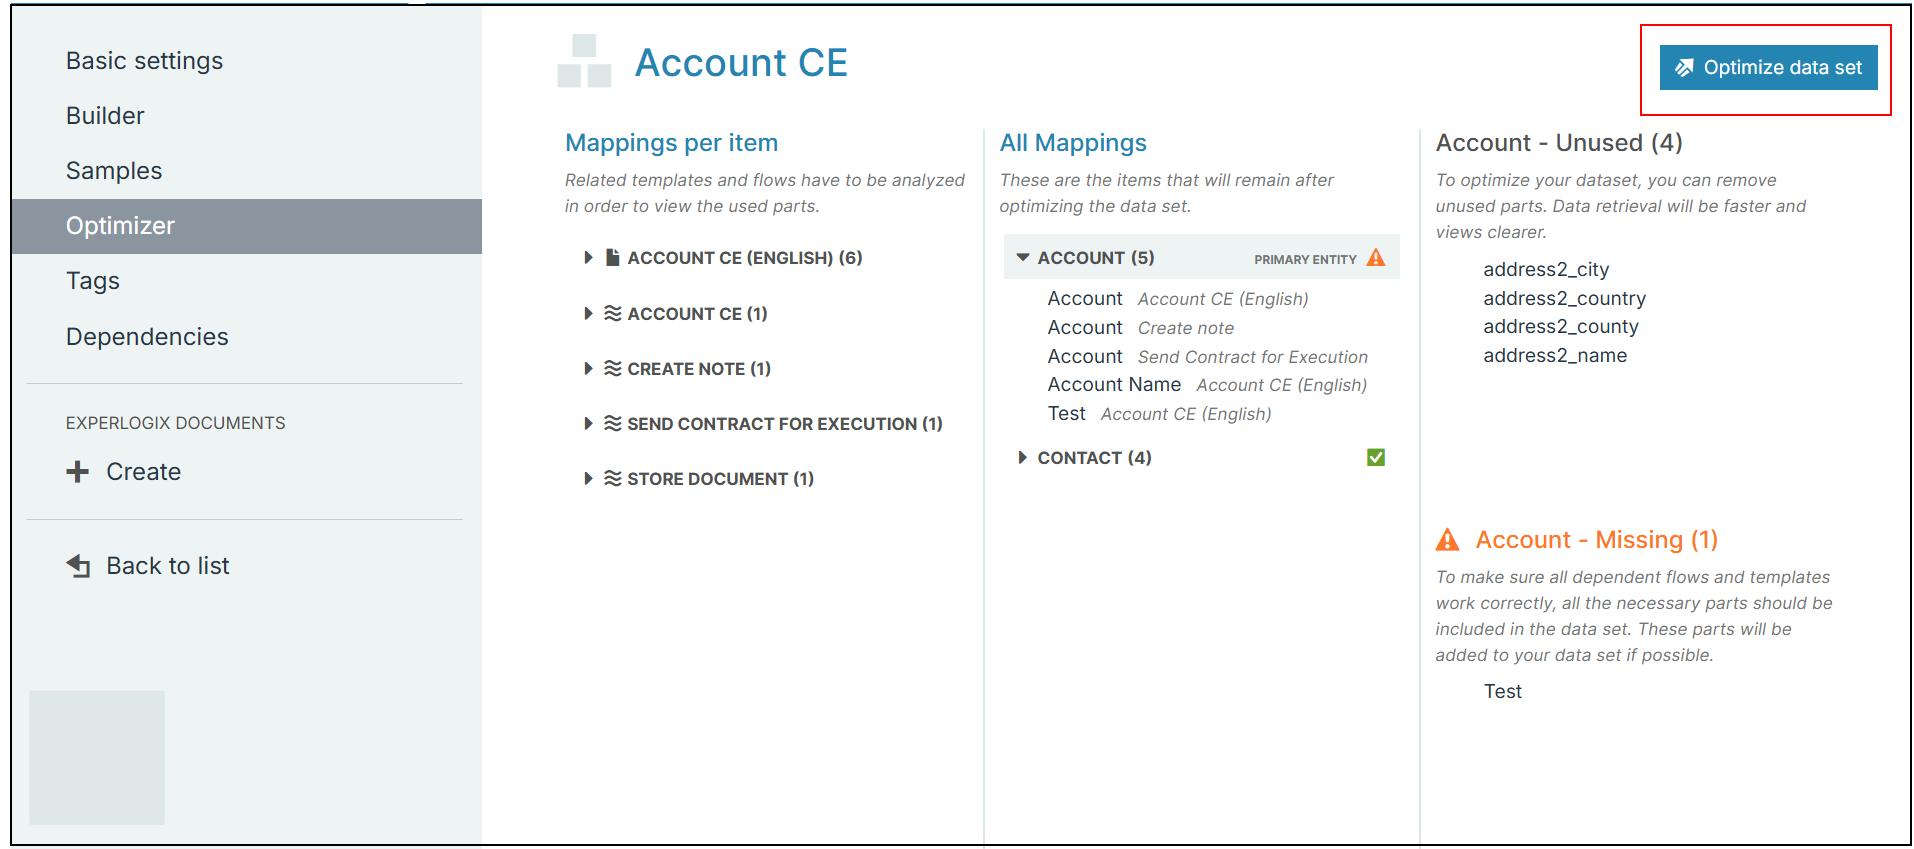
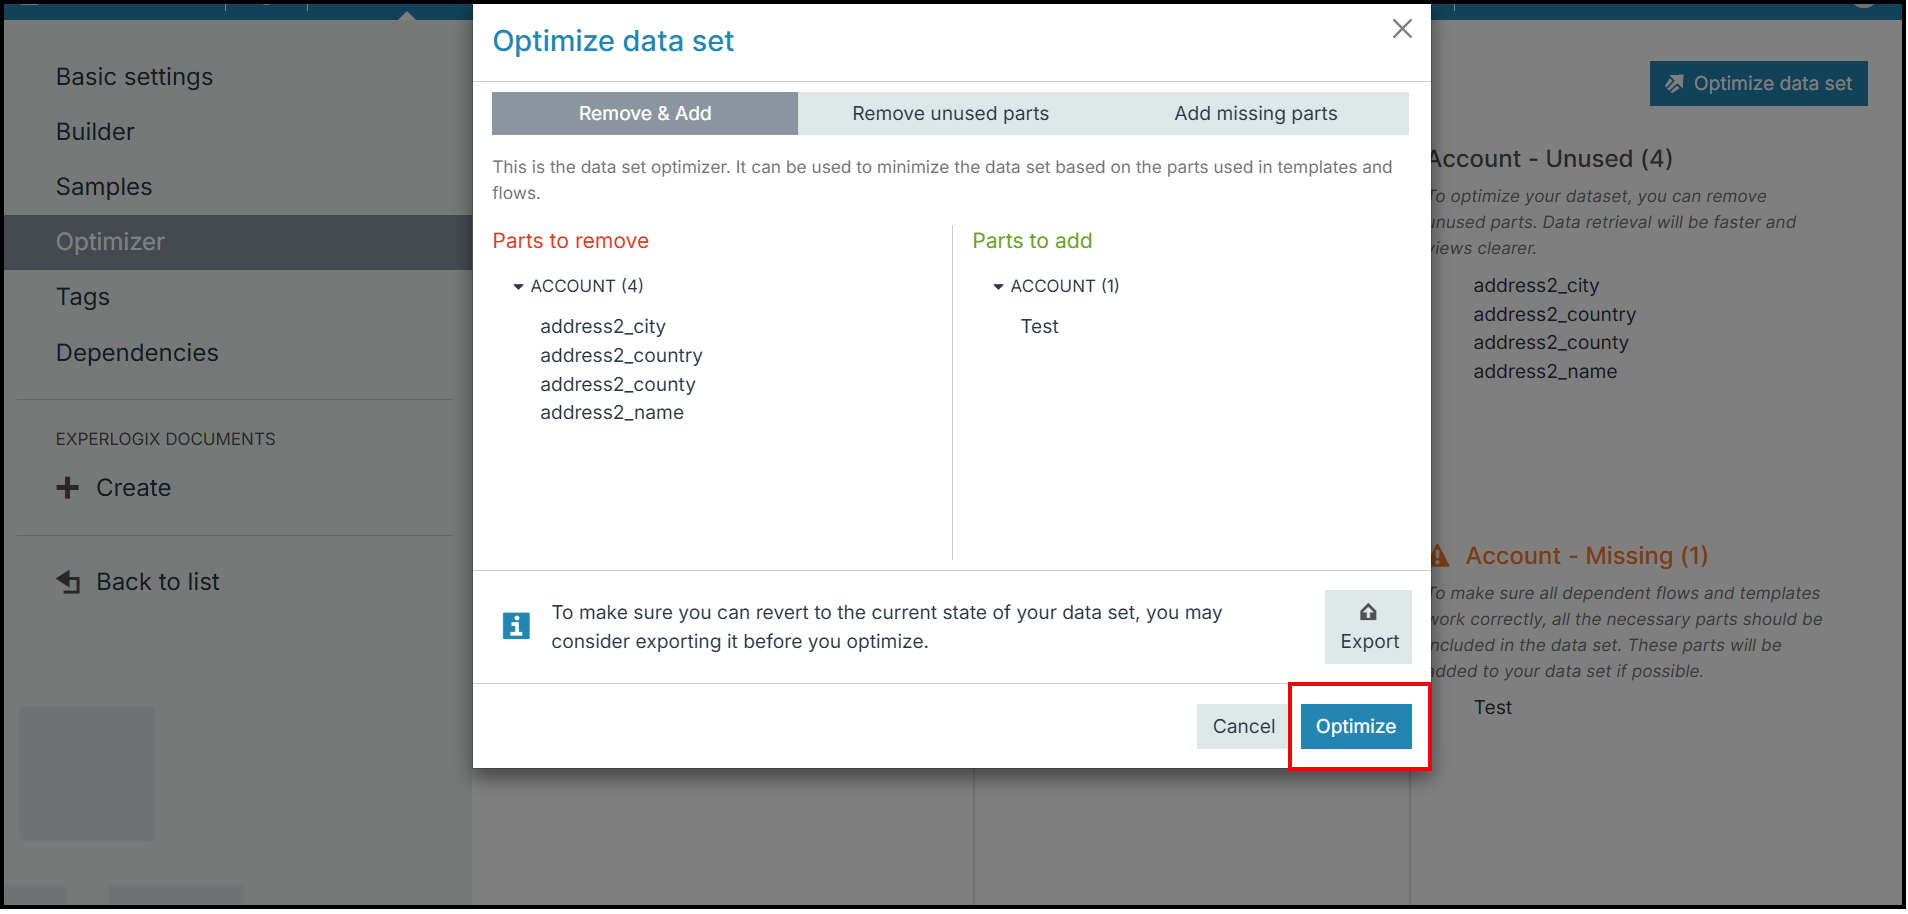
The page refreshes, and the Mapping- Unused(#) section no longer displays. The check mark next to PRIMARY ENTITY displays green. Your data set is now optimized.