
In some cases, Smart Flows doesn't trust an external resource due to an invalid, self-signed, and expired web certificate. Network calls done by the Smart Flows server to such a domain will fail. Use the Certificates tab to add certificates that Smart Flows should trust.
The Certificates tab displays a list of trusted certificates. In the List view, you can add, Test, View, Download, or Delete a сertificate in Smart Flows.
Testing a Certificate
Test a URL to check whether Smart Flows trusts it. If it does not, you can import the certificate of the site directly from the test result.
-
On the Certificates tab, select Test. The Test a certificate by url dialog is displayed.
-
Enter the URL of the site you want to test.
-
Select Test.
If Smart Flows trusts the URL, the message "The url is trusted" is displayed.
If Smart Flows does not trust the URL, an error and the List of certificates of the site are displayed. For each certificate, you can:
-
Select Import to add the certificate to the list of trusted certificates.
-
Select Download to save the certificate as a file.
Adding a Certificate
-
In Project Console, select the Control panel > Settings.
-
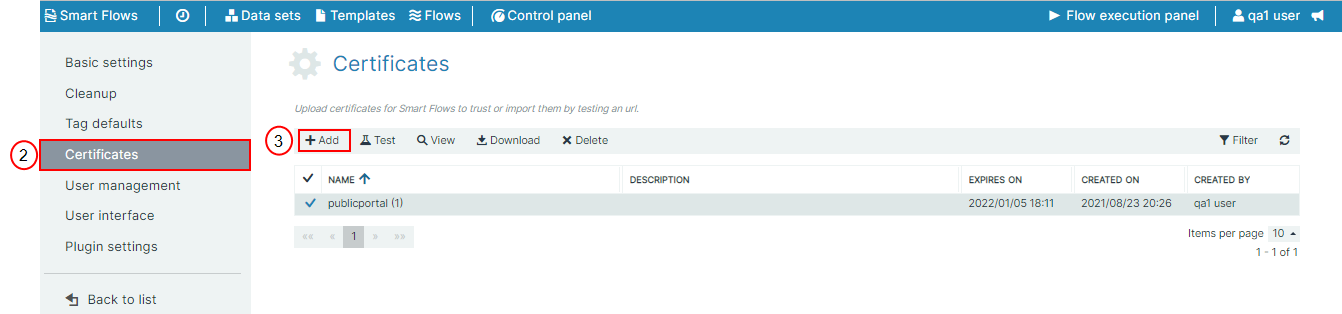
In the left-hand navigation, select Certificates.
-
Select +Add.
-
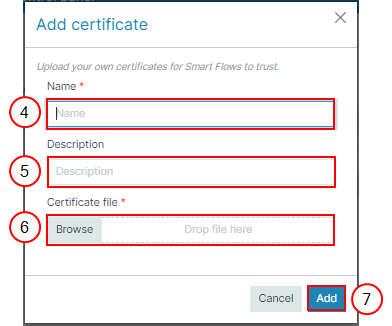
In the Name field, enter the name for the certificate.
-
(Optional) In the Description field, enter the description for the certificates.
-
In the Certificate file field, browse for the certificate file.
The Smart Flows supports .cer, .crt, .pem. files for certification.
-
Select Add.
Trusting a CRM Certificate
If a connector cannot connect to your CRM because Smart Flows does not trust its certificate, test the CRM URL as described in Testing a Certificate and select Import next to the certificate.
If you cannot import the certificate this way, export it from your browser and add it manually:
-
In your browser, open the CRM URL and select the icon on the left of the address bar to view the site information.
-
Select Connection is secure.
-
Select Show certificate to view the certificate.
-
Select Details.
-
Select Copy to File. The Certificate Export Wizard is displayed.
-
Select Next.
-
In the Export File Format window, select Base-64 encoded X.509 (.CER) and select Next.
-
Use Browse to specify the File name and select Next to complete the wizard.
-
When "The export was successful" message is displayed, select OK.
-
Add the exported file as described in Adding a Certificate.