
Overview
Templates in Experlogix Smart Flows use dynamic data to populate documents automatically. To handle varying business scenarios, designers can make parts of a template conditional so that sections, values, or formatting appear only when specific data criteria are met.
Conditional rules evaluate dataset fields, occurrence checks, or custom expressions during document generation. Depending on the result, Smart Flows dynamically includes or hides content, substitutes values, or applies distinct formatting styles.
Types of Conditional Content
Smart Flows supports three ways to apply conditions in a template using the Template Builder add-in:
|
Type |
Description |
Best used for |
|---|---|---|
|
A designated zone in the document that renders only if its associated condition is true. |
Showing or hiding entire pages, paragraphs, tables, images, or headers and footers. |
|
|
A field mapping whose output value depends on an ordered list of value-condition pairs. |
Dynamically changing text outputs based on field values (for example, displaying "Mr", "Ms", or "Dear Customer" based on gender or salutation fields). |
|
|
A set of formatting rules applied to a mapping based on specific conditions. |
Highlighted text, color changes (such as displaying negative balances in red), or changing format types dynamically. |
Condition Boxes
A Condition Box wraps a selected region of a Word document inside a conditional container. When Smart Flows generates the document, it evaluates the condition:
-
True: The content inside the box is included in the output document.
-
False: The content inside the box and its surrounding space are completely omitted.
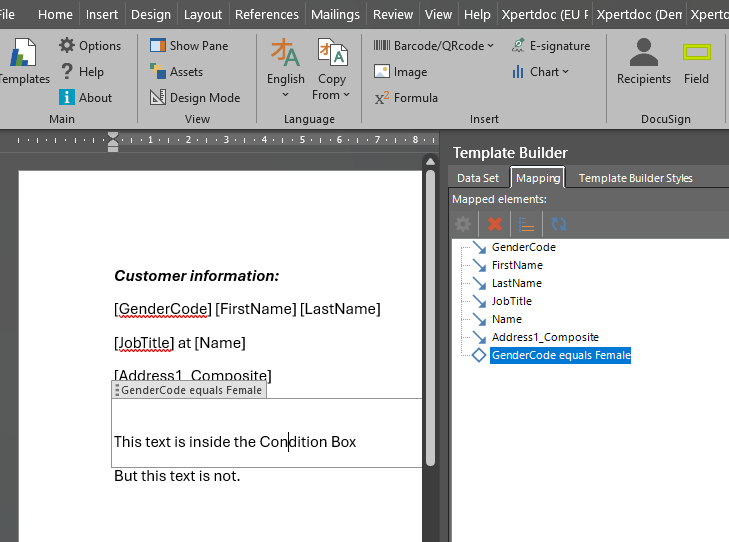
Condition boxes can contain any standard Word content, including paragraphs, tables, inline images, text boxes, and breaks.
Inserting a Condition Box
To add a condition box in the Template Builder:
-
Open your template in Microsoft Word with the Template Builder pane active.
-
Select the content in your document that should be conditional.
-
In the Template Builder pane, navigate to the Data set tab.
-
Select the target field and select Condition.
By default, Smart Flows creates a condition that checks whether the selected field occurs. -
In the Condition Builder window, define the comparison rule (see Defining Conditions).
-
Click OK to apply the condition.
The selected content is now enclosed in a condition box in the Word template, and the rule appears in the Mapping tab of the Template Builder pane.
Example: Displaying Targeted Welcome Blocks Based on JobTitle
Example: Displaying Targeted Welcome Blocks Based on JobTitle
Suppose you want to send tailored location details depending on the recipient’s job title:
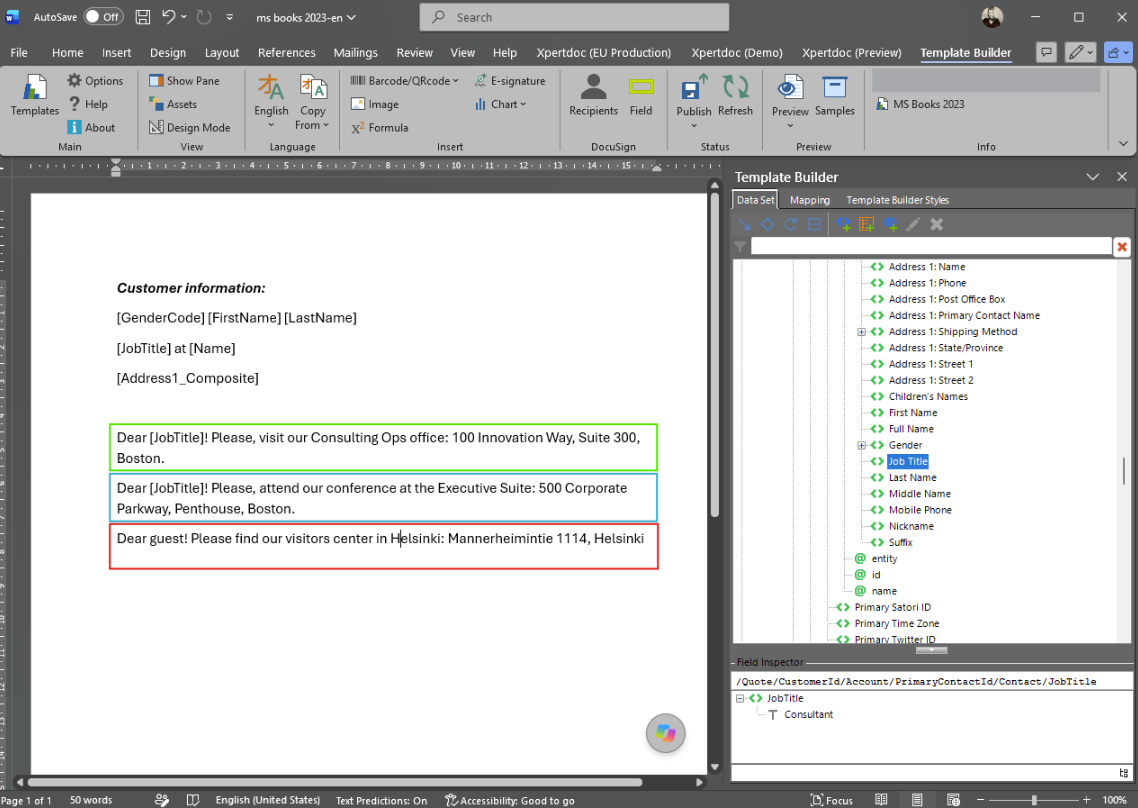
Step 1: Create the First Condition Box (Consultant)
-
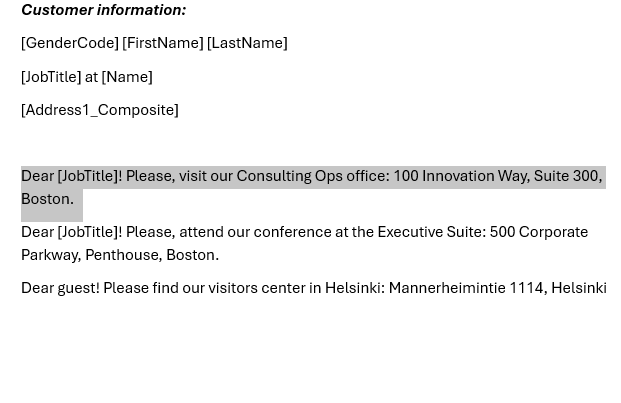
In your Word template, highlight the JobTitle mapping and the address for Consultants:
-
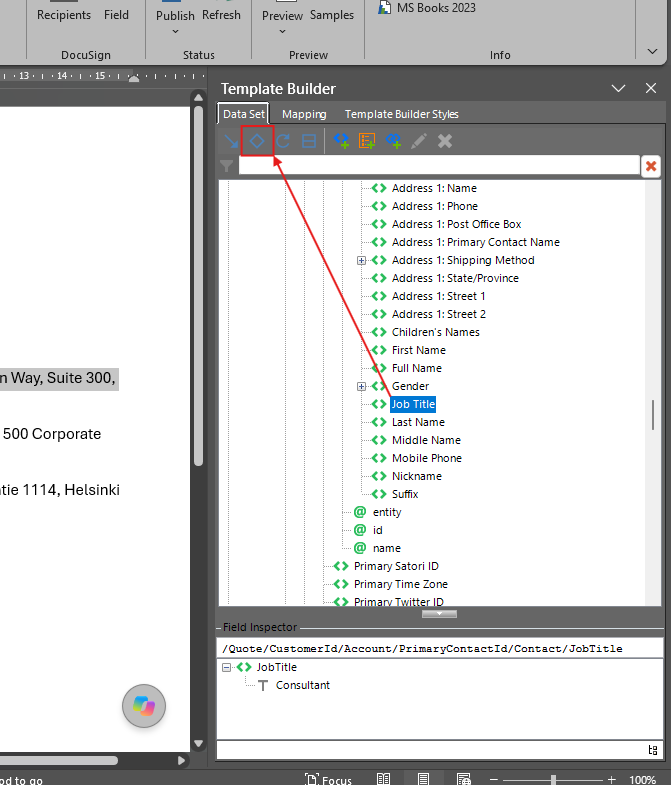
In the Template Builder pane, go to the Data set tab, select JobTitle, and select Condition.
-
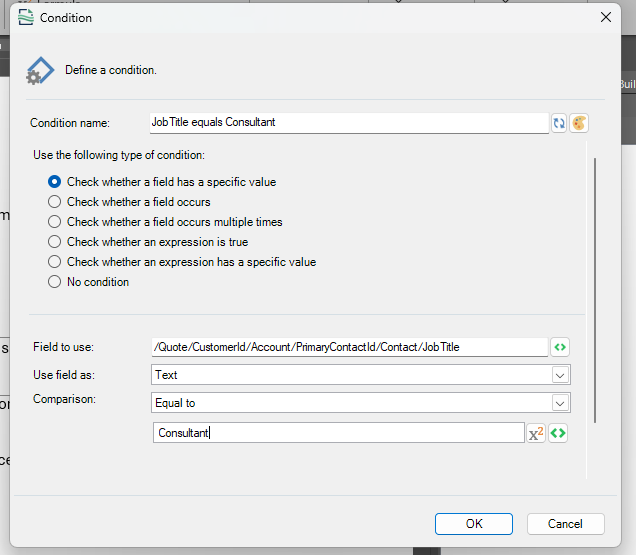
In the Condition Builder window, configure the rule:
-
Condition type: Select Check whether a field has a specific value.
-
Field: Select JobTitle.
-
Type: Select Text.
-
Comparison: Select equal to.
-
Value: Type
Consultant.
-
Select OK.
Step 2: Create the Second Condition Box (CEO)
-
Highlight the JobTitle mapping and the address of the executive center (see screenshots in the Step 1 for more details):
Dear [JobTitle]! Please, attend our conference at the Executive Suite: 500 Corporate Parkway, Penthouse, Boston. -
In the Template Builder pane, select JobTitle and select Condition.
-
In the Condition Builder window, configure the rule:
-
Condition type: Select Check whether a field has a specific value.
-
Field: Select JobTitle.
-
Type: Select Text.
-
Comparison: Select equal to.
-
Value: Type
CEO.
-
Select OK.
Step 3: Create the Third Condition Box (Guest)
-
Highlight the JobTitle mapping and the address of the visitors center (see screenshots in the Step 1 for more details):
In the Template Builder pane, select JobTitle and select Condition. -
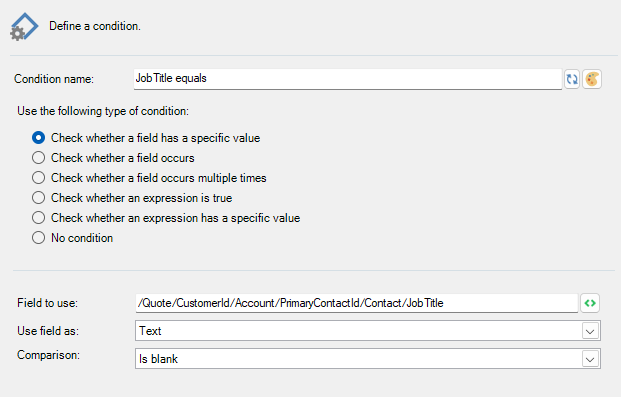
In the Condition Builder window, configure the rule:
-
Condition type: Select Check whether a field has a specific value.
-
Field: Select JobTitle.
-
Type: Select Text.
-
Comparison: Select Is Blank.
-
Select OK.
Document Output
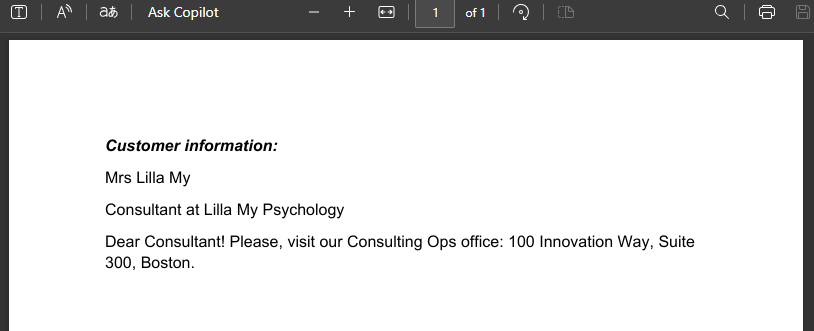
In our example, the recipient's JobTitle field is set to Consultant.
When Smart Flows generates the document, it evaluates each of the three condition boxes:
-
First Condition Box (
JobTitle equal to Consultant): Evaluates totrue. Smart Flows renders the Consultant welcome block and populates the address mapping in the output document. -
Second Condition Box (
JobTitle equal to CEO): Evaluates tofalse. Smart Flows skips this block entirely. -
Third Condition Box (
JobTitle is blank): Evaluates tofalsebecause theJobTitlefield contains data (Consultant). Smart Flows skips this block as well.
Because only the first condition is met, the generated document displays only the Consultant block, while the other two blocks are omitted:
Removing a Condition Box
To delete a condition box from your template:
-
In the document body: Select the condition box tag enclosing your content and press Delete
or -
In the Template Builder pane: Open the Mapping tab, select the condition box mapping, and select Remove.
Conditional Mappings
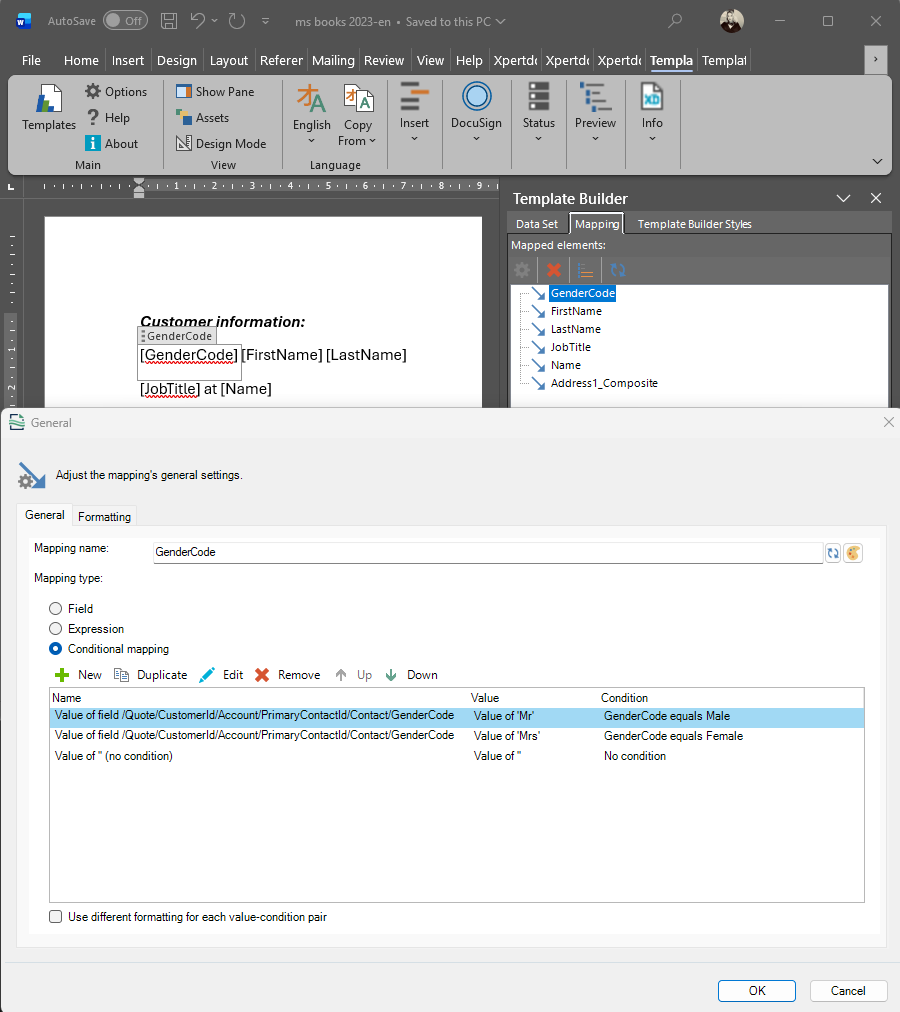
A Conditional Mapping evaluates an ordered list of value-condition pairs. When Smart Flows processes the mapping during document generation, it checks each pair from top to bottom. The first condition that evaluates to true determines the value returned by the mapping.
Value-Condition Pairs
Each value-condition pair consists of:
-
Condition: A rule that must evaluate to
true. -
Value: The field, text string, or expression output to display when the condition is met.
The final pair in the list is always the Default condition. It acts as a fallback mechanism to ensure that the mapping always resolves to a valid value even if all preceding conditions evaluate to false. The default condition cannot be removed.
Configuring a Conditional Mapping
To create a conditional mapping:
-
Select a mapping in the template or in the Mapping tab of the Template Builder.
-
Click Settings to open the Mapping Settings window.
-
Under the General section, select Conditional mapping.
-
To add a new pair, click Add or Duplicate.
-
Select the pair and click Edit to open the Value-Condition Pair configuration window:
Condition tab: Click the edit icon to configure the condition rule.
Value tab: Select whether the output should be a dataset Field or a custom Expression.
General tab: Enter a descriptive name for the pair. -
Use the Up and Down buttons to arrange the evaluation order. Smart Flows evaluates conditions from top to bottom.
-
Click OK to save the mapping settings.
Example: Setting Up a Conditional Salutation Mapping
Example: Setting Up a Conditional Salutation Mapping
Suppose you want to output a title (Mr or Mrs) in front of a contact's name based on their gender, or output nothing if the gender is unspecified or blank.
You can achieve this by configuring a Conditional Mapping on the GenderCode field using three value-condition pairs.
Step 1: Open the Mapping Settings
-
In the Template Builder pane, select the Mapping tab.
-
Select the
GenderCodemapping and select Settings (or double-click the mapping).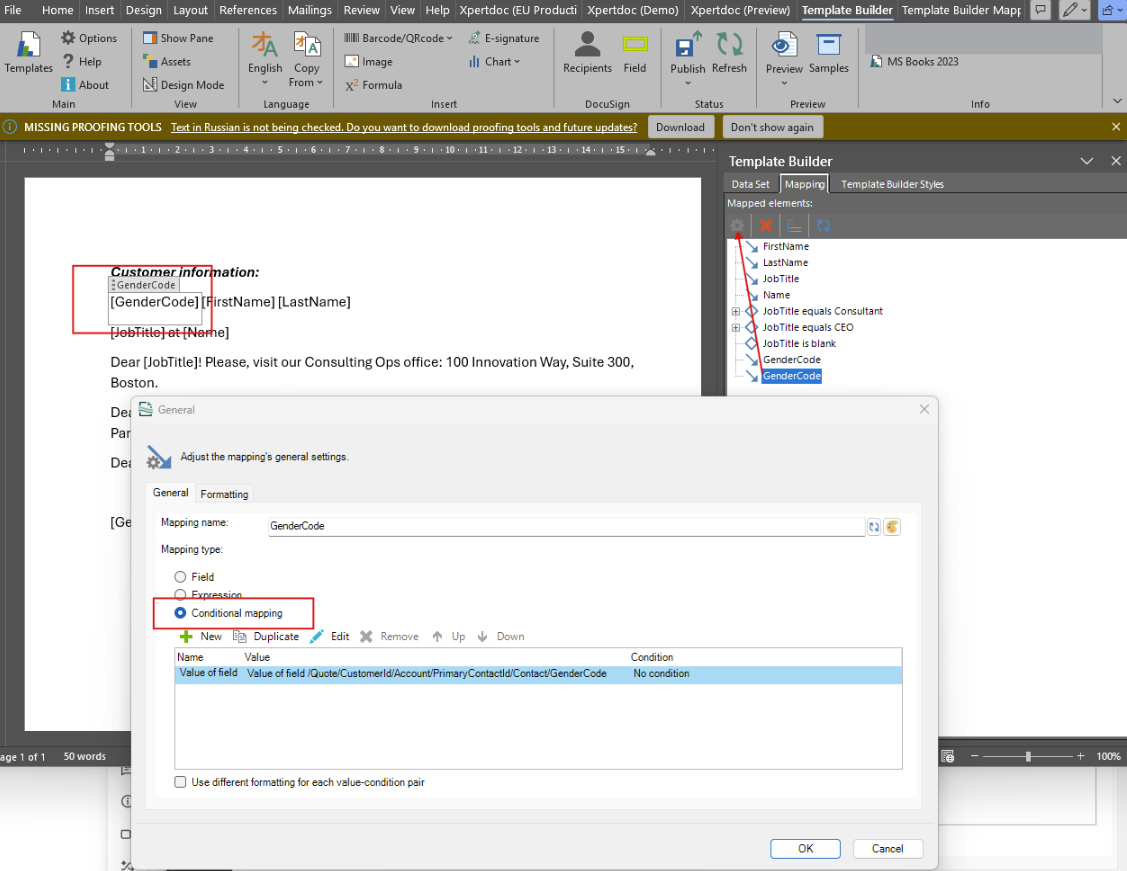
-
In the General settings tab, set the Mapping type to Conditional mapping.
Step 2: Configure the Value-Condition Pairs
Tip: When configuring a value-condition pair, it is easiest to work through its tabs from right to left (Condition -> Value -> General).
Pair 1: Male Salutation (Mr)
-
Select New to create the first value-condition pair, then select Edit.
-
Condition tab: Select the edit icon and configure the rule:
GenderCode equals Male.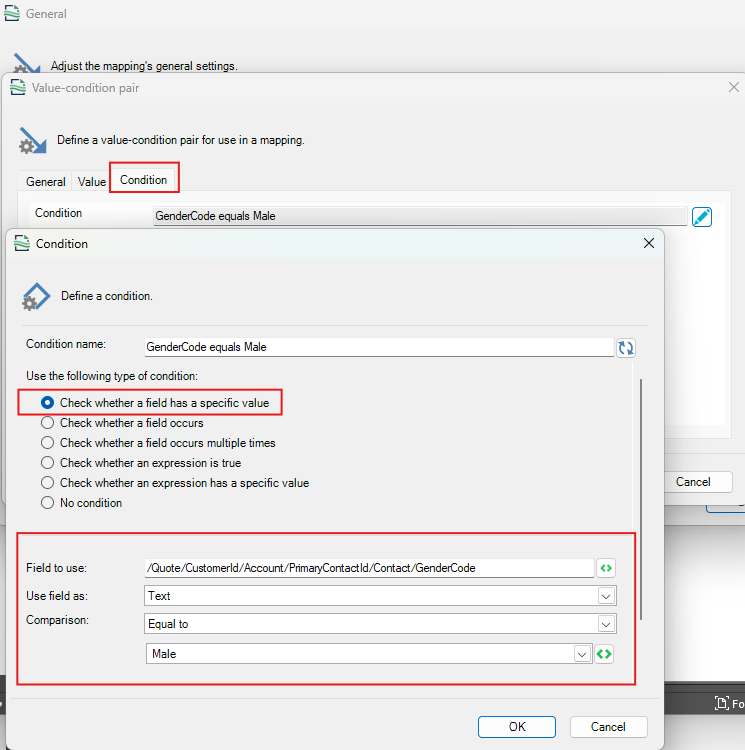
-
Value tab: Select Expression and enter:
'Mr'.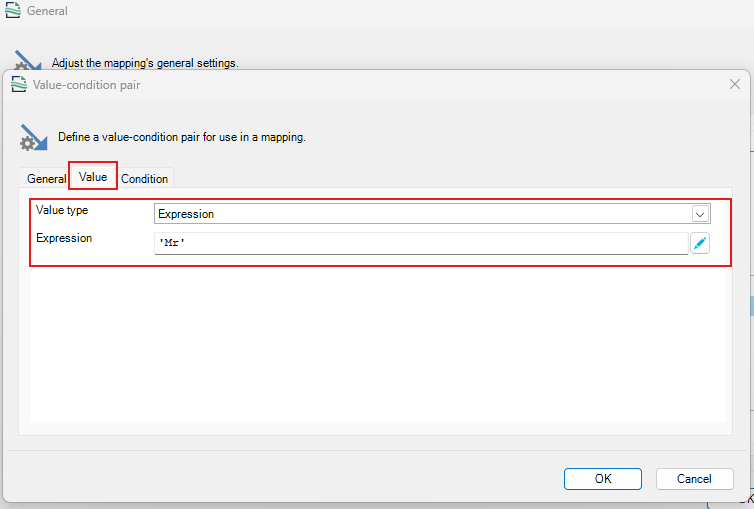
Tip: When setting a static text string as the value for a pair or formatting condition, select Expression and wrap your text in single quotes (for example, 'Mr', 'Mrs', or 'Special Offer'). Single quotes ensure Smart Flows treats the entry as literal text rather than a field name or variable.
-
To use a text value use Expression > ‘text in single quotes'
-
General tab (optional): Enter a descriptive name (for example,
Male Salutation).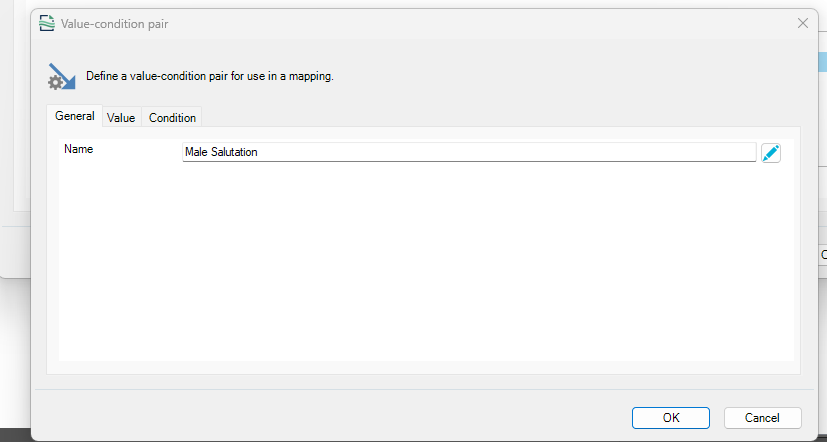
-
Select OK.
Pair 2: Female Salutation (Mrs)
Tip: To save time and avoid navigating complex dataset field paths repeatedly, fully configure your first value-condition pair, then select Duplicate. You can then edit the duplicated pair to quickly update just the values, keeping the field path intact.
-
Select the first pair (
Male Salutation) and select Duplicate. -
Select Edit on the duplicated pair.
-
Condition tab: Select the edit icon and change the comparison value from
MaletoFemale. -
Value tab: Update the expression to:
'Mrs'. -
General tab (optional): Update the name to
Female Salutation. -
Select OK.
Pair 3: Default Fallback (Empty String)
-
Select the default fallback pair (No condition) and select Edit.
-
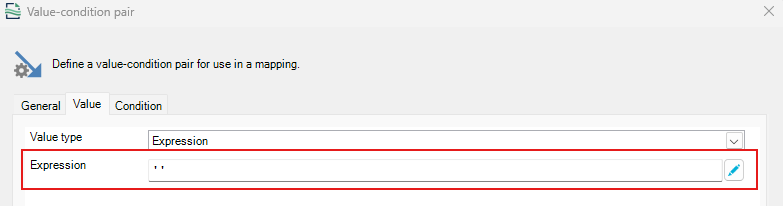
Value tab: Select Expression and enter an empty string:
''.
-
General tab (optional): Keep or update the default name.
-
Select OK.
Note: The default fallback pair (No condition) ensures that if GenderCode is neither Male nor Female (or is blank), Smart Flows outputs nothing instead of causing an error.
Step 3: Save the Mapping Settings
Select OK to save your conditional mapping rules. The GenderCode tag in your Word template now dynamically resolves its output at runtime based on these rules.
Document Output Example
In our scenario, the recipient's GenderCode field is set to Female.
When Smart Flows generates the document, it evaluates the conditional mapping pairs sequentially from top to bottom:
-
First Pair (
GenderCode equals Male): Evaluates tofalse. Smart Flows skips this pair and moves to the next. -
Second Pair (
GenderCode equals Female): Evaluates totrue. Smart Flows returns'Mrs'as the output value for the mapping and stops further evaluation. -
Third Pair (
No condition): Skipped because a preceding condition has already evaluated totrue.
As a result, Smart Flows outputs Mrs in the generated document, rendering the full greeting as:
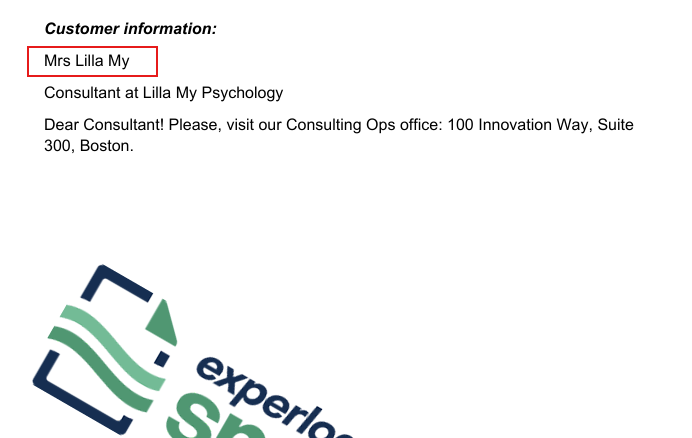
Reordering and Removing Value-Condition Pairs
The order of value-condition pairs determines their evaluation sequence. Smart Flows checks conditions strictly from top to bottom.
-
To reorder pairs: Select a pair in the list and select Up or Down.
-
To remove a pair: Select the pair and select Remove.
Note: The Default condition (No condition) cannot be removed or reordered below other fallback rules.
Per-Pair Formatting
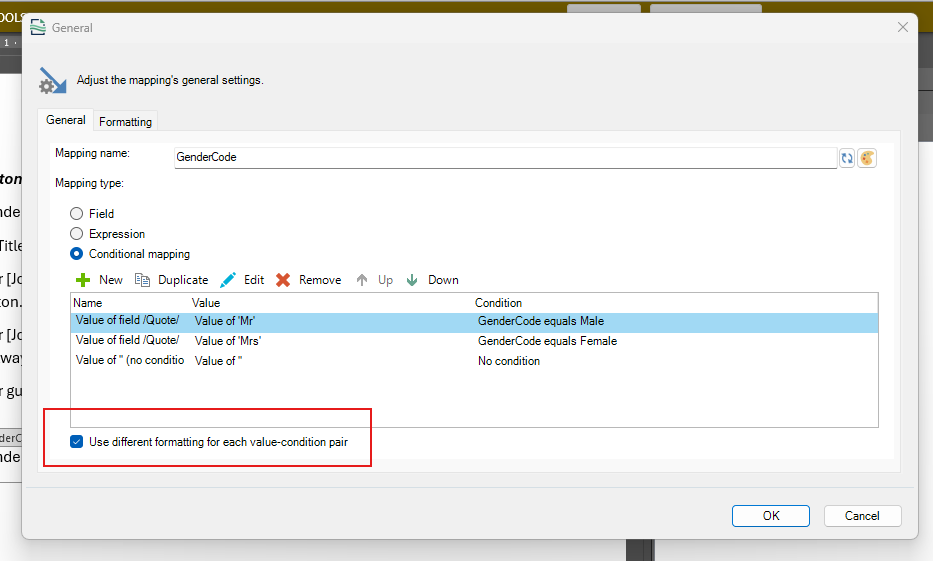
By default, all value-condition pairs share the same formatting rules. To apply unique formatting to individual pairs:
-
Open the Mapping Settings for the conditional mapping.
-
Under General, check Use different formatting for each field.
-
Switch to the Formatting tab, select the specific value-condition pair from the dropdown, and configure its formatting individually.
Conditional Formatting
Conditional formatting changes the appearance or structure of a mapped value based on conditional rules without altering the underlying data.
Setting Up Conditional Formatting
-
Open the Mapping Settings window for any mapping.
-
Navigate to the Formatting tab and check Use conditional formatting.
-
Click the add icon (+) to insert a new condition. The Default condition is automatically placed at the bottom of the list.
-
Select a condition and click the edit icon to configure the rule.
-
Define the formatting options for the selected condition (such as font style, text color, date/number formats, or image conversion).
-
Click OK to save.
Note: Smart Flows evaluates the formatting conditions sequentially. The first condition that returns true applies its formatting to the output.
Example: Setting Up Conditional Formatting Based on Country
Example: Setting Up Conditional Formatting Based on Country
Suppose your document contains the text:
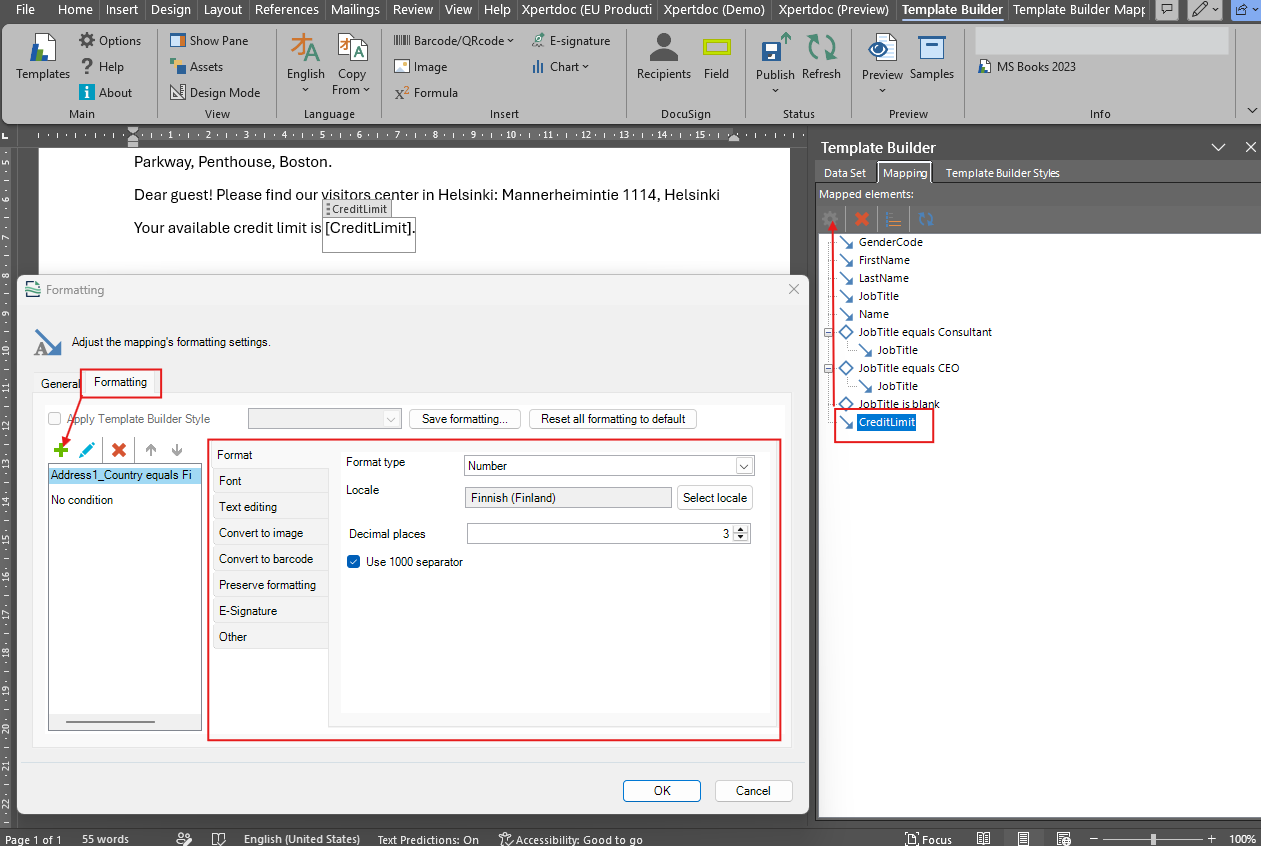
Your available credit limit is [CreditLimit].
You want the CreditLimit mapping to automatically change its number formatting depending on the primary contact’s country:
-
Finland (
Finland): Formatted as a Number using the Finnish (Finland) locale, with 3 decimal places and the 1000 separator enabled. -
Other Countries (Default): Formatted as Currency using the English locale with 2 decimal places, and the 1000 separator disabled .
Step 1: Open Formatting Settings and Enable Conditional Formatting
-
In your Word template, select the
CreditLimitmapping. -
In the Template Builder pane, select the Mapping tab, select
CreditLimit, and select Settings (or double-click the mapping). -
In the Mapping Settings window, switch to the Formatting tab.
-
Select the Use conditional formatting checkbox at the bottom left.
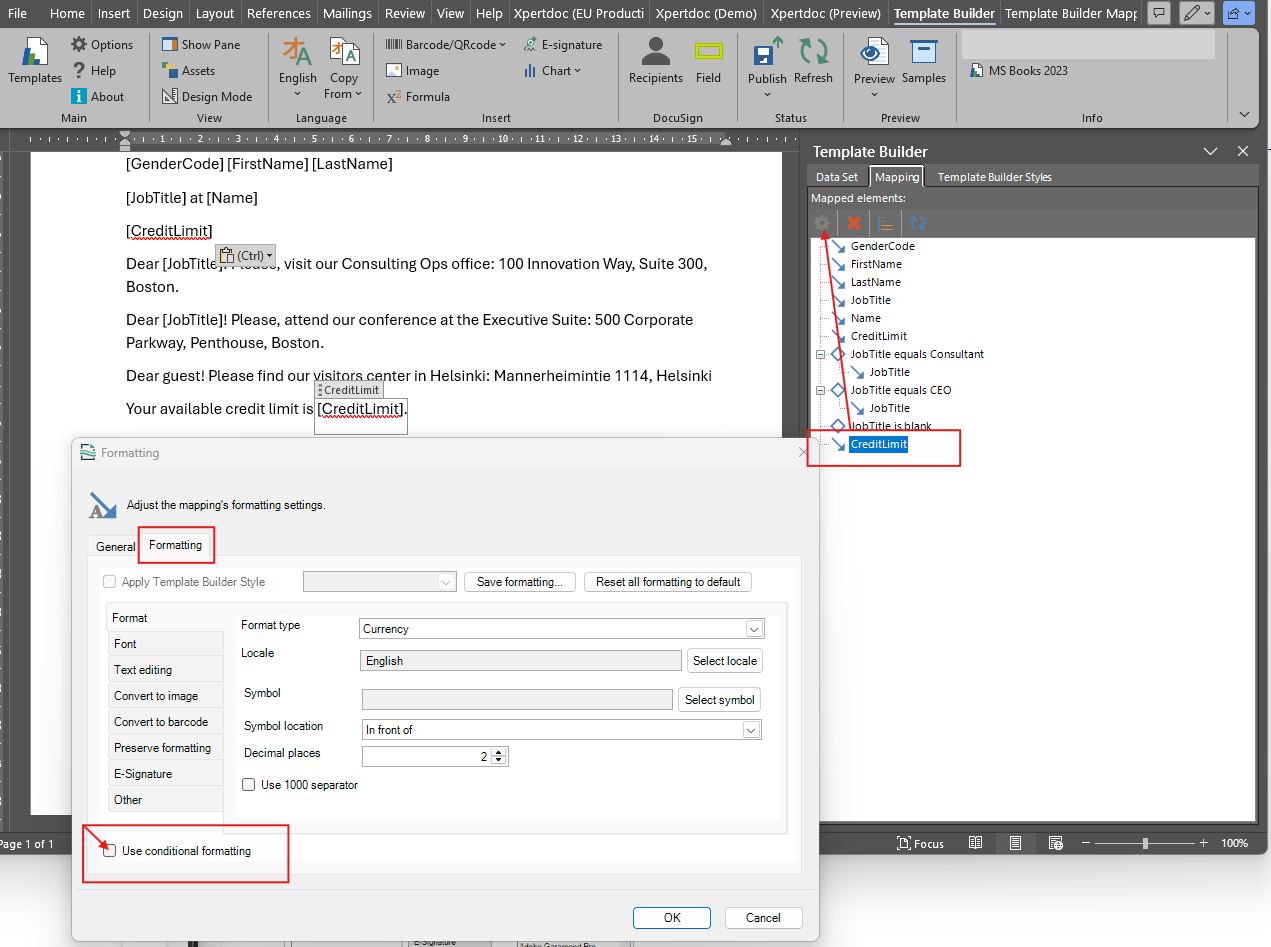
By default, the list contains only No condition, which defines the baseline fallback formatting (Format type: Currency, Locale: English, Decimal places: 2).
Step 2: Add the Country Condition for Finland
-
Select the green add icon (+) above the condition list to create a new condition.
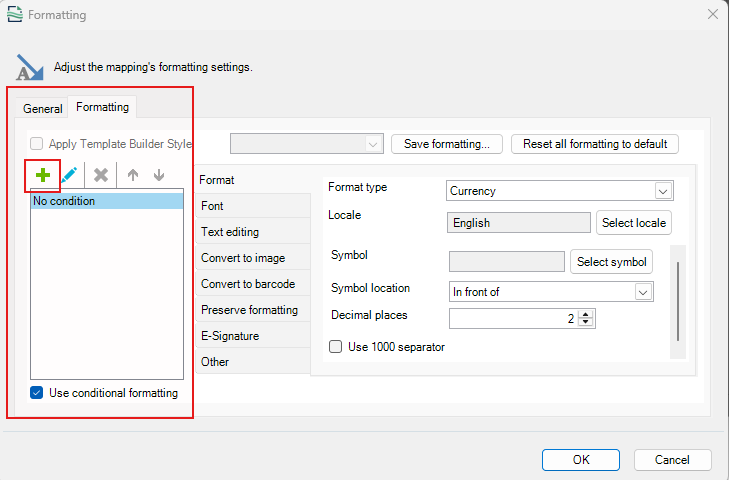
-
In the Condition window, set up the rule:
-
Condition name: Enter
Address1_Country equals Finland. -
Condition type: Select Check whether a field has a specific value.
-
Field to use: Select
/Quote/CustomerId/Contact/Address1_Country. -
Use field as: Select Text.
-
Comparison: Select Equal to.
-
Value: Type
Finland.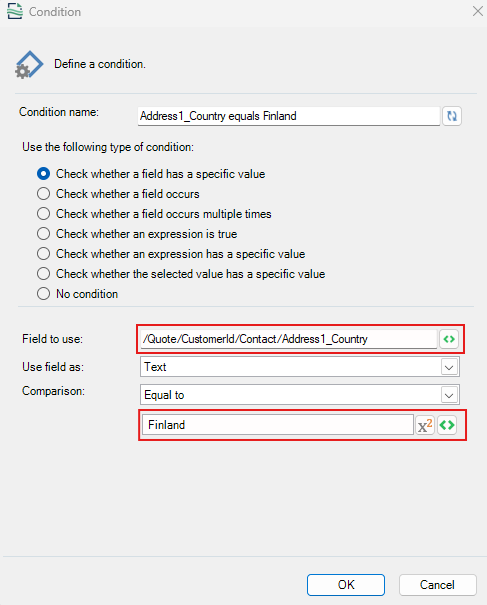
-
Select OK.
Step 3: Configure Formatting for Finland
-
Select the
Address1_Country equals Finlandcondition in the list on the left. -
Under Format settings on the right, configure the specific format:
-
Format type: Select Number.
-
Locale: Select Finnish (Finland).
-
Decimal places: Set to
3. -
Use 1000 separator: Select the checkbox.
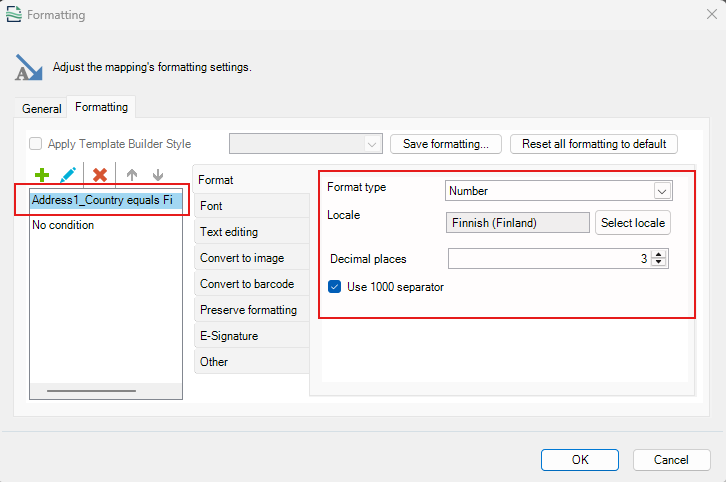
-
Select OK to save the mapping settings.
Document Output
During document generation, Smart Flows checks the conditional formatting rules in order:
-
First Condition (
Address1_Country equals Finland): If the contact's country isFinland, Smart Flows applies Finnish number formatting (3 decimal places and 1000 separator). -
Second Condition (
No condition): If the country is not Finland, Smart Flows falls back to English currency formatting (2 decimal places).
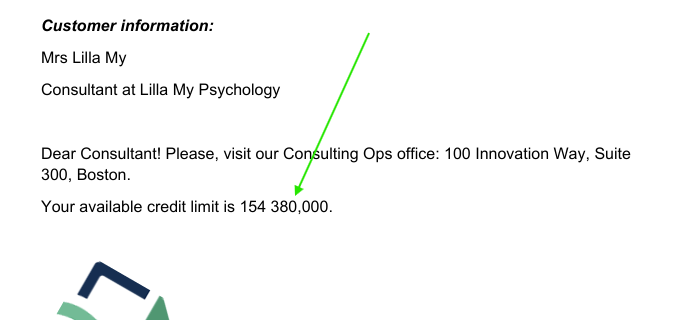
In our sample the contact's country is Finland and the credit limit value is 154380.0:

Generated Output:
Your available credit limit is 154 380,000
Reordering and Removing Formatting Conditions
Smart Flows evaluates formatting conditions sequentially. The first condition that returns true applies its formatting rules.
-
To reorder conditions: Select a condition in the list and select the Up or Down arrow icons above the list.
-
To remove a condition: Select the condition and select the red delete icon (X).
Note: The baseline No condition rule at the bottom of the list cannot be removed.
Defining Conditions
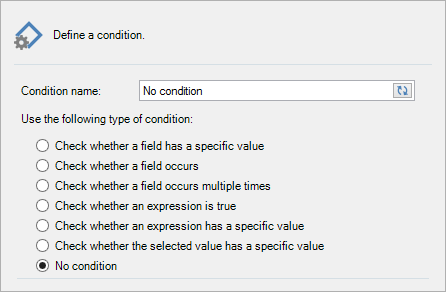
All conditional features (Condition Boxes, Conditional Mappings, and Conditional Formatting) rely on the Condition Builder to define evaluation logic.
Condition Types
Smart Flows supports the following condition types:
|
Condition Type |
Description |
|---|---|
|
Check whether a field has a specific value |
Compares a dataset field against a static value, another field, or a range. |
|
Check whether a field occurs |
Evaluates whether a dataset field is present and contains data. |
|
Check whether a field occurs multiple times |
Checks the number of occurrences of a repeating dataset field against a numeric threshold. |
|
Check whether an expression is true |
Evaluates a custom Smart Flows expression to a boolean result (any non-zero value is |
|
Check whether an expression has a specific value |
Evaluates the result of a custom expression against a comparison rule. |
|
Check whether the selected value has a specific value |
Available in conditional formatting to evaluate the current mapped output value. |
|
No condition |
Always evaluates to |
Comparison Operators by Data Type
When comparing a field or expression against a value, available operators depend on the selected data type:
|
Data Type |
Supported Operators |
|---|---|
|
Text |
|
|
Number |
|
|
Date / Time / DateTime |
|
|
Boolean |
|
Occurrence Evaluation and Empty Fields
When using Check whether a field occurs:
-
CRM connectors provide full schema structures where fields are always technically present in the dataset structure.
-
The Treat empty fields as not occurring option (enabled by default) ensures that dataset fields containing empty values or nulls are treated as non-occurring.
-
Smart Flows processes empty fields consistently across all dataset types (including CRM, custom datasets, and XML schemas).
Best Practices
-
Always maintain a valid default condition: Ensure the final fallback rule in conditional mappings handles unexpected data gracefully to prevent document generation errors.
-
Order conditions carefully: Place specific conditions at the top of the evaluation list and general or fallback conditions at the bottom.
-
Use "Selected Value" for formatting conditional mappings: When applying conditional formatting to a mapping, use the Check whether the selected value has a specific value condition type. This evaluates the final output text generated by the mapping rather than a raw dataset field, ensuring your formatting rules stay intact even if the underlying dataset fields change.
-
Test with realistic dataset samples: Verify conditional logic against multiple sample datasets representing edge cases (such as missing fields, null values, or extreme numbers).