Flow Builder is the core of Smart Flows, enabling users to design, automate, and manage document generation processes. It offers two flow types: Simple and Advanced to cater to different levels of complexity and customization. While Simple Flows provide guided, structured workflows with built-in safeguards, Advanced Flows offer greater flexibility, including custom block arrangements, parallel processing, and advanced error handling. Understanding the differences between these flow types helps users build efficient and scalable automation solutions.
Flow Builder
Flow Builder in Smart Flows comes in two different layouts: simple and advanced. This article details the structural differences, usage limitations, and flexibility between the two types of flows, emphasizing insights into their respective zones, flow block arrangements, and error handling. Whether you are a beginner seeking to understand the fundamentals of simple flows or an advanced user contemplating an upgrade to advanced flows, this guide provides a primer on making informed decisions in flow management.
The simple flow builder has more restrictions than the advanced flow builder, but it provides more guidance and makes it harder to break things.
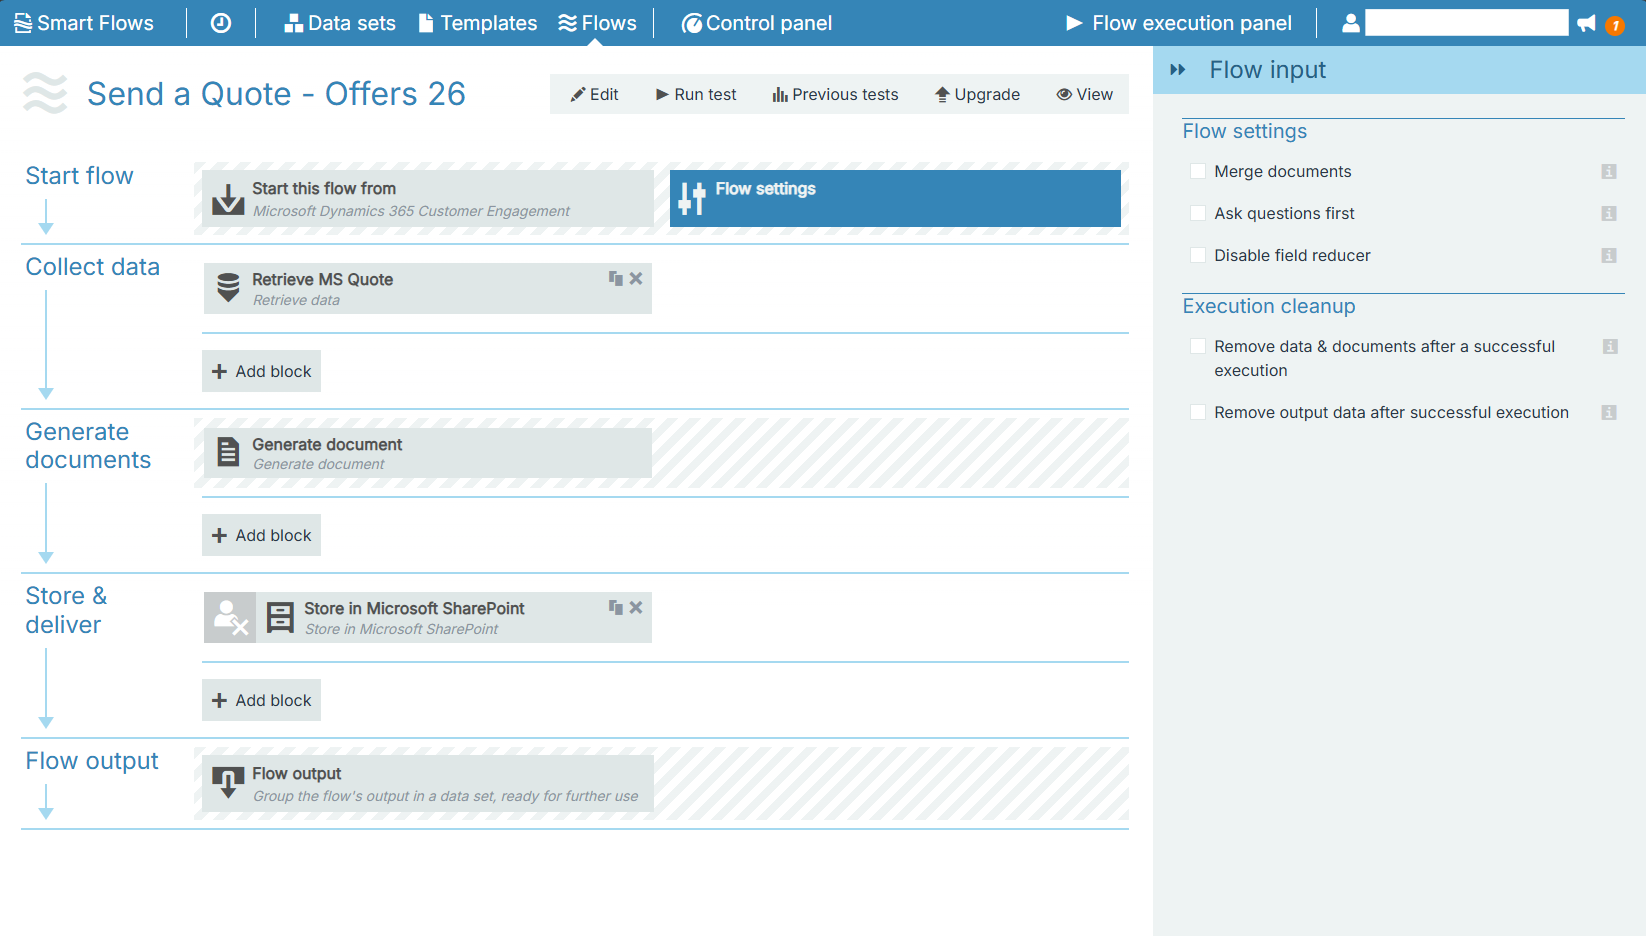
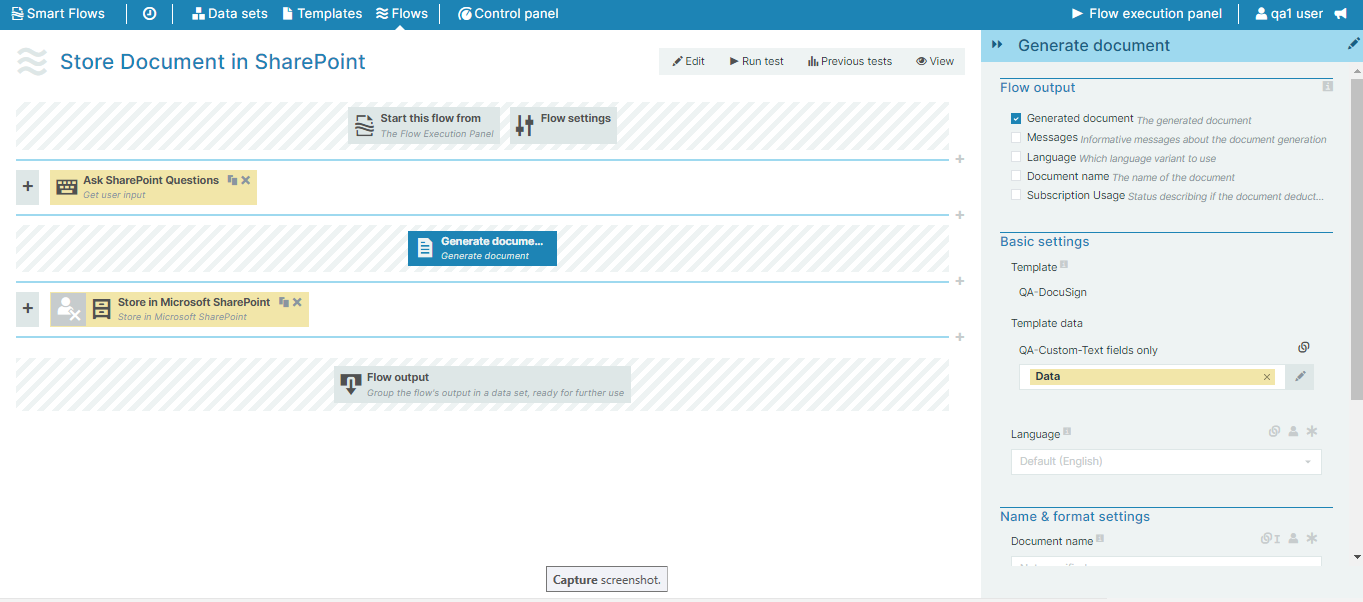
Here's what a simple flow looks like.
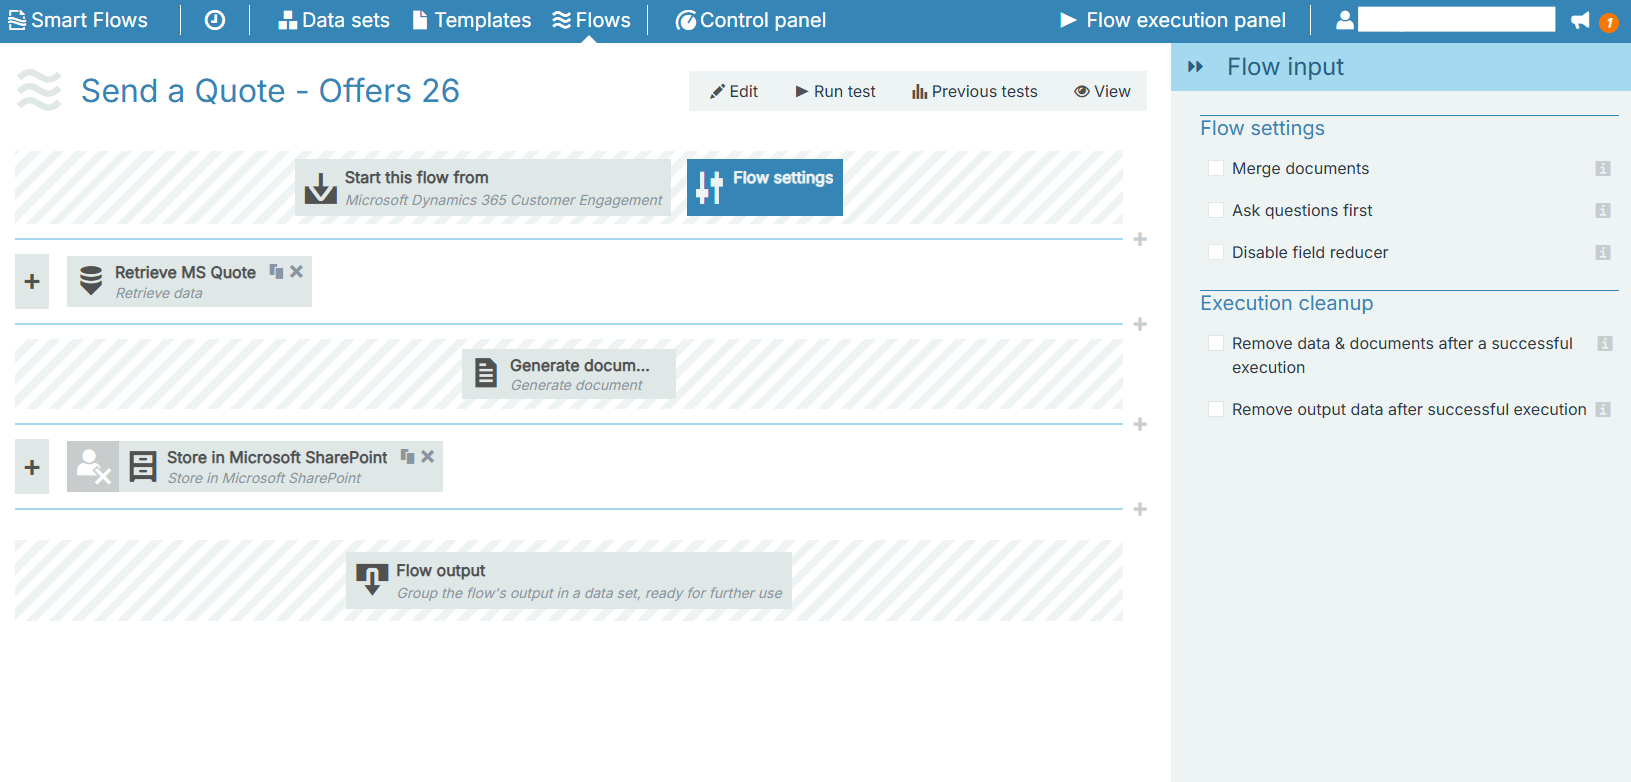
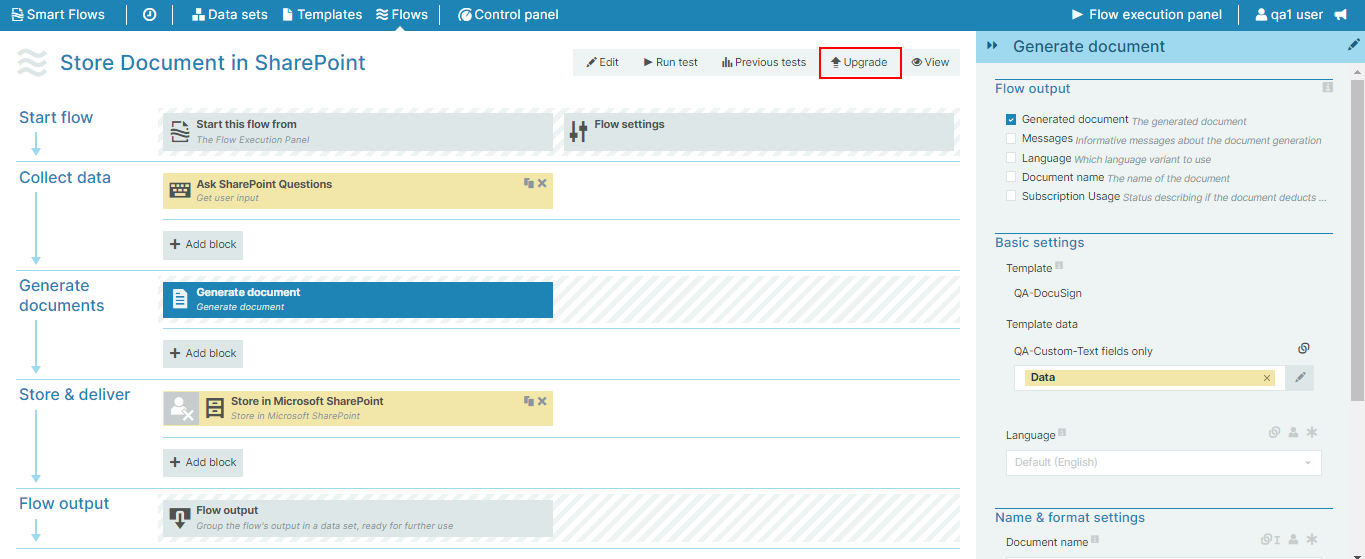
Here is the same flow, upgraded to an advanced flow.
Simple Flow
The simple flow building experience reduces complexity and guides a user toward an easy solution. A simple flow always has five zones.
-
Start flow
-
Collect data
-
Generate documents
-
Store and deliver
-
Flow output
Notice the three shaded zones in the simple flow below (Start flow, the first Generate documents, and the Flow output). The existing flow blocks in the shaded zones cannot be moved to another zone or replaced.
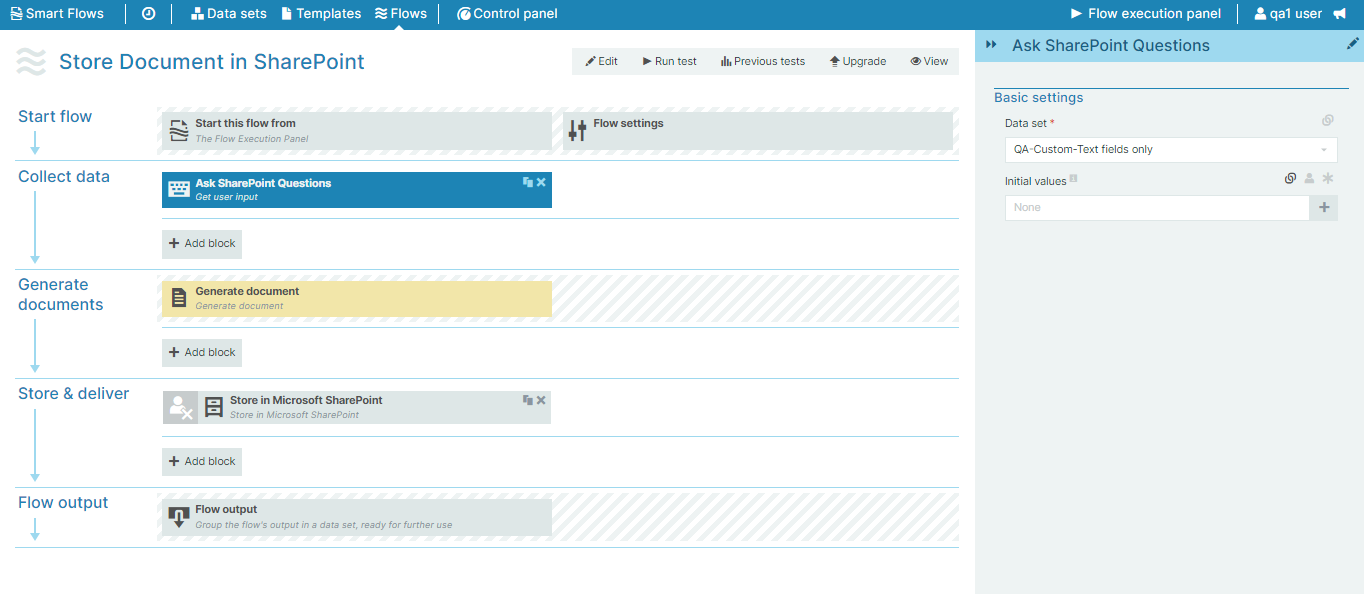
In simple flows, users cannot move a flow block to a place where it won't work. The system checks that the flow blocks are correctly configured. In simple flow, you can only retrieve data from its correct zone or generate a document from its correct zone. For example, you can only perform an action in the Store and Deliver zone.
Advanced Flow
There are two ways to create an advanced flow. You can create an advanced flow immediately or upgrade from a simple flow to an advanced flow. When upgrading from simple flow to advanced flow, the system tells you that upgrading from simple flow to advanced flow is not reversible.
When you upgrade to an advanced flow, the five zones present in the simple flow no longer display and are replaced by a zone for each individual flow block you have.
Each flow block appears one above the other, but in advanced flow, you can rearrange the flow blocks so they are next to each other. Flow blocks next to each other are executed simultaneously, whereas flow blocks one below the other are executed only when the flow block, or flow blocks above them, have completed execution.
Upgrading to an Advanced Flow
To upgrade from a simple flow to an advanced flow, follow these steps.
Upgrading to advanced flow is an irreversible action. Once you are in advanced flow, you cannot go back to simple flow.
-
In Flow Builder, select Upgrade.
-
Select Upgrade to convert to an advanced flow.
The Upgrade flow dialog box displays.
Parallel Flow Block Execution
In the simple Flow Builder, each flow block displays one above the other, but in advanced flows, you can rearrange the flow blocks so they are next to each other. Flow blocks next to each other are executed simultaneously.
Sequential Flow Block Execution
Flow blocks one below the other are executed sequentially from top to bottom.
Flow Error States in Advanced Flows
Unlike simple flows, where the steps are configured in their correct zones, advanced flows let you move your flow blocks to different locations, but this also means you can place a flow block in a location where the system cannot execute it. This is indicated by the small red x displayed in the flow block. You cannot save your flow if a flow block is incorrectly configured.
Simple vs. Advanced Flows
|
|
Simple Flow |
Advance Flow |
|---|---|---|
|
Fixed Zone |
Provides 5 fixed zones that cannot be removed. Each of these zones is labeled according to its function. |
There are no fixed zones. |
|
Customization |
Zones can only contain flow blocks that are relevant to that zone, as well as any control blocks. You cannot add flow blocks meant for a different zone. |
Flow blocks are movable across the different zones. Flow blocks that do not meet certain criteria will not work and will have a small red x marked next to it. |
|
Conversion |
Can upgrade to an advanced flow. |
Cannot downgrade from an advanced flow to a simple flow. |
|
Supports Try/Catch |
Cannot use the Try/Catch flow block. |
Can use the Try/Catch flow block. |
|
Error Handling |
When an error happens in a post-processing step, that error is handled and the rest of the flow will continue with a warning. |
This error handling is not done, the flow stops and an error message is given. |
Advanced Tab
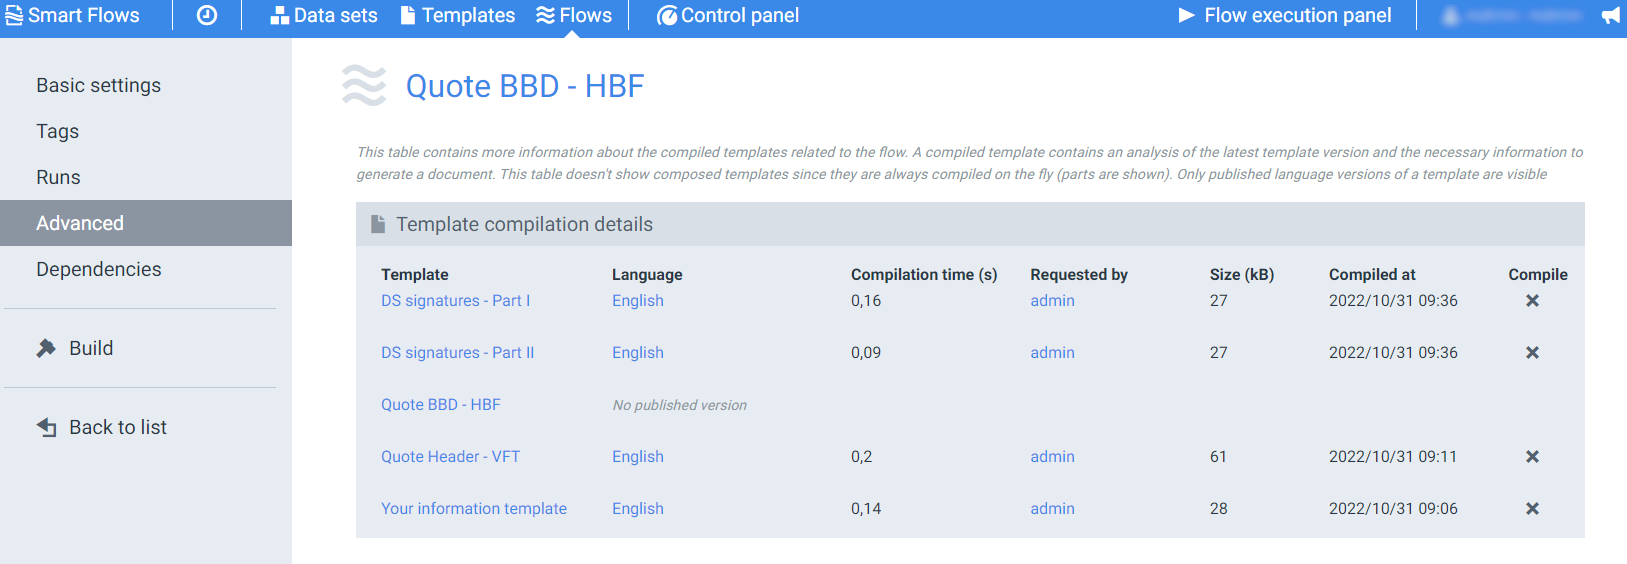
The Advanced tab gets detailed information about template compilation during flow execution and also displays an analysis of the latest template version.
Template Compilation Details
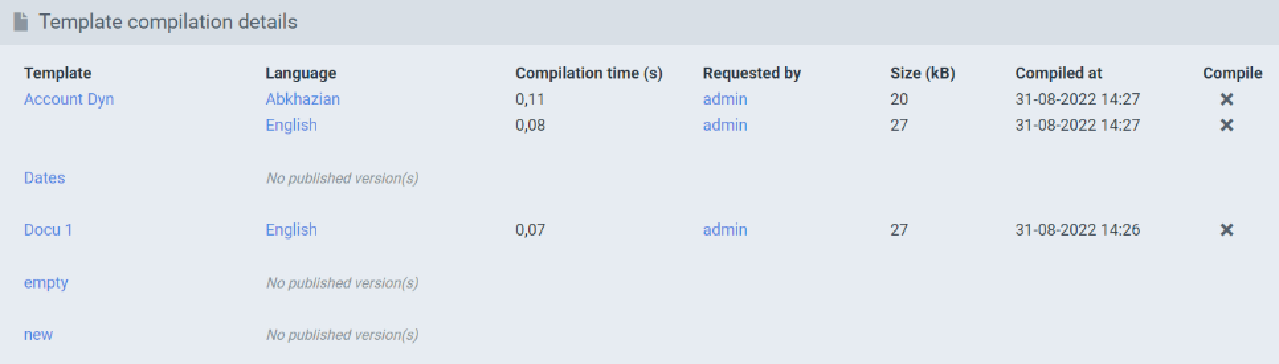
Users can manually fill the cache per template or language and track the compilation time. The Template compilation details table displays all the templates with their languages options, if the templates are cached, and the time taken to compile them. With compilation details, Admins can track the cached templates.
|
Field name |
Description |
|---|---|
|
Template |
List of the templates related to the flow. |
|
Language |
Published language version. |
|
Compilation time (s) |
Compilation time per template in seconds. |
|
Requested by |
Users who ran the flow. |
|
Size (kB) |
The size of the template. |
|
Compiled at |
Compilation date and time. |
|
Compile |
If the template is yet to compile, it allows you to compile it. If already compiled, you can clear the cached version of a template by clicking the "x" icon. |
Building Flows with the Flow Builder
The Flow Builder is the beating heart of Smart Flows: this is the place where you decide which documents to generate, how, and what to do with them. Flows can be either simple or advanced. The simple Flow Builder has more restrictions than the advanced Flow Builder, but it provides more guidance and makes it harder to break things. The advanced Flow Builder introduces the element of customization and decision-making.
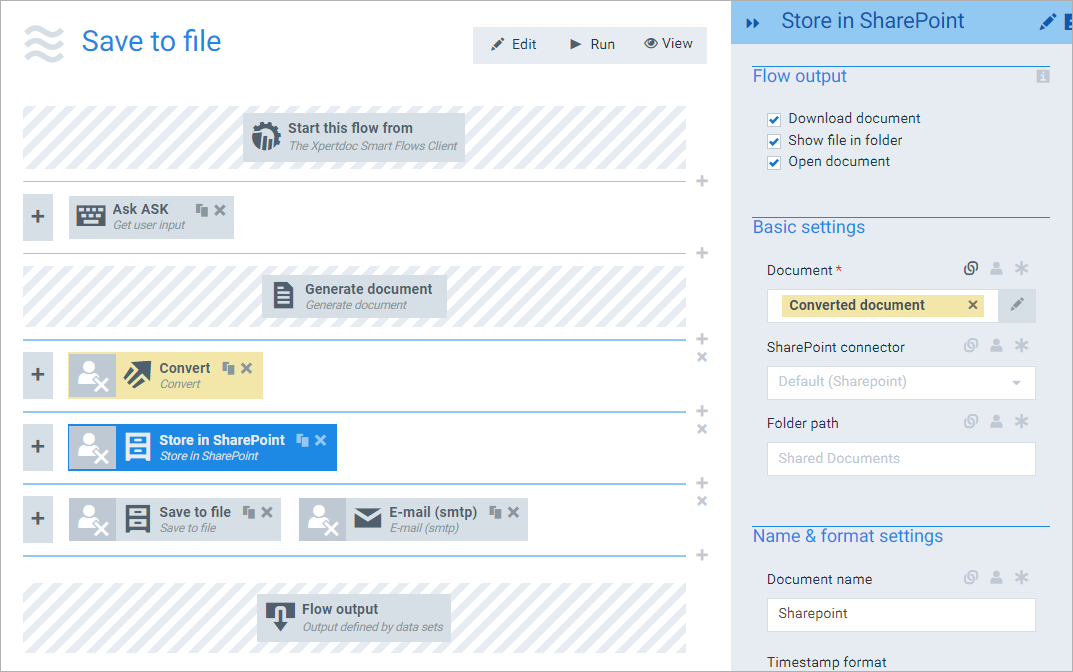
-
The Flow SettingsFlow Block controls functionality that affects multiple blocks in your flow or how the flow functions overall.
-
Managing blocks learn Flow Block properties. How to add, edit, move, and delete Flow Blocks.
-
Block settings are where the Flow Block inspector is. Here, you change a Flow Block's settings. Here is also where you link Flow Blocks to each other.
-
Linking blocks together lets you link a parameter field to another block's output or a data set field.
-
Managing zones Learn how to add and delete a delete zones.
-
Flow output has two functions. It groups all of the other blocks' output and displays them. It gives you a mechanism to decide which outputs of which Flow Blocks you would want to use in subsequent processes.
Flows: Best Practices
Flows give you the freedom to create very powerful document automation processes, but there are a few things you should keep in mind when building them.
Give your blocks sensible names
Smart Flows will automatically suggest unique names for all new blocks, but it's best to give them names that make sense to you.
This is similar to programming: as long as you're familiar with the code and you're actively working on it, you know which variable does what. But if your flow requires changes after 6 months of inactivity, you'll be glad to see meaningful names instead of having to select every block and figure out what's going on.
Clone a flow before ruining it
The Clone feature cannot be used enough when trying out new things. Moving blocks around, re-linking them, cloning blocks... If you're going to be messing around with your flow and you're not sure whether the changes will work, clone it beforehand and see whether it works. It's like having your own little sandbox - anything goes. And if it breaks, you can just re-clone the original.
Don't forget to choose the output you want the end user to see, you can check which output is shown to the end user by clicking the Flow output block.
Sending a Smart Form to External Users
To generate effective documents in your flow, you'll often need to get input or information from external users. You can use Smart Forms via the Get user input from anonymous Smart Form flow block to get information from external users. We have provided an example workflow below.
Example: In this example, we'll show you how to let an external user complete a Smart Form without authenticating with Portal.
Requirements
-
Smart Form data set
-
An advanced flow
Create an Advanced flow
-
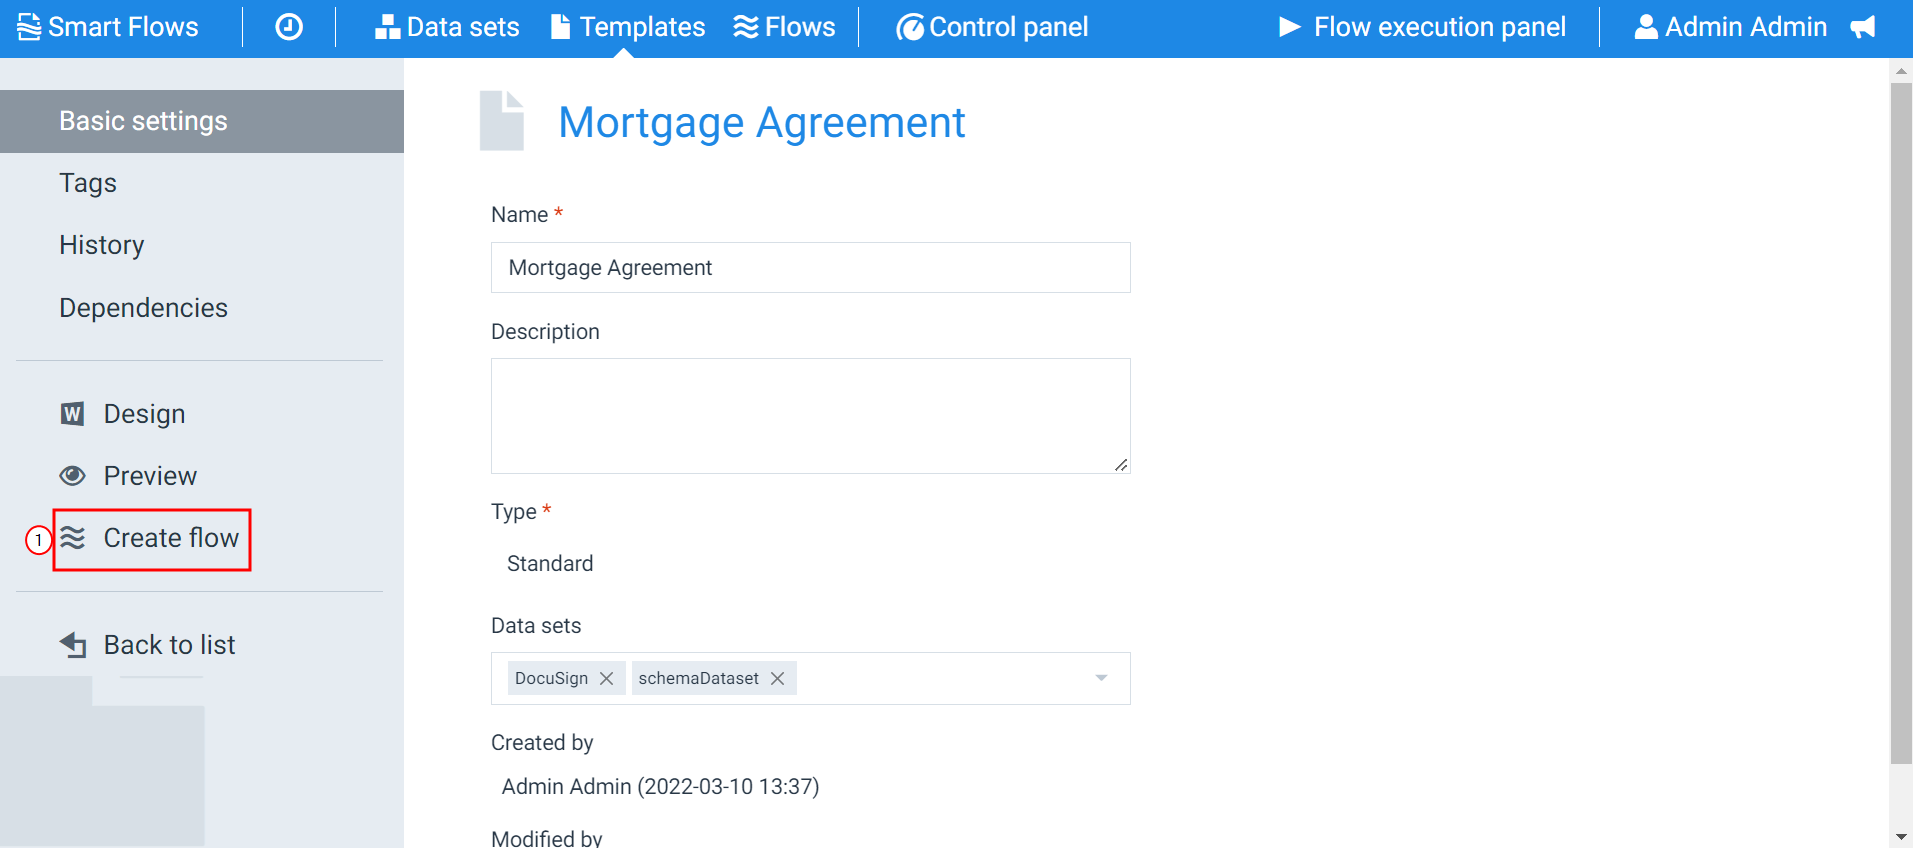
On the Basic settings page for your template, select Create a flow.
-
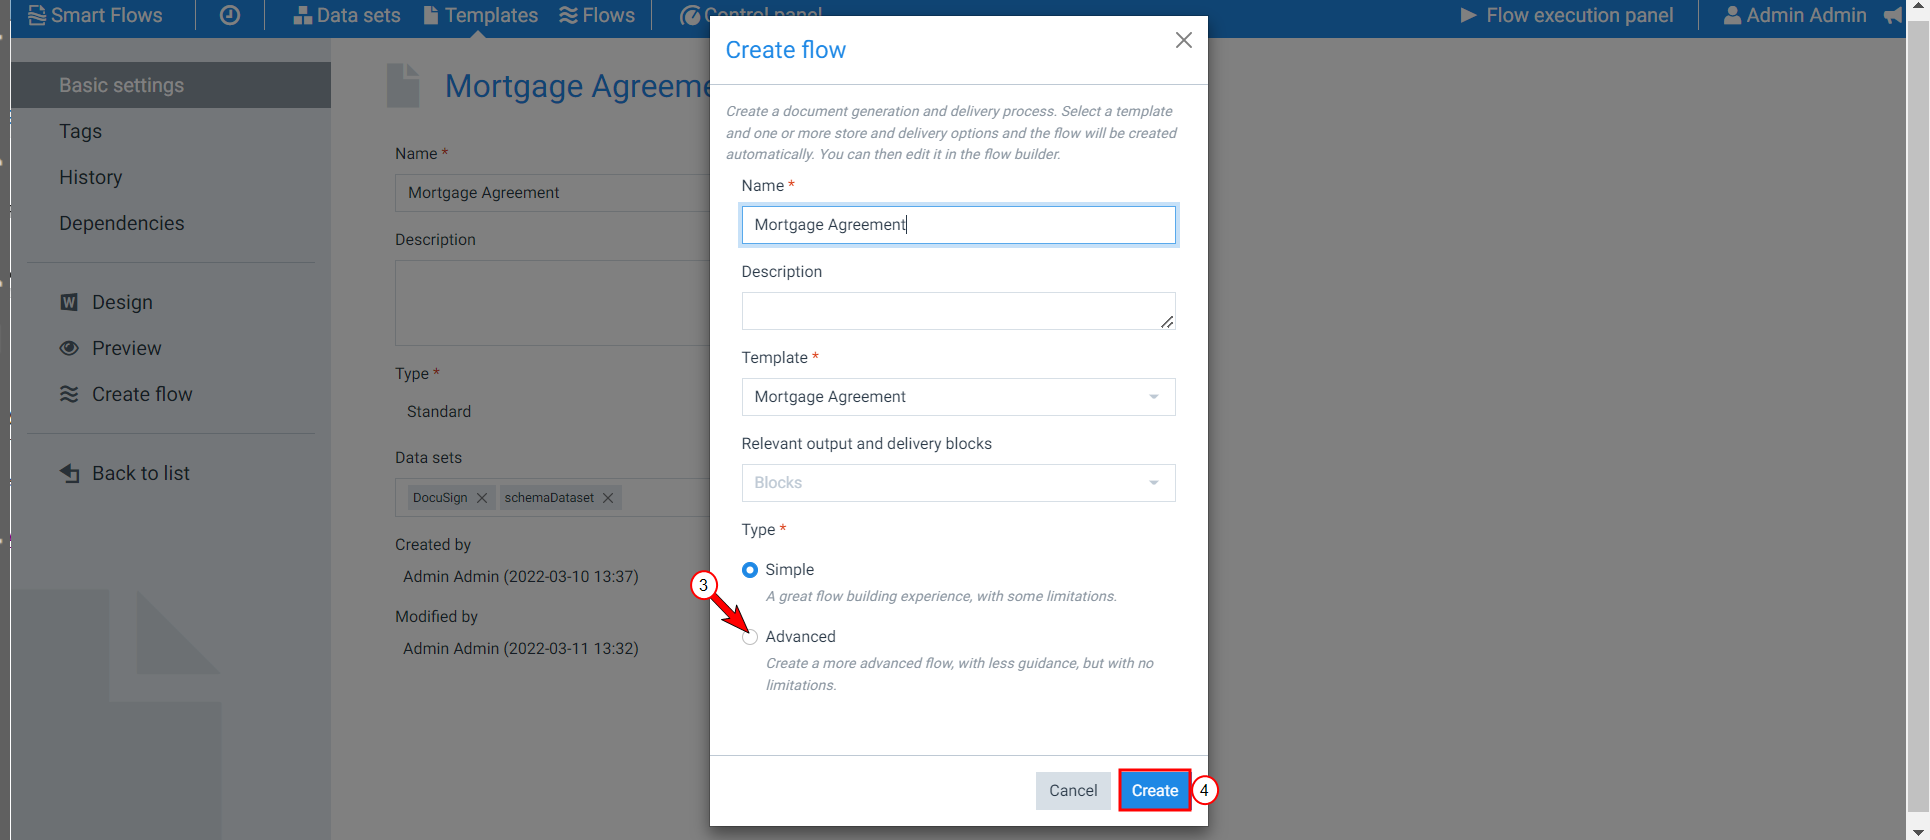
In the Create a flow window, configure your flow.
-
Select the bubble next to advanced flow.
-
Select the Create.
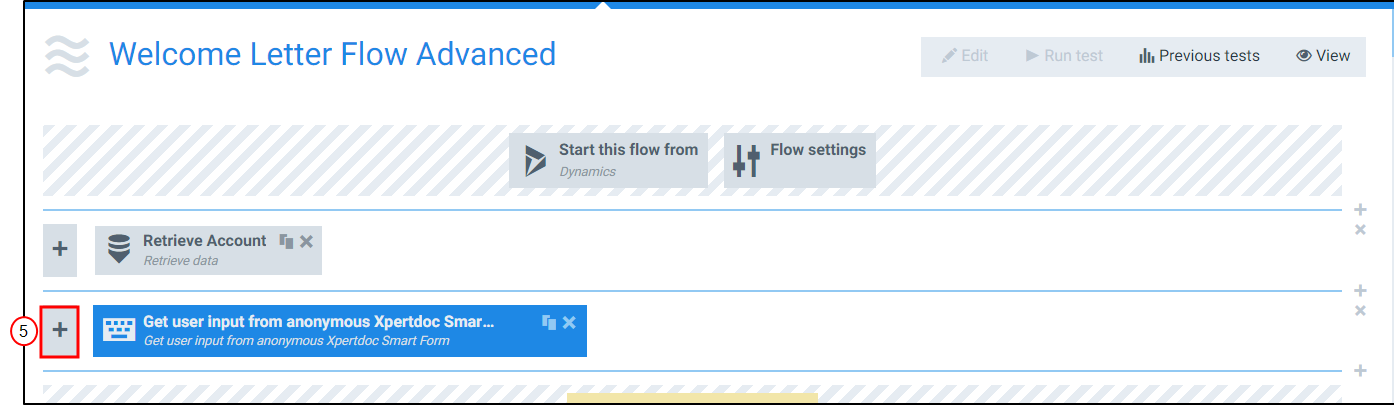
The flow builder displays in the Advanced view.
Configure input flow from external users
-
Select the plus sign to add a Get user input from anonymous Smart Form.
-
Configure your Get user input from anonymous Smart Form to use the correct Smart Form data set. Refer to Get user input from anonymous for more information.
You can use the E-mail (Dynamics) or the E-mail (smtp) flow blocks to send e-mails.
-
Select the plus sign to add an e-mail flow block.
-
Configure your e-mail flow block to send an e-mail to the required contact.
-
In the body of the e-mail, map the Smart Form URL from the Get user input from anonymous Smart Form.
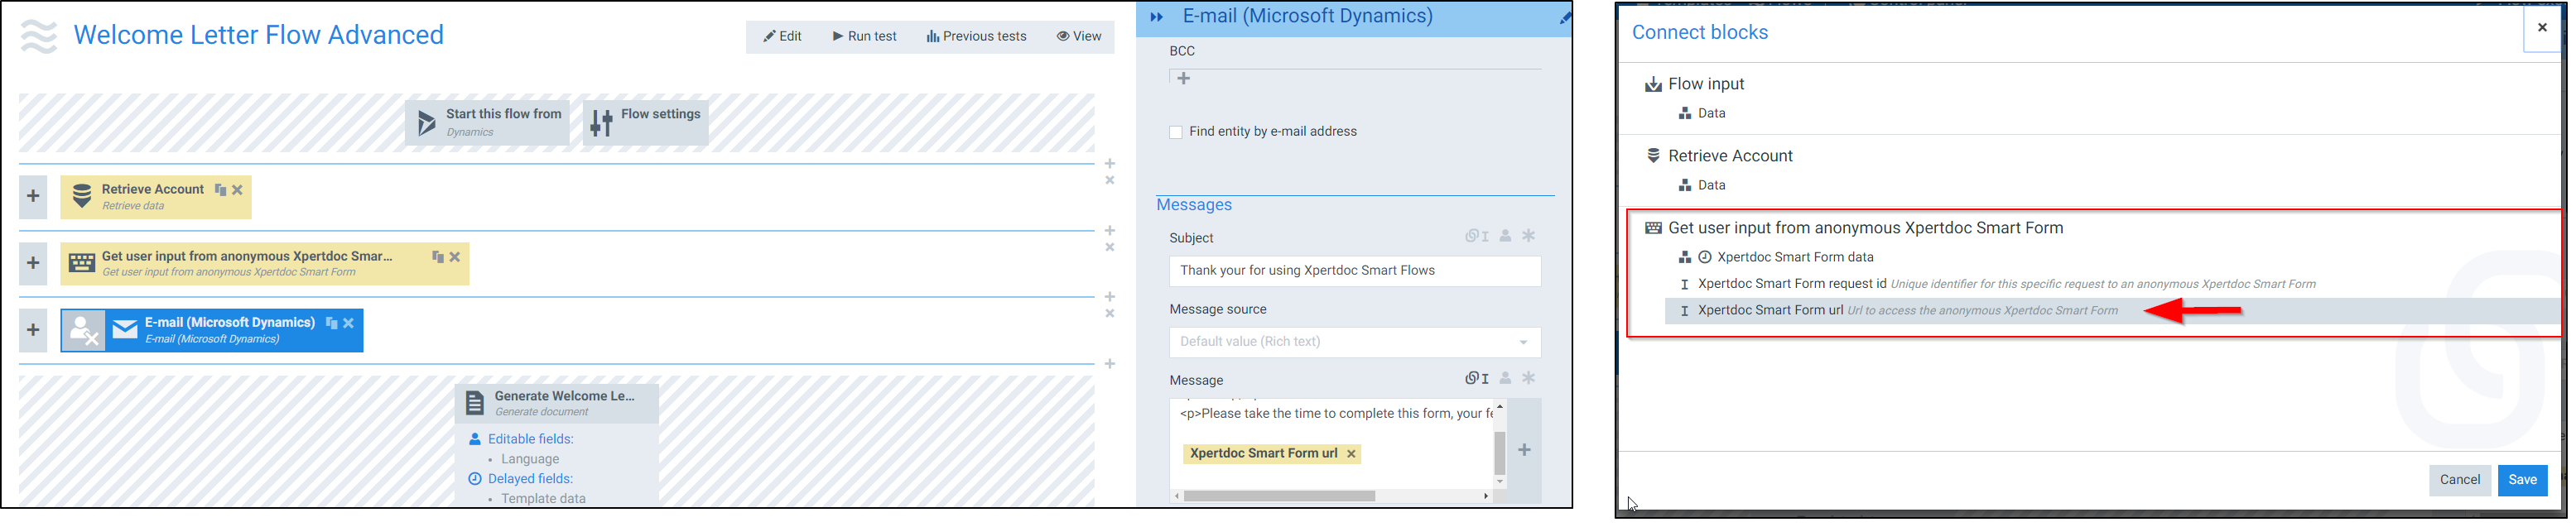
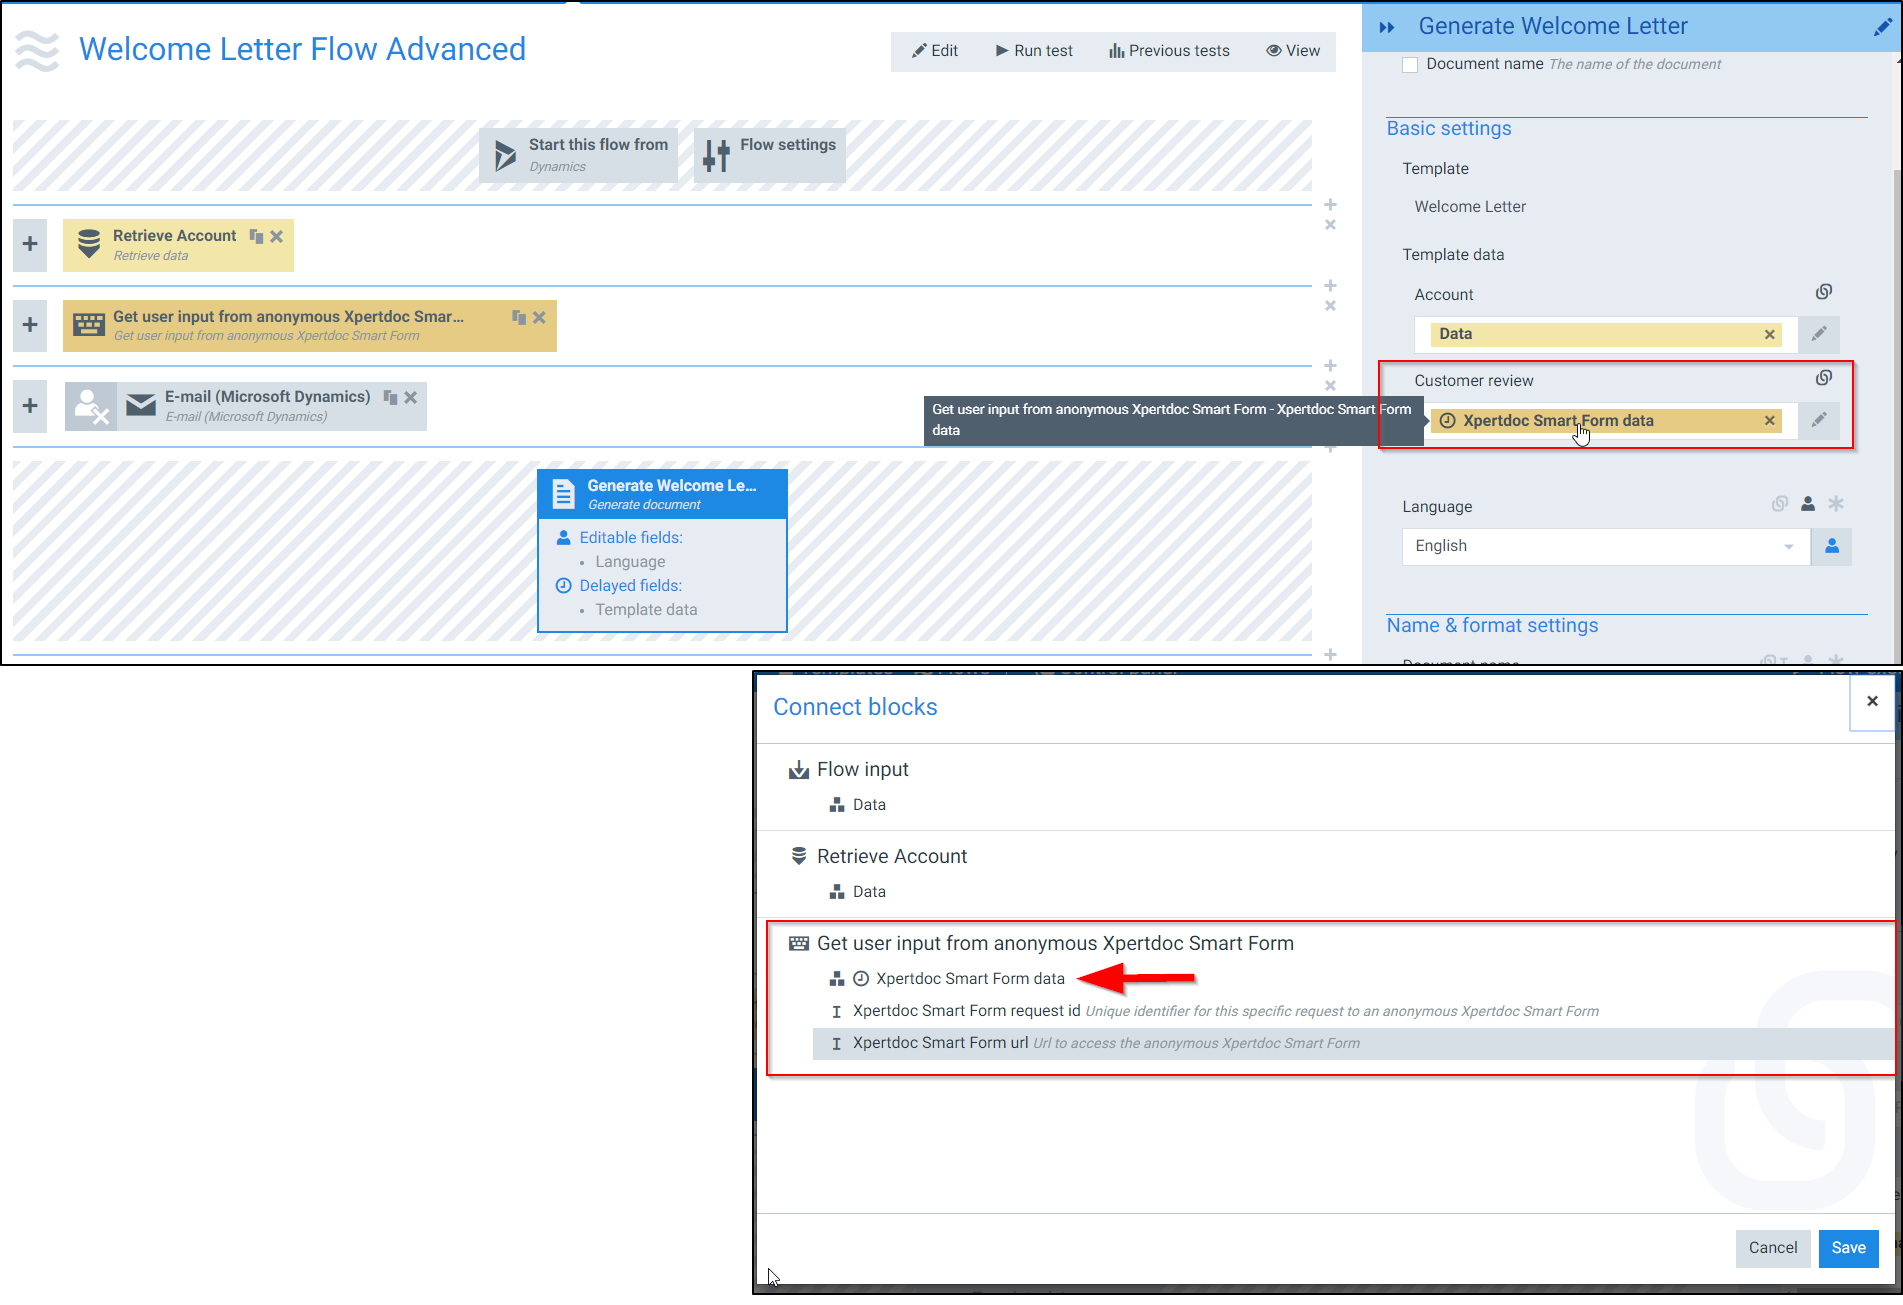
If you are using data from your Smart Forms data set, you must map your Generate Document flow block. Mapping the Generate Document to your Smart Form data ensures the system waits for the Smart Form to be completed before running the Generate Document step. The Get user input from anonymous Smart Form must also be above the Generate Document flow block in the flow.
-
On your Generate Document flow block, ensure you have mapped the flow block to use the data from your Smart Form.
Use a Document from a Smart Form
If you are using a Smart Form with a FilePicker field in the Collect data phase of your Flow, it is possible to retrieve a file uploaded to the Smart Form and utilize it within other flow blocks downstream. For instance, a user could upload a quote to a Smart Form and the flow could retrieve it, convert it into a document, and attach it to an email.
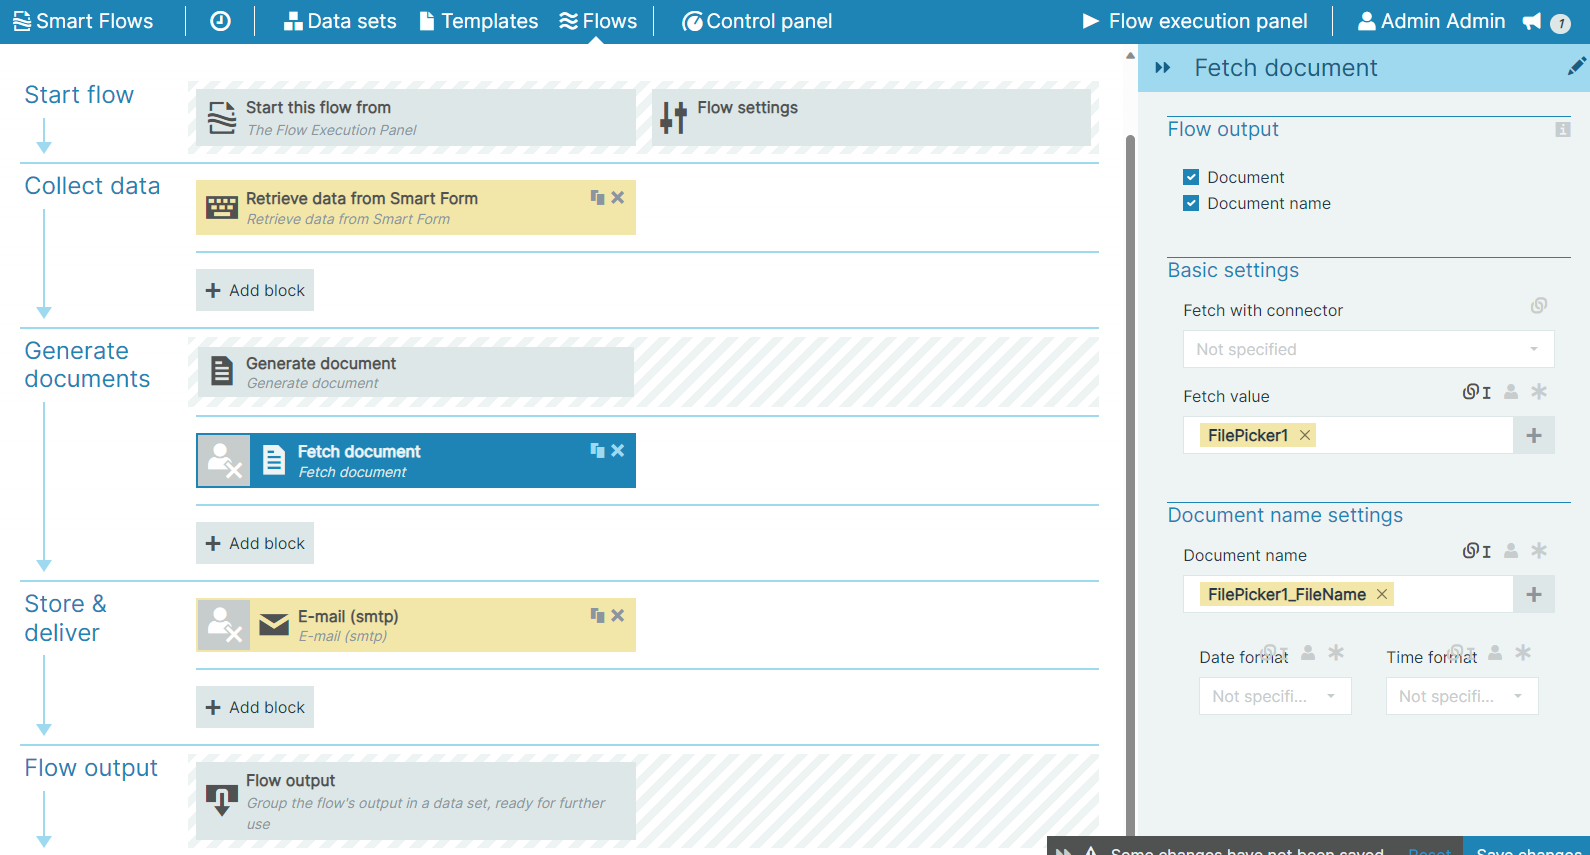
In this example, note that there is an intermediary step where we must process the FilePicker output from the Retrieve Data from Smart Forms block to convert it to a Smart Flows document to be consumed as an input in other blocks. See Process a Smart Forms Upload using Fetch Document for more information.
Though the FilePicker allows users to select multiple files, only one document may be retrieved per field.
Process a Smart Forms Upload using Fetch Document
To convert the output of a FilePicker field to a document that can serve as an input of another flow block, you must insert a Fetch document block in your flow. This step coverts the content of the FilePicker field (a base64 string) into a Smart Flows document. Subsequent flow blocks, such as those listed below, can then utilize this document:
-
Store in Microsoft SharePoint
-
Send to e-signature provider
-
Save in CRM/ERP system
-
Send e-mail (body or attachment)
-
Convert document
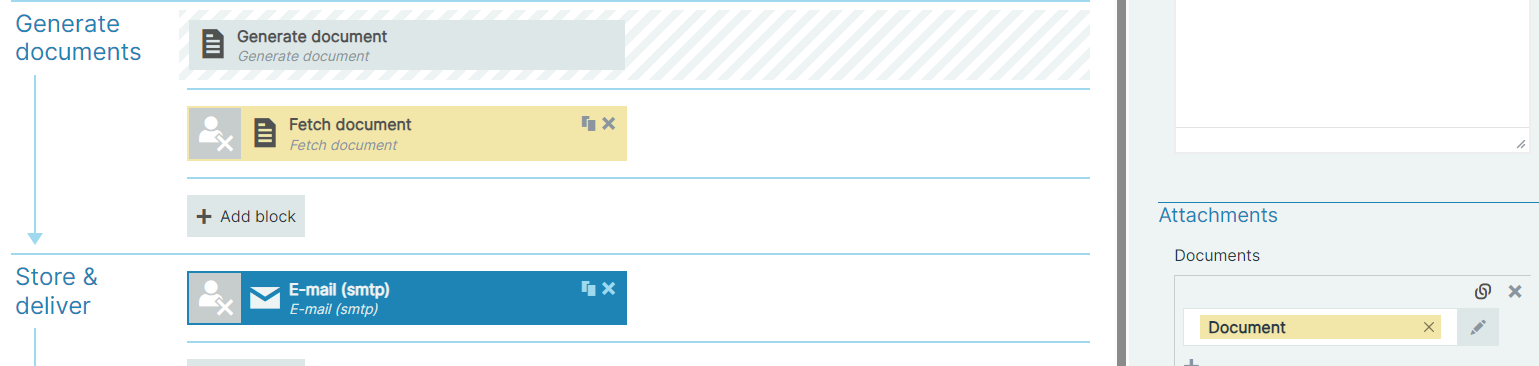
In the image below, you can see that the Email (SMTP) block is linked to the output of the Fetch document block.