
The Create connector wizard guides you through the configuration when creating a Microsoft SharePoint connector. You can create multiple Microsoft SharePoint-type connectors, each connecting to a different account. However, you can only have one default Microsoft SharePoint connector.
Create a Smart Flows App Registration for SharePoint Access in Microsoft Entra
There are two options available to create an App Registration for SharePoint
-
Use the pre-configured Smart Flows App Registration available in the connector - If using the pre-configured Smart Flows App Registration, most of the configuration is handled automatically. You must complete the authentication steps to authorize the connector.
-
Create a custom App Registration in MS Entra ID - If you choose to create a custom App Registration, you must manually configure following the steps below.
General Registration
For the initial registration of the application, please follow guidance from Registering a new application and further continue to API Permissions.
|
Options |
Select |
|---|---|
|
Supported account types |
You can choose either 'Accounts in any organizational directory (Any Microsoft Entra ID tenant - Multitenant)' option or 'Accounts in this organizational directory only (EXPERLOGIX only - Single tenant)' option. |
|
Redirect URI |
https://login.example.smartflows.xpertdoc.com/oauth2/redirect You can find this in your SharePoint connector configuration in Smart Flows. Adding the URI is required. The App Registration must have a URI configured before it is registered. |
API Permissions
-
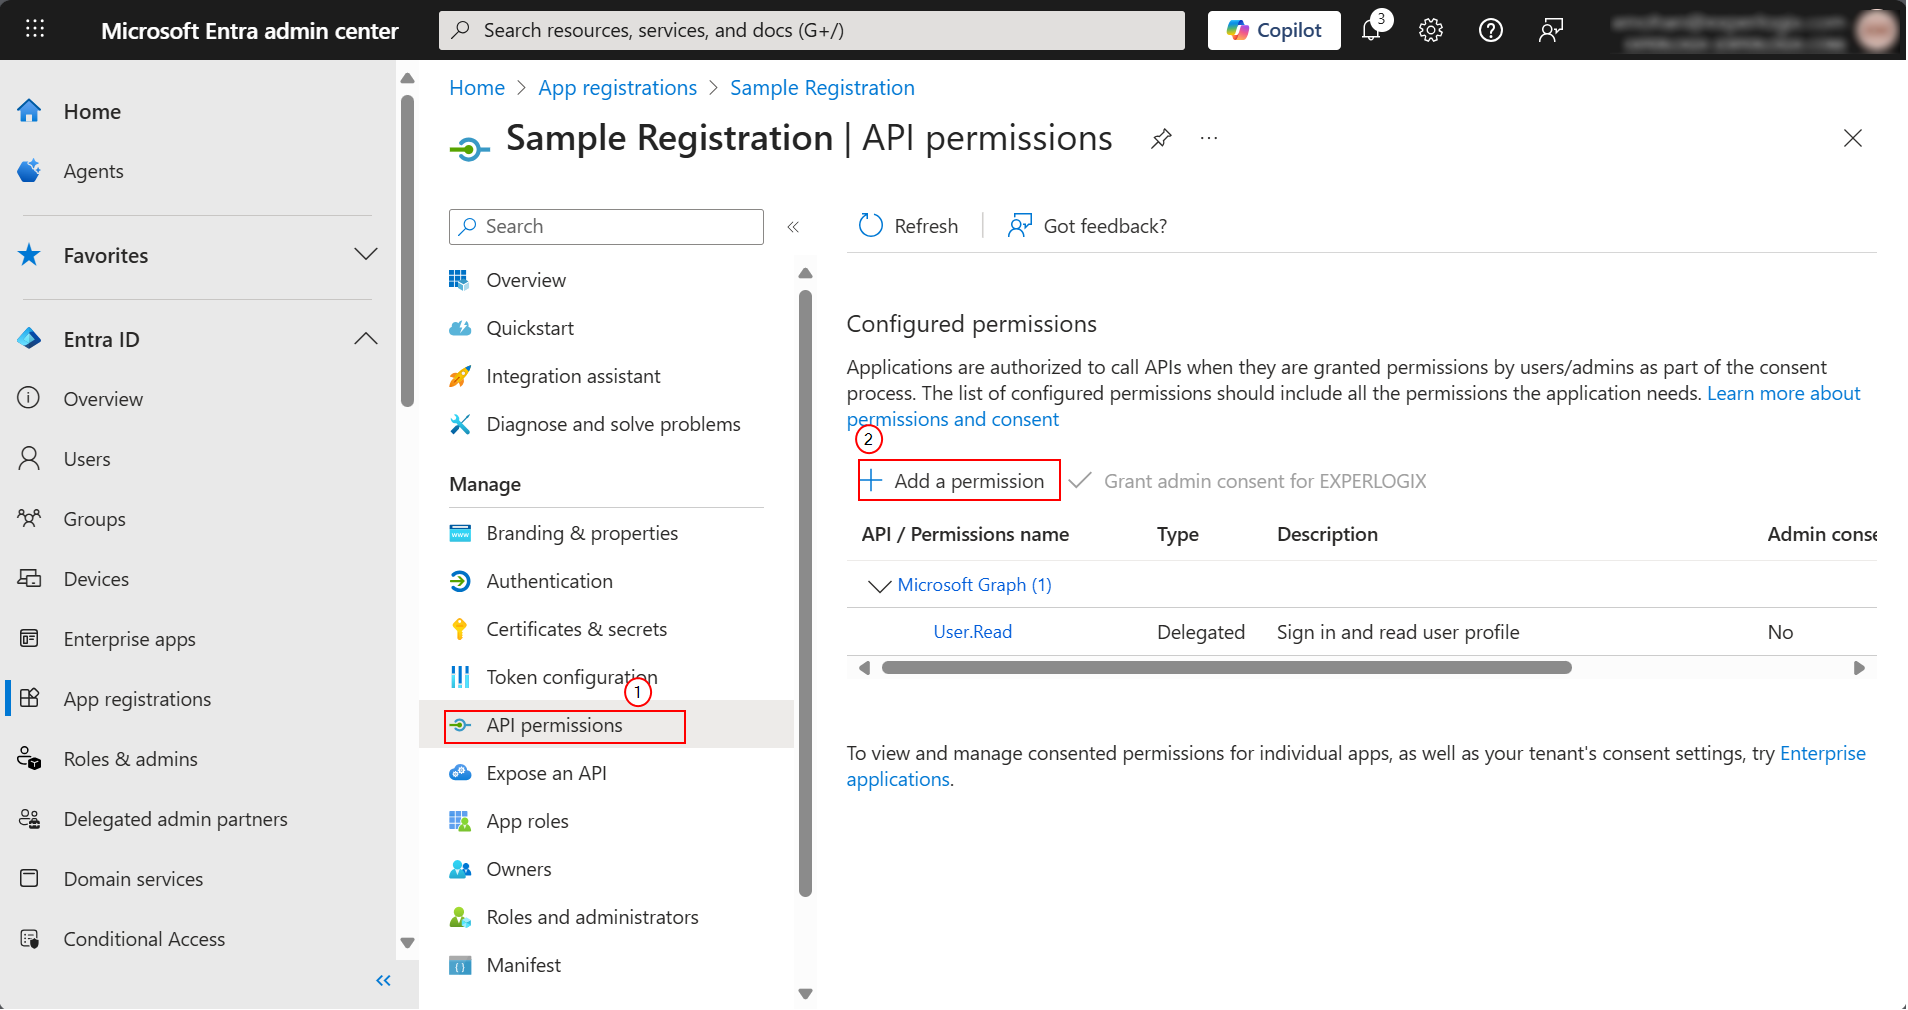
On the App Registration navigation menu, select API permissions > Add a permission.
-
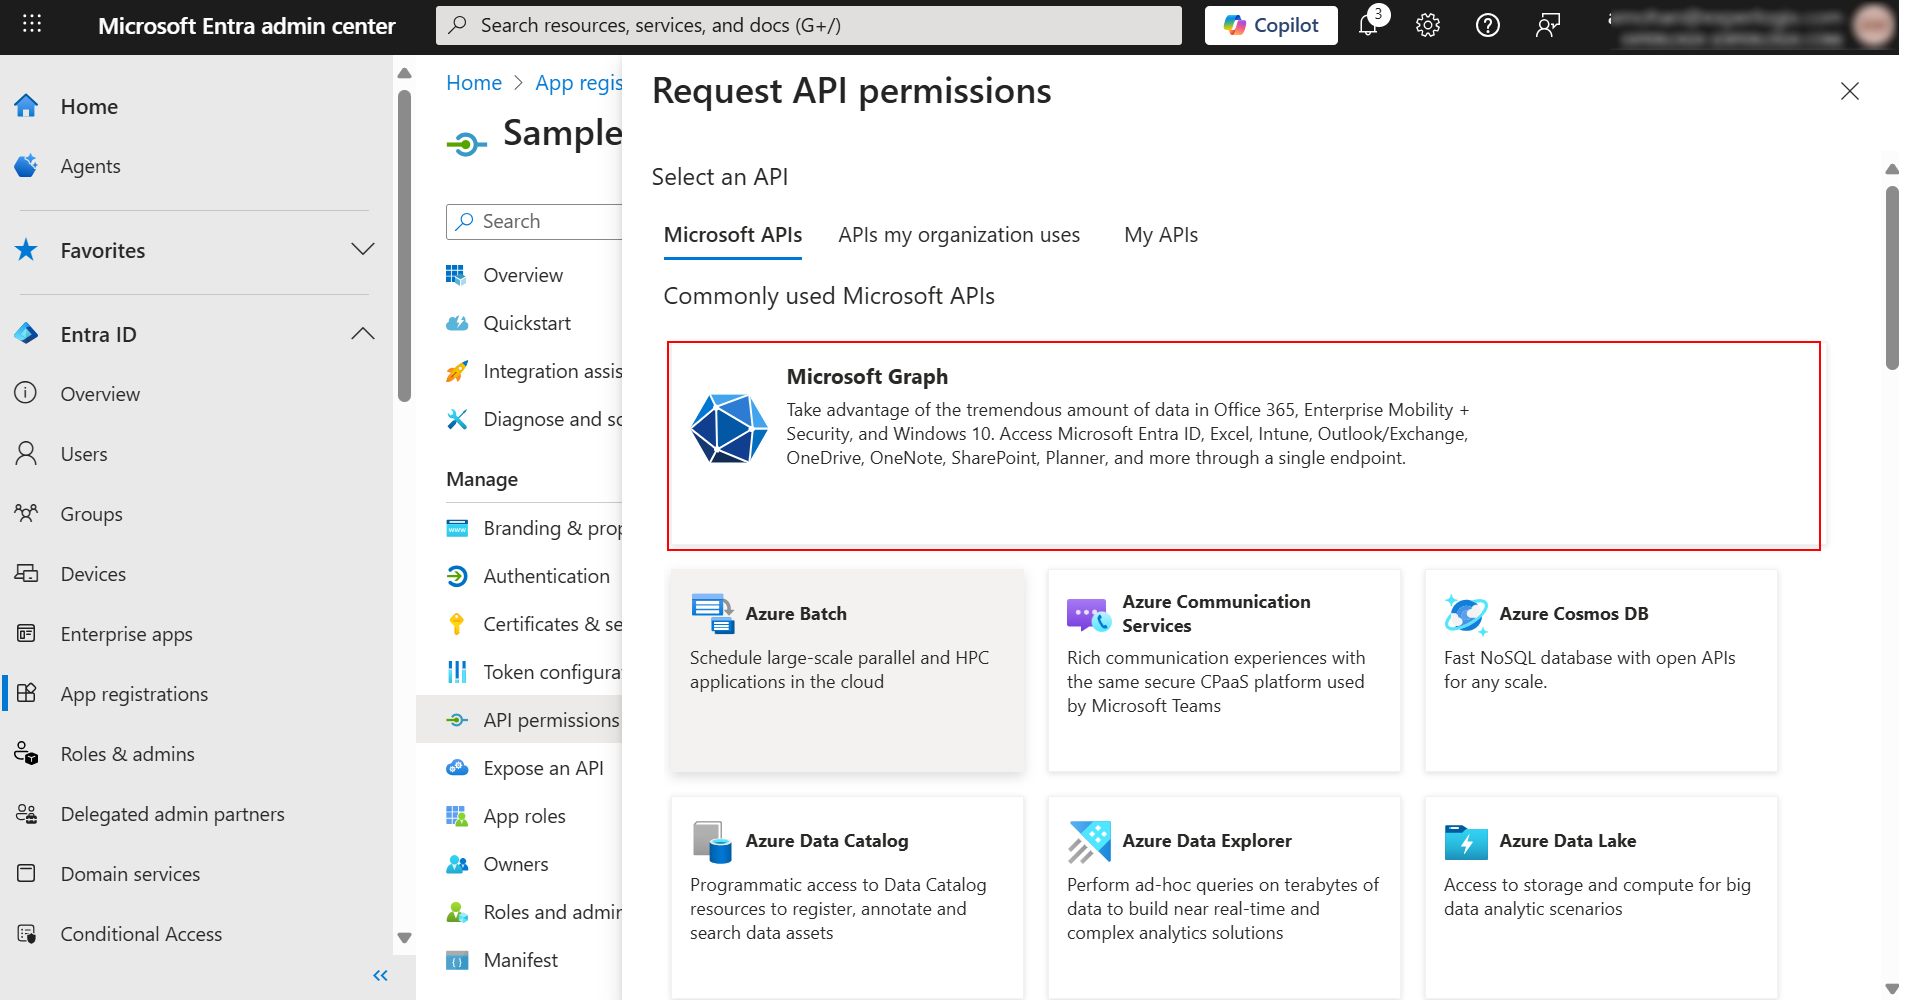
From the list of commonly used APIs, choose Microsoft Graph.
-
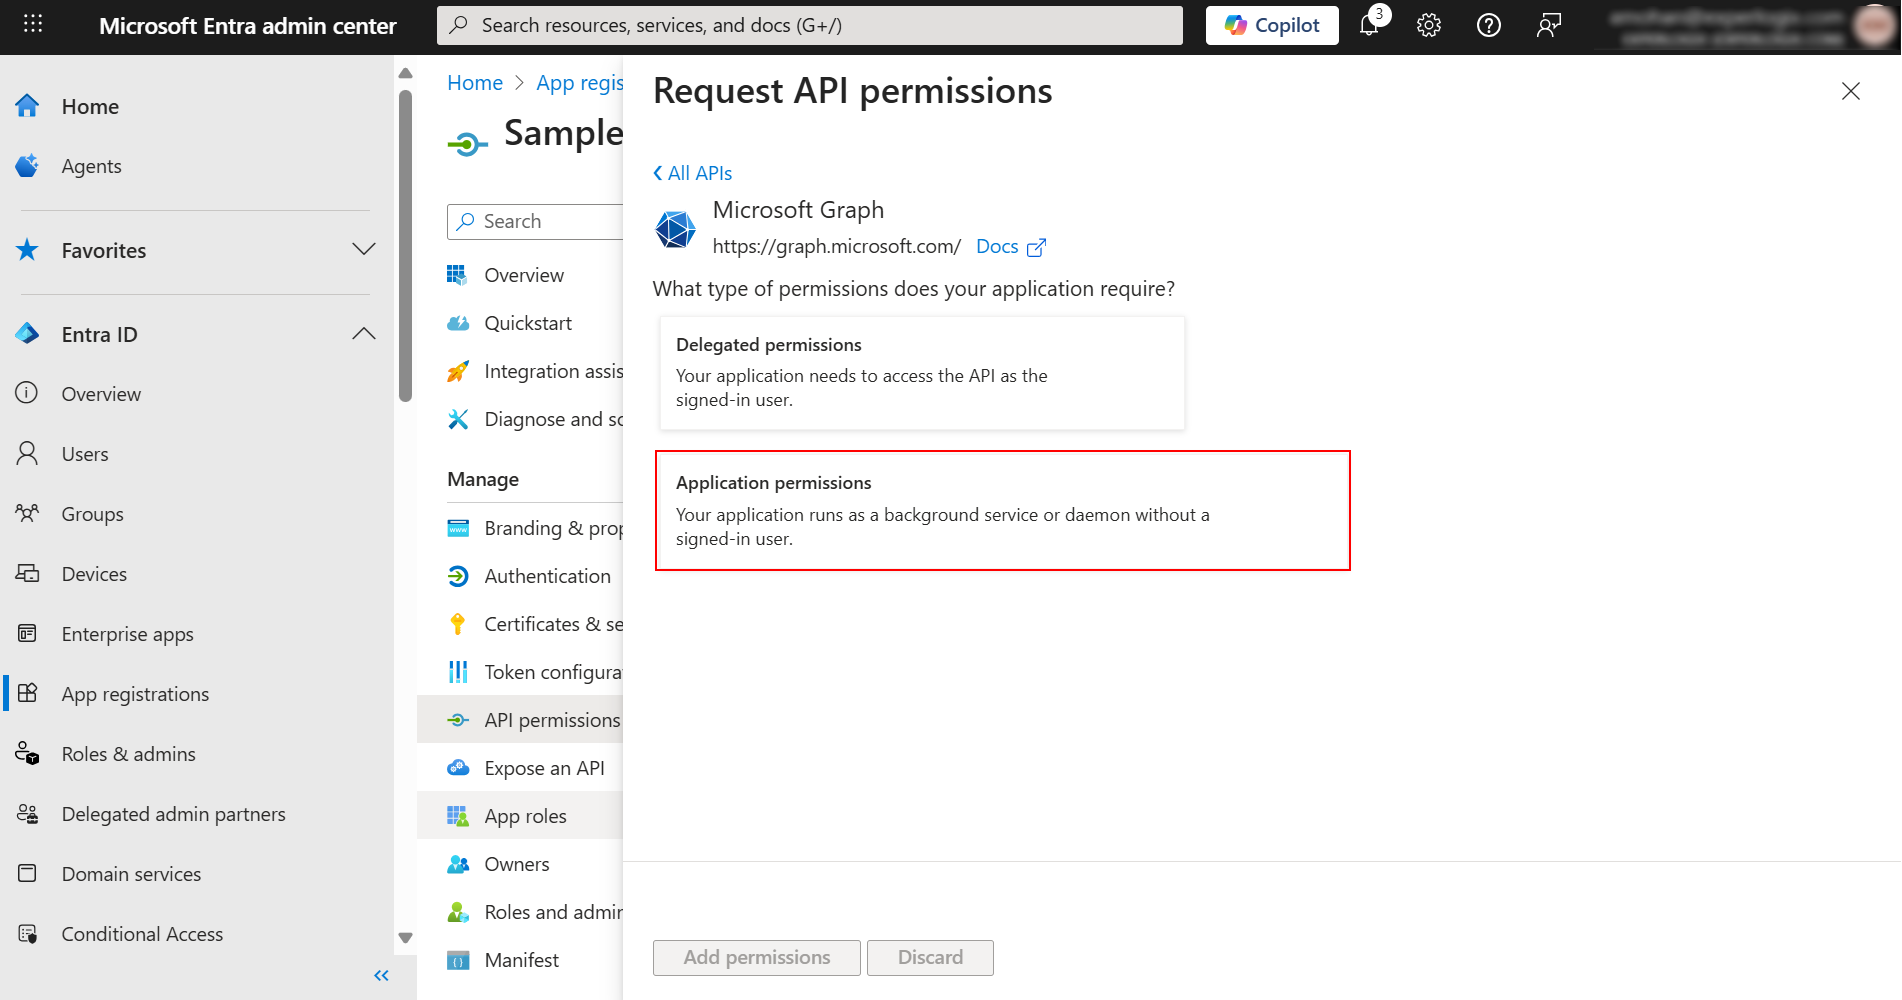
Under What type of permissions does your application require?, select Application permissions.
-
In the search bar, search for sites and select Sites.Selected.
-
Select Add permissions.
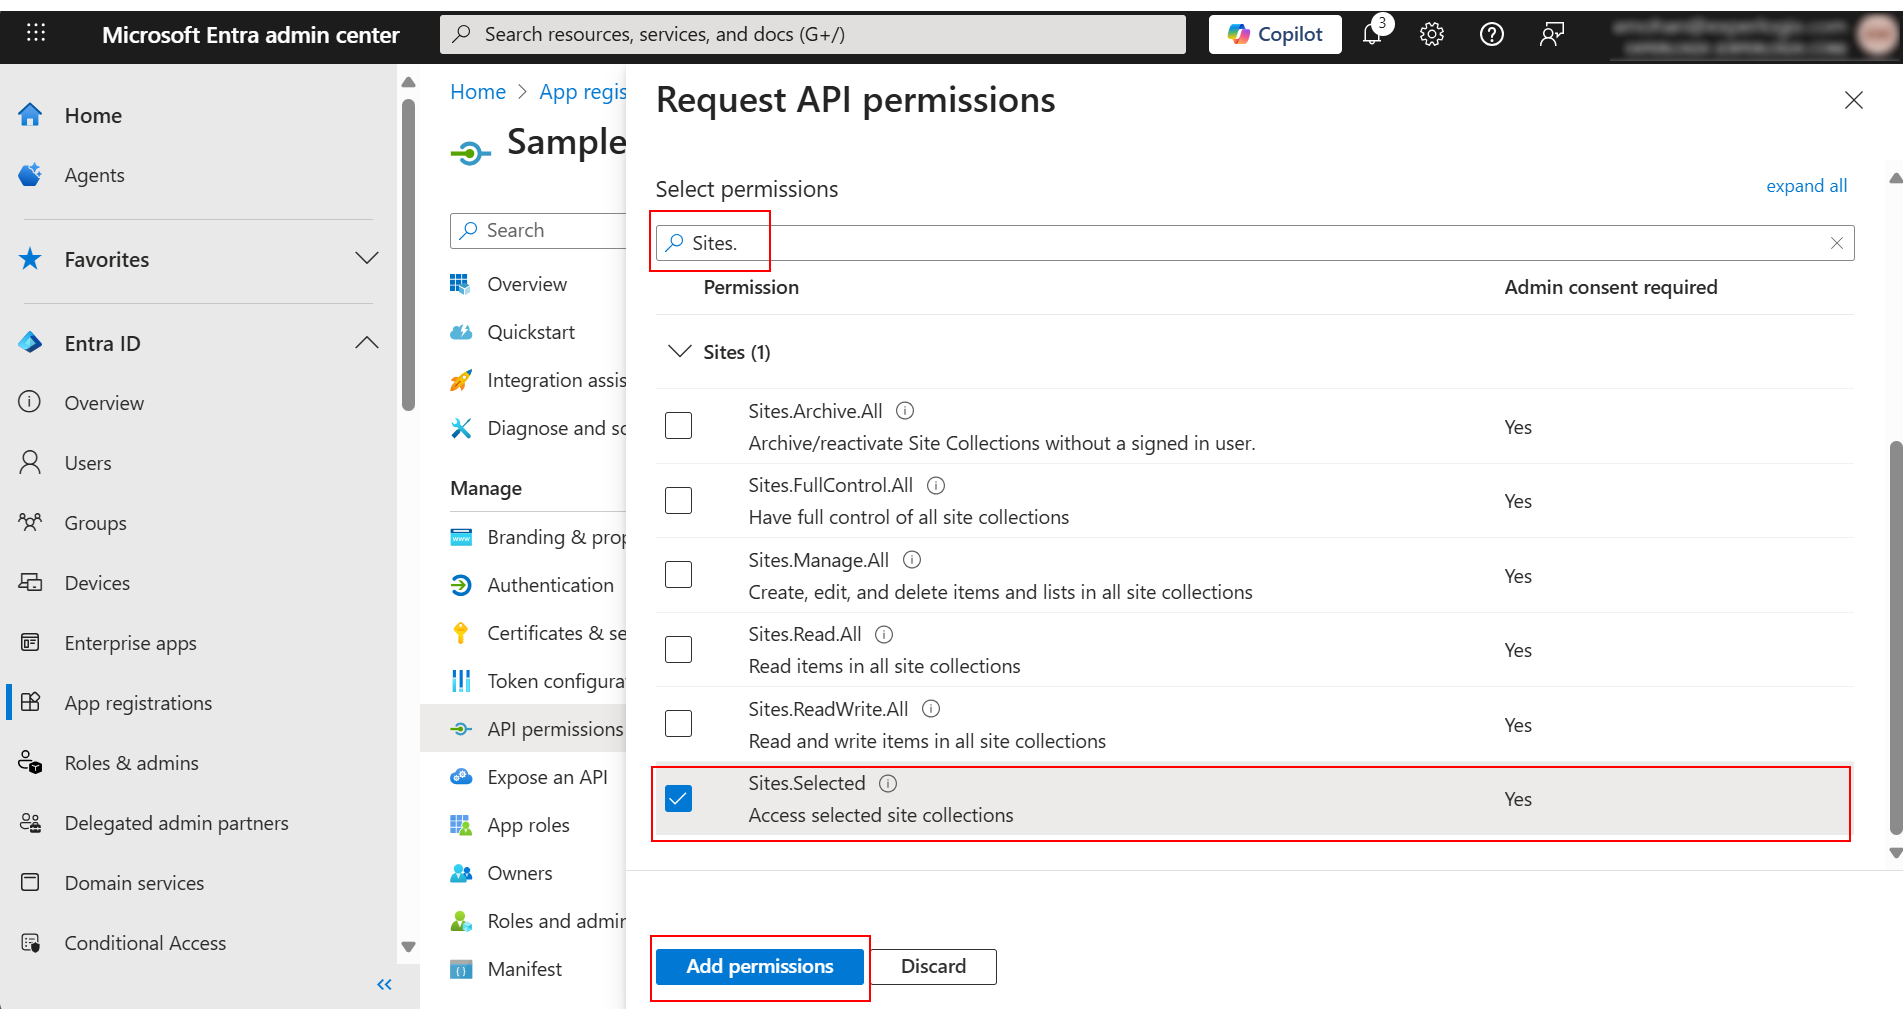
The API is added and you are returned to the main page.
Repeat step 1 - 5 to add the following permissions.
-
SharePoint > Application > Sites.Selected
-
SharePoint > Delegated > AllSites.Read
-
SharePoint > Delegated > AllSites.Write
-
If the connector fails post authorization, add the permission SharePoint > Delegated > AllSites.FullControl temporarily, while you complete the connector configuration.
Delegated permissions are necessary for authorization during the connector configuration. Upon successful configuration, these permissions can be safely removed from the application registration. At runtime, the system utilizes the Sites.Selected application permissions.
Grant Admin Consent
Upon adding the API permissions to the App registration, select Grant Admin Consent.
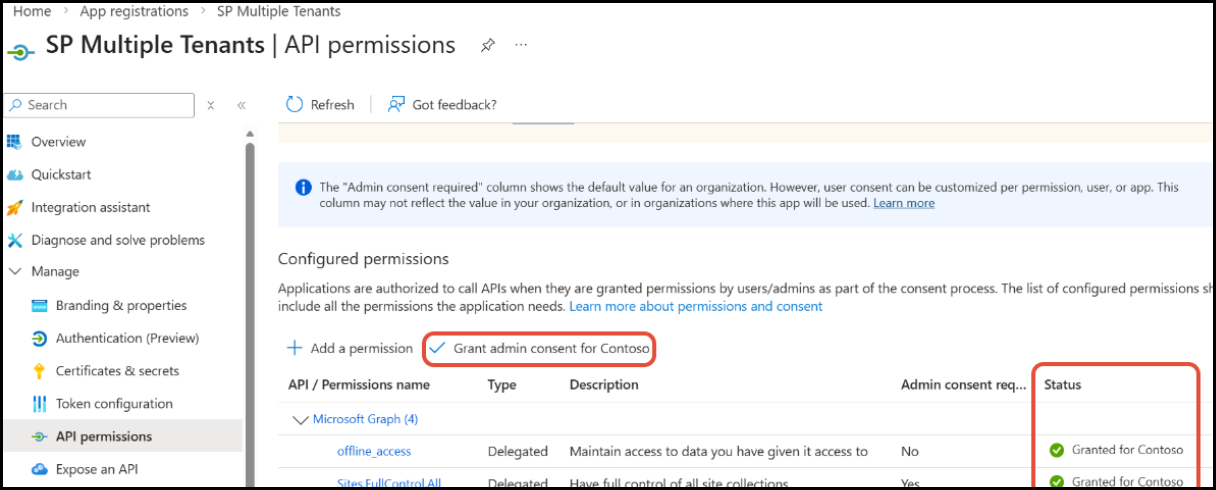
The following are granted with the Admin Consent:
|
API Name |
API Type |
Permission Name |
Reason for Permission |
|---|---|---|---|
|
Microsoft Graph |
Application |
Sites.Selected |
Manages the permissions interface for Microsoft SharePoint sites selected. |
|
Microsoft SharePoint |
Application |
Sites.Selected |
Provides access to the selected Microsoft SharePoint sites. |
|
Microsoft SharePoint |
Delegated |
AllSites.Read |
Connector Configuration |
|
Microsoft SharePoint |
Delegated |
AllSites.Write |
Connector Configuration |
Add Client Secret
-
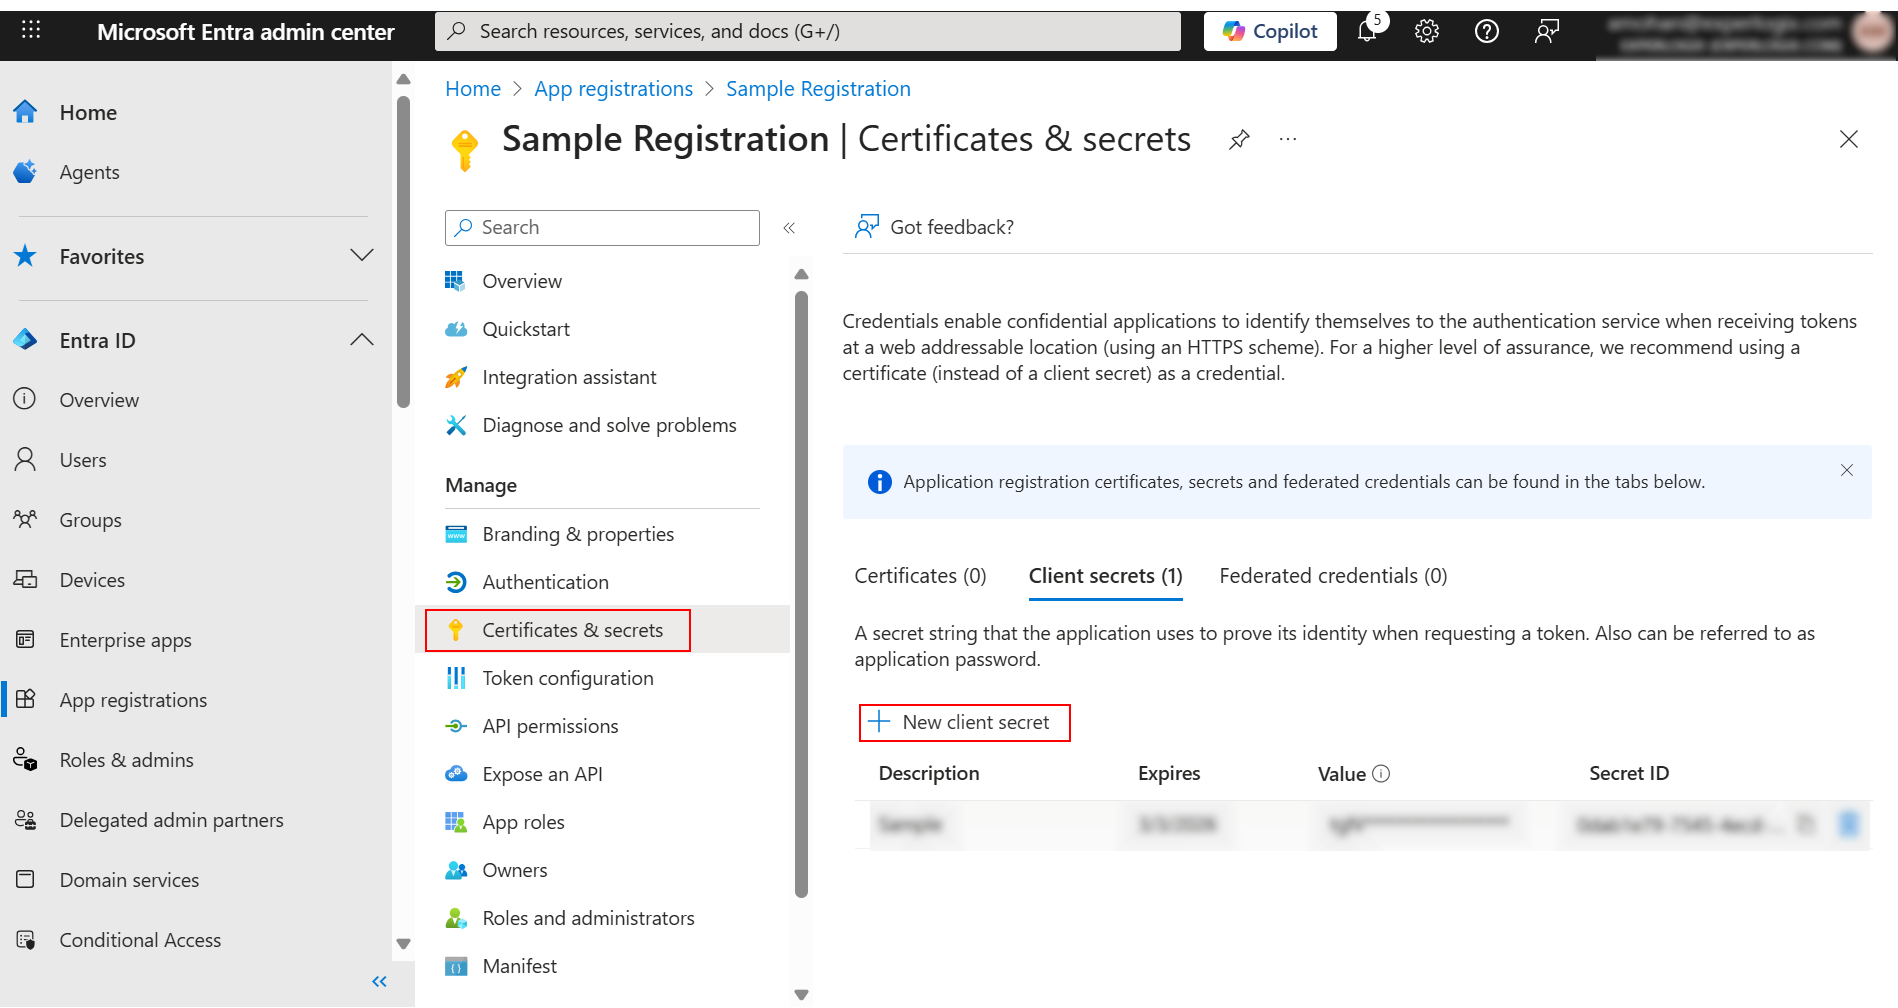
On the App Registration navigation menu, select Certificates and secrets > New client secret.
-
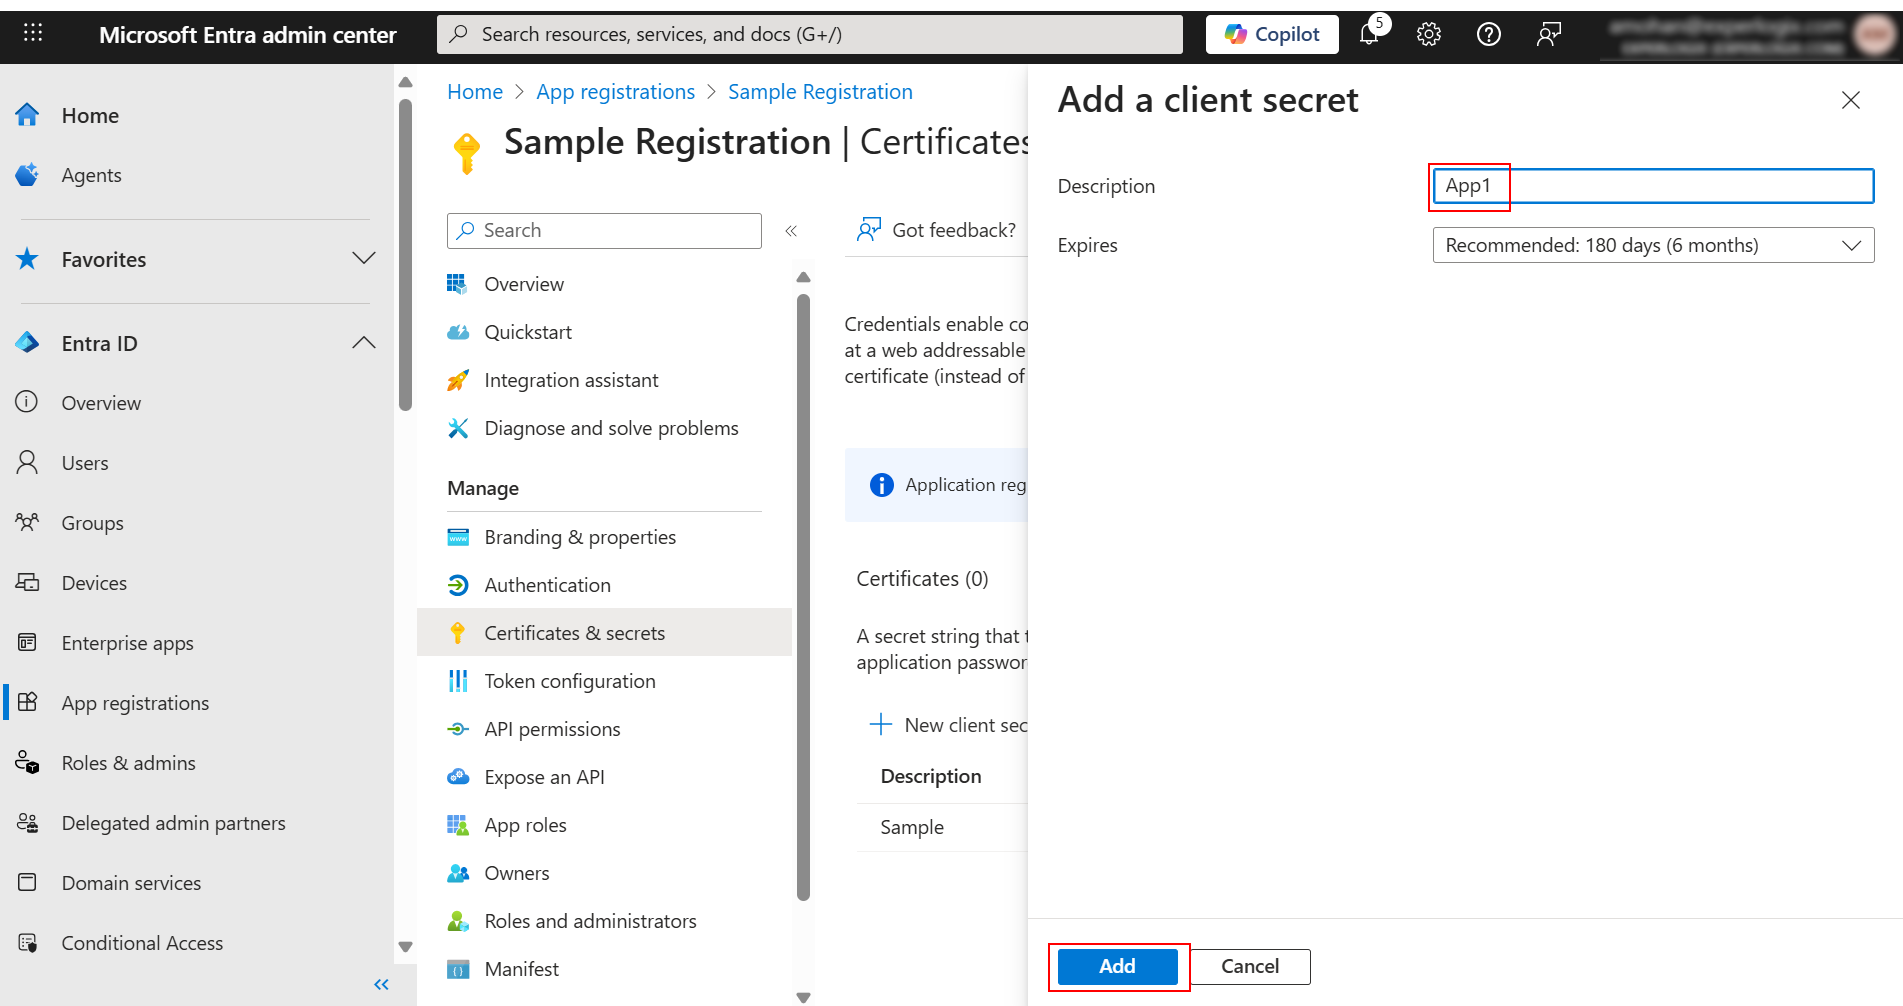
In the Add a client secret section, add a Description and Expiry duration (recommended: 180 days), and select Add.
The secret value is populated. Ensure you copy the Secret Value and not the Secret ID.
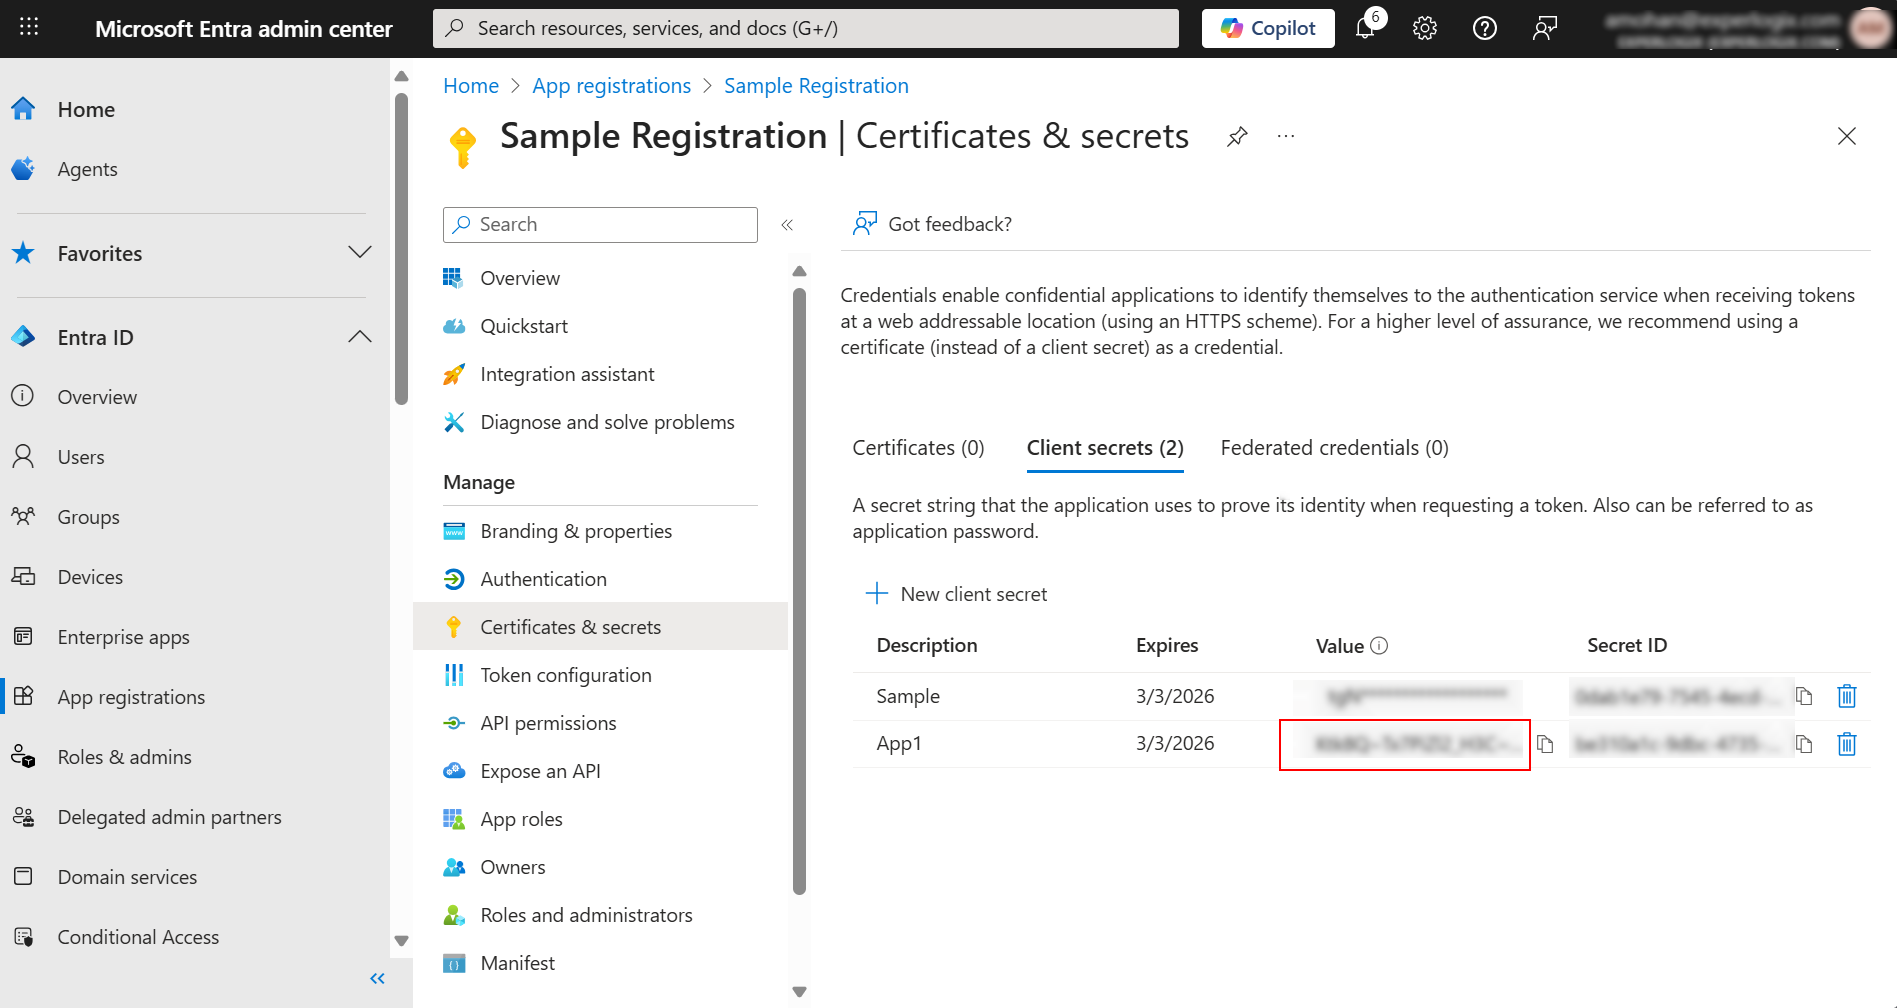
Client secret values cannot be viewed, except immediately after creation. Be sure to save the secret Client when created before leaving the page.
If first time creating a Microsoft SharePoint connector, then please continue to Creating the Connector.
If reconfiguring the Microsoft SharePoint connector OAuth2.0, then please skip to OAuth Authorization.
Creating the Connector
-
In the Project Console, navigate to the Control panel > Connectors.
-
Select +Create.
-
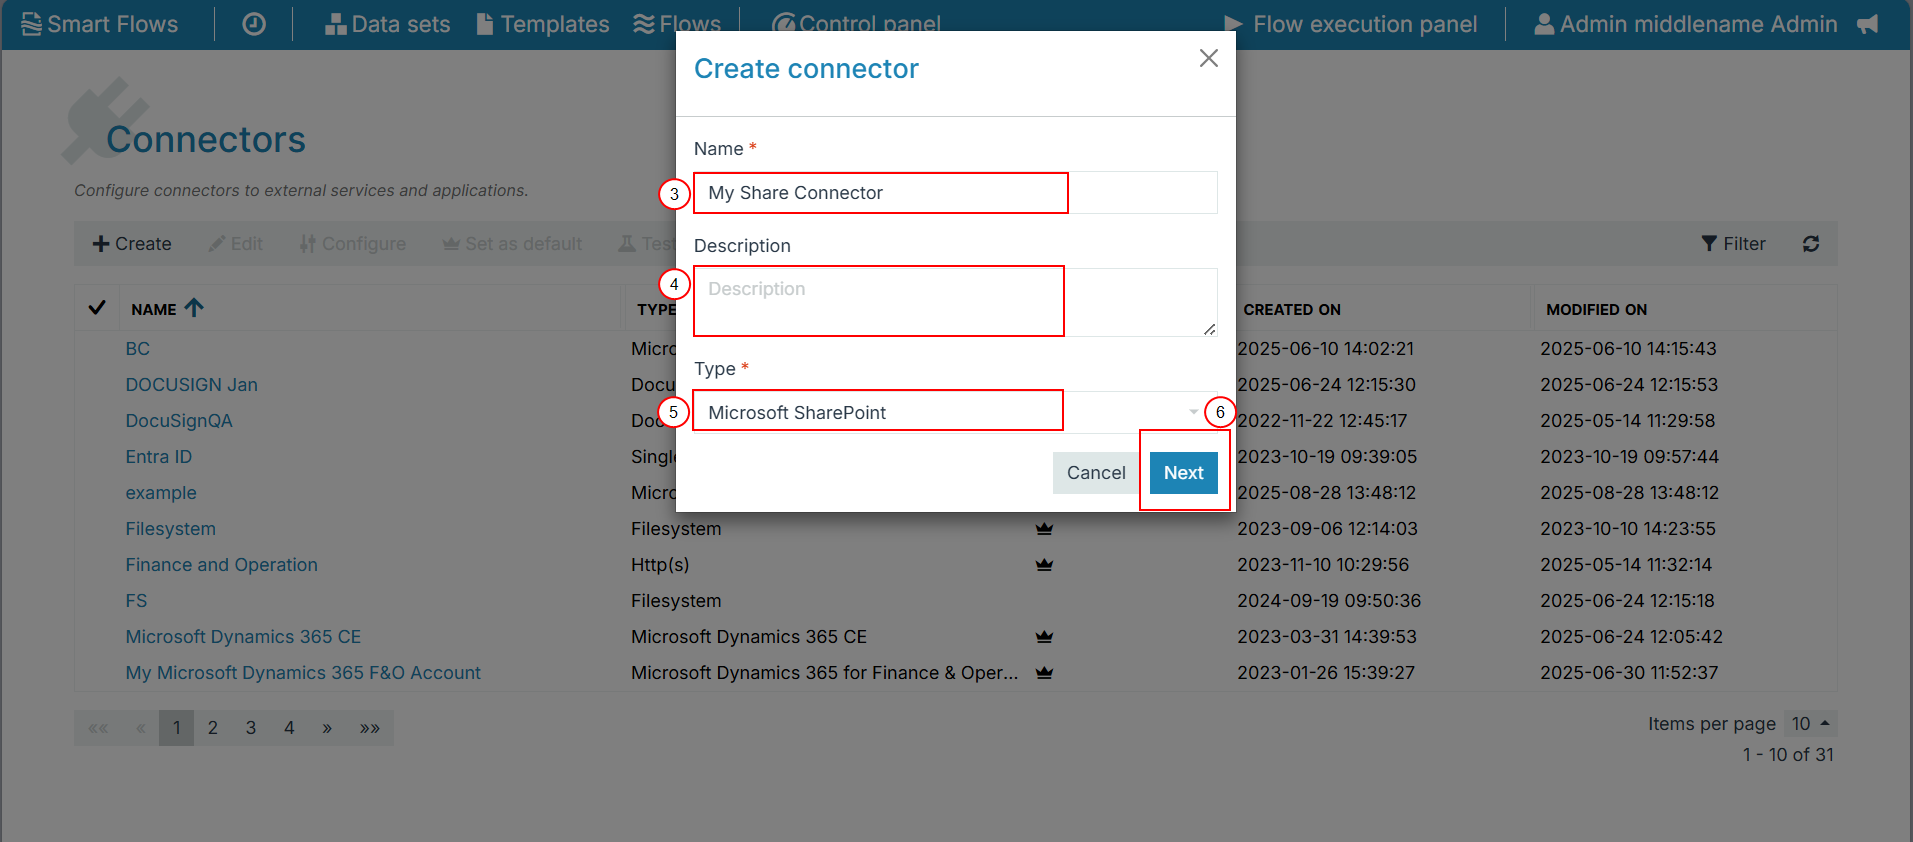
Enter the values for Name, Description fields and select a value in the Type dropdown.
-
Input the Microsoft SharePoint Site URL, SharePoint site and select Authorization Type.
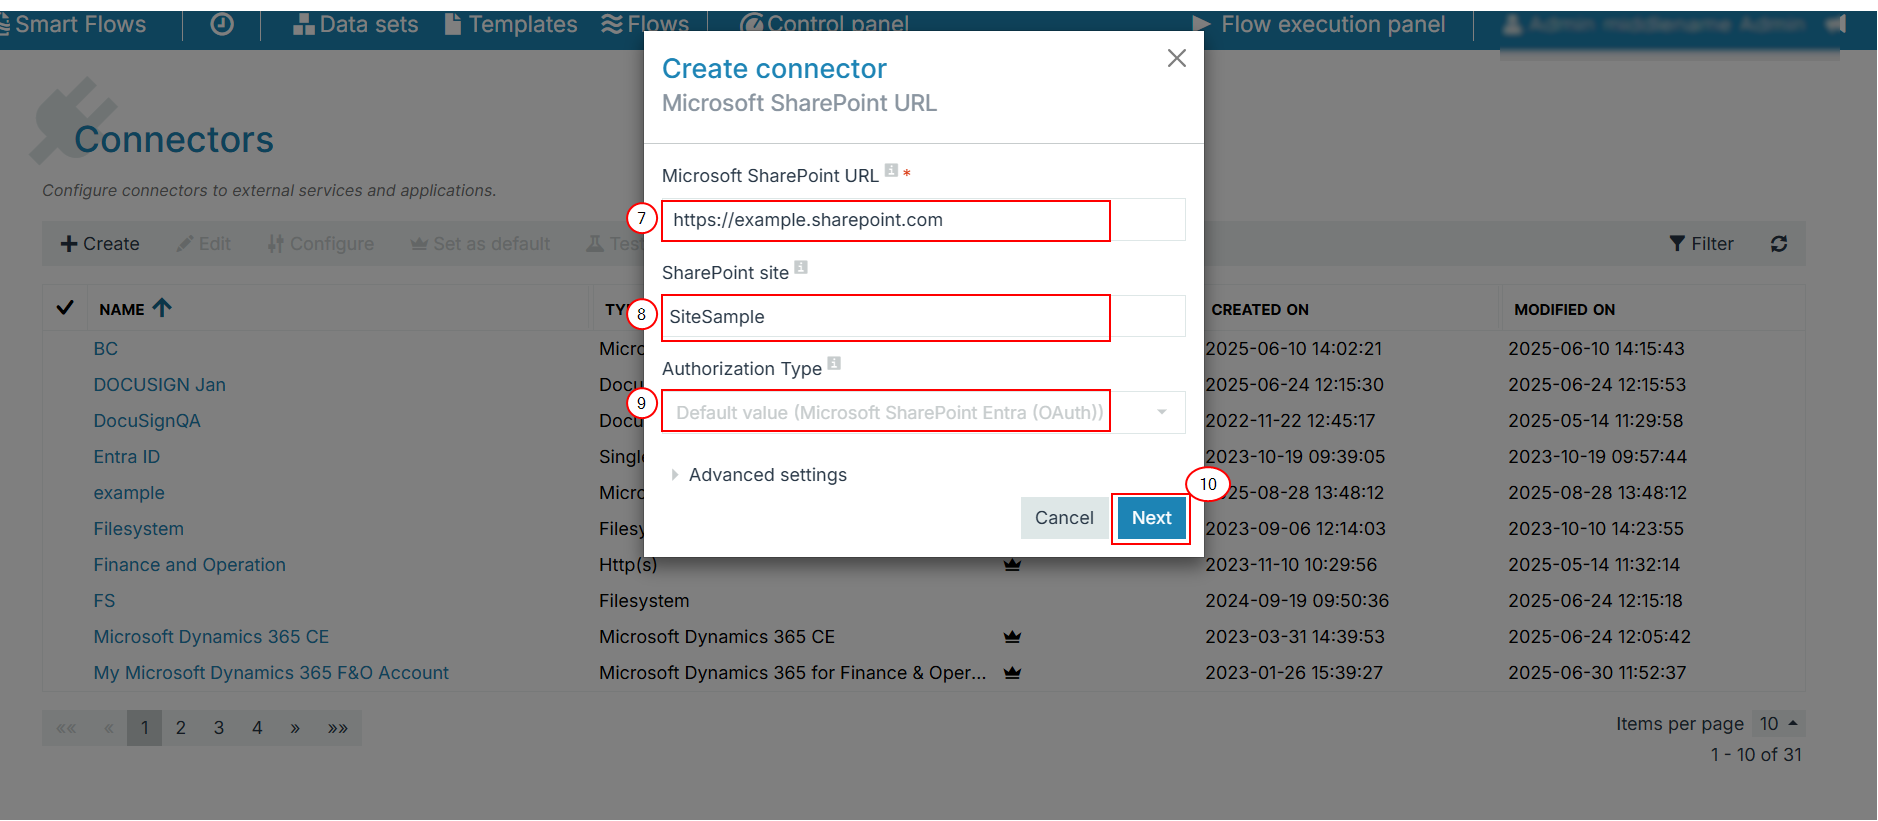
The Authorization Type uses Microsoft SharePoint Entra (OAuth) as the default value.
Decision Point
You can authorize the connector in two ways depending on your use-case.
-
OAuth 2.0 Authorization uses an Entra ID account. In Cloud instances, a SharePoint connector can only be authorized using OAuth.
-
Username/Password account credentials are entered manually. On premise instances can use either Authorization type.
-
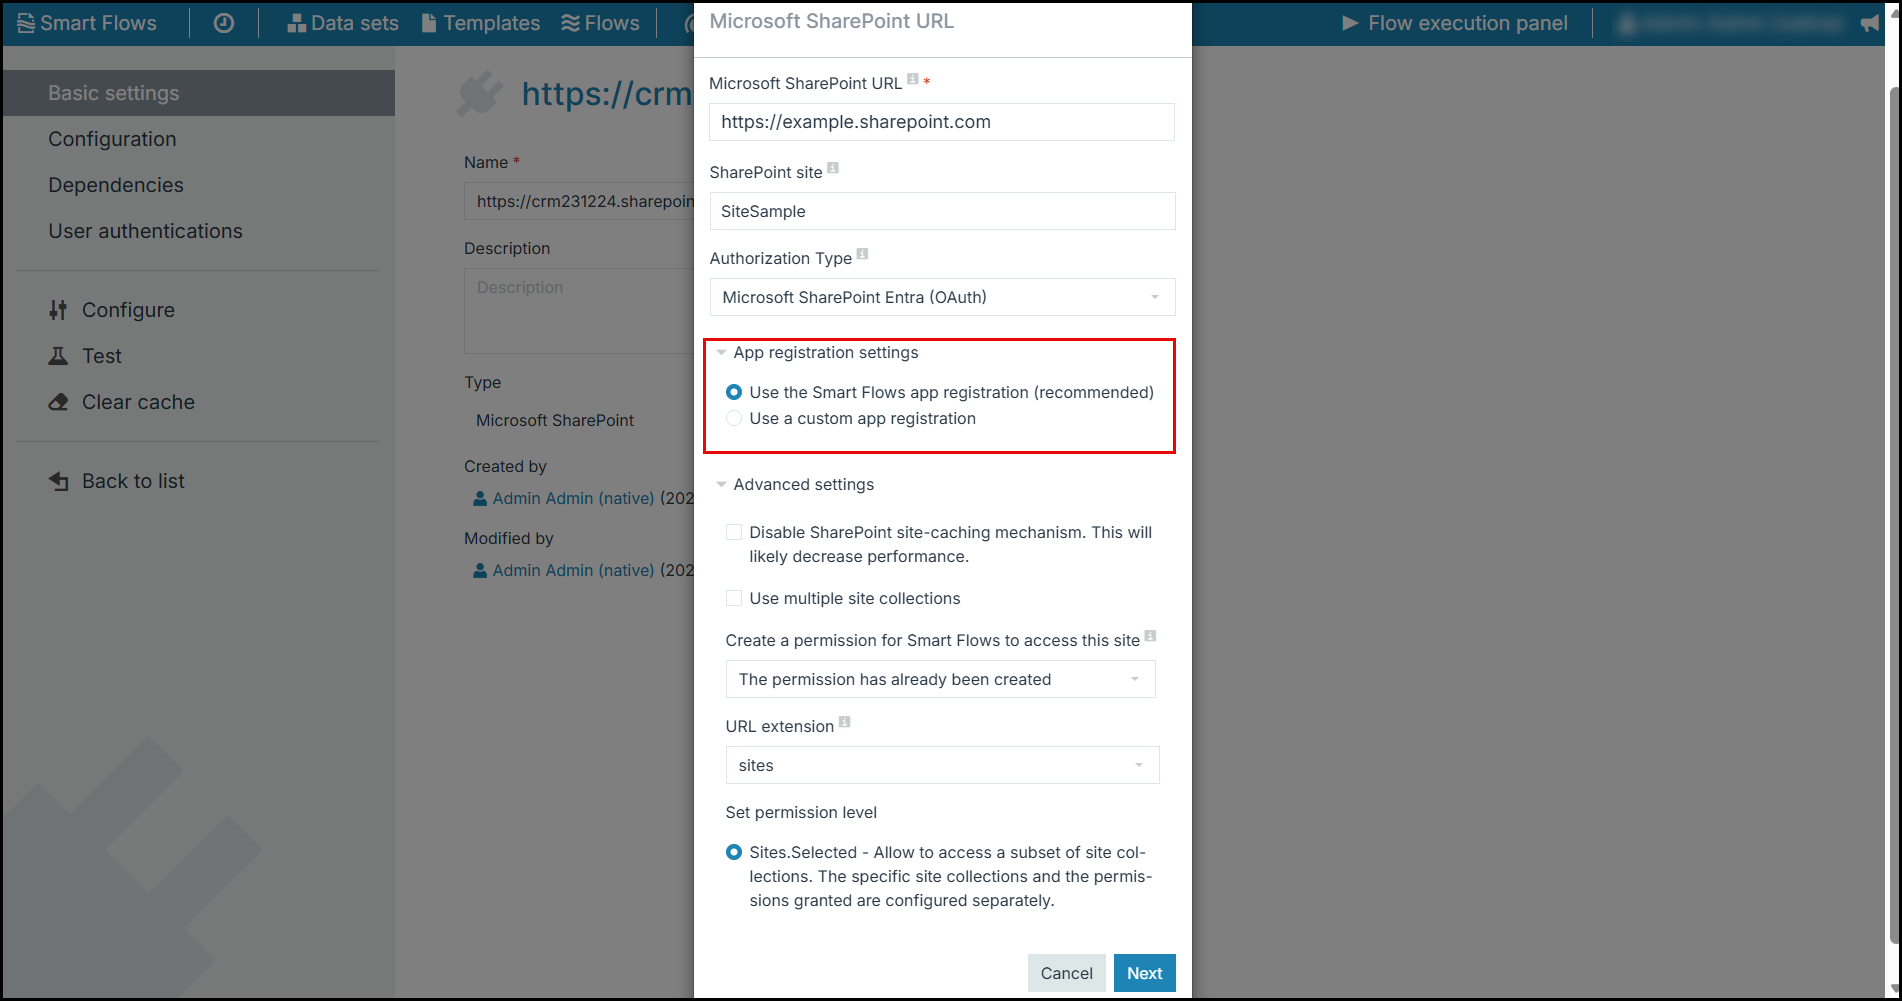
In the App registration settings, select one of the below options:
-
Use the Smart Flows app registration (recommended)
-
Use a custom app registration
-
-
In the Advanced settings, perform the following steps:
-
To prevent Smart Flows retrieving the site information at every request, you can select Disable SharePoint site-caching mechanism. This will likely decrease the performance.
-
To handle all sites of the collection at the time of registration, select Use multiple site collections.
-
In the URL extension dropdown menu, select Default value (sites).
-
For Set permission levels, select Sites.Selected, Site.Manage or Site.Write, and select Next.
-
See Microsoft SharePoint Edit Connector Parameters for a list of permissions.
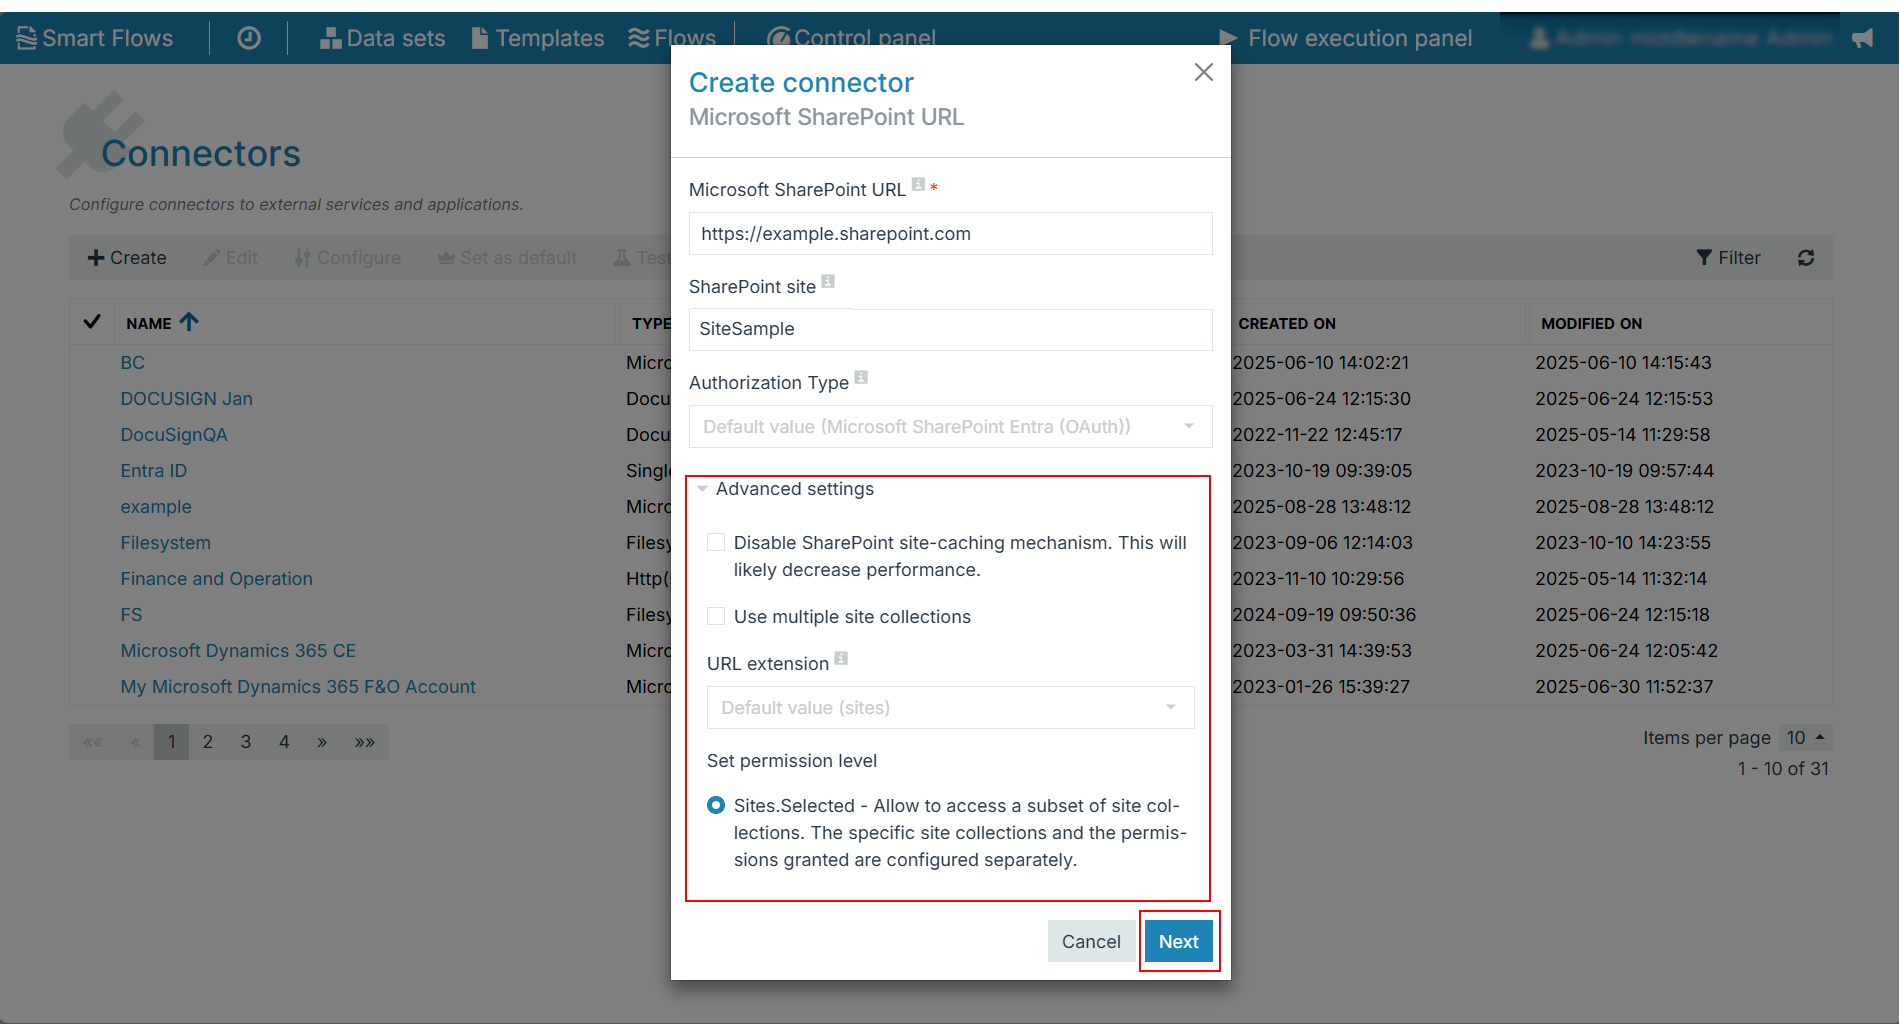
The Site.Manage or Site.Write options are displayed only when you check Use multiple site collections option. If unchecked, then only Sites.Selected option is displayed.
Register Smart Flows in Microsoft SharePoint window displays.
OAuth Authorization
If you select OAuth as Authorization Type, you either create an App Registration in your Microsoft Entra Portal or select the Smart Flows pre-configured App Registration in your Connector configuration. See Create a Smart Flows App Registration for SharePoint Access in Microsoft Entra
-
Add the client Id and client secret value from the custom App Registration and select Next.
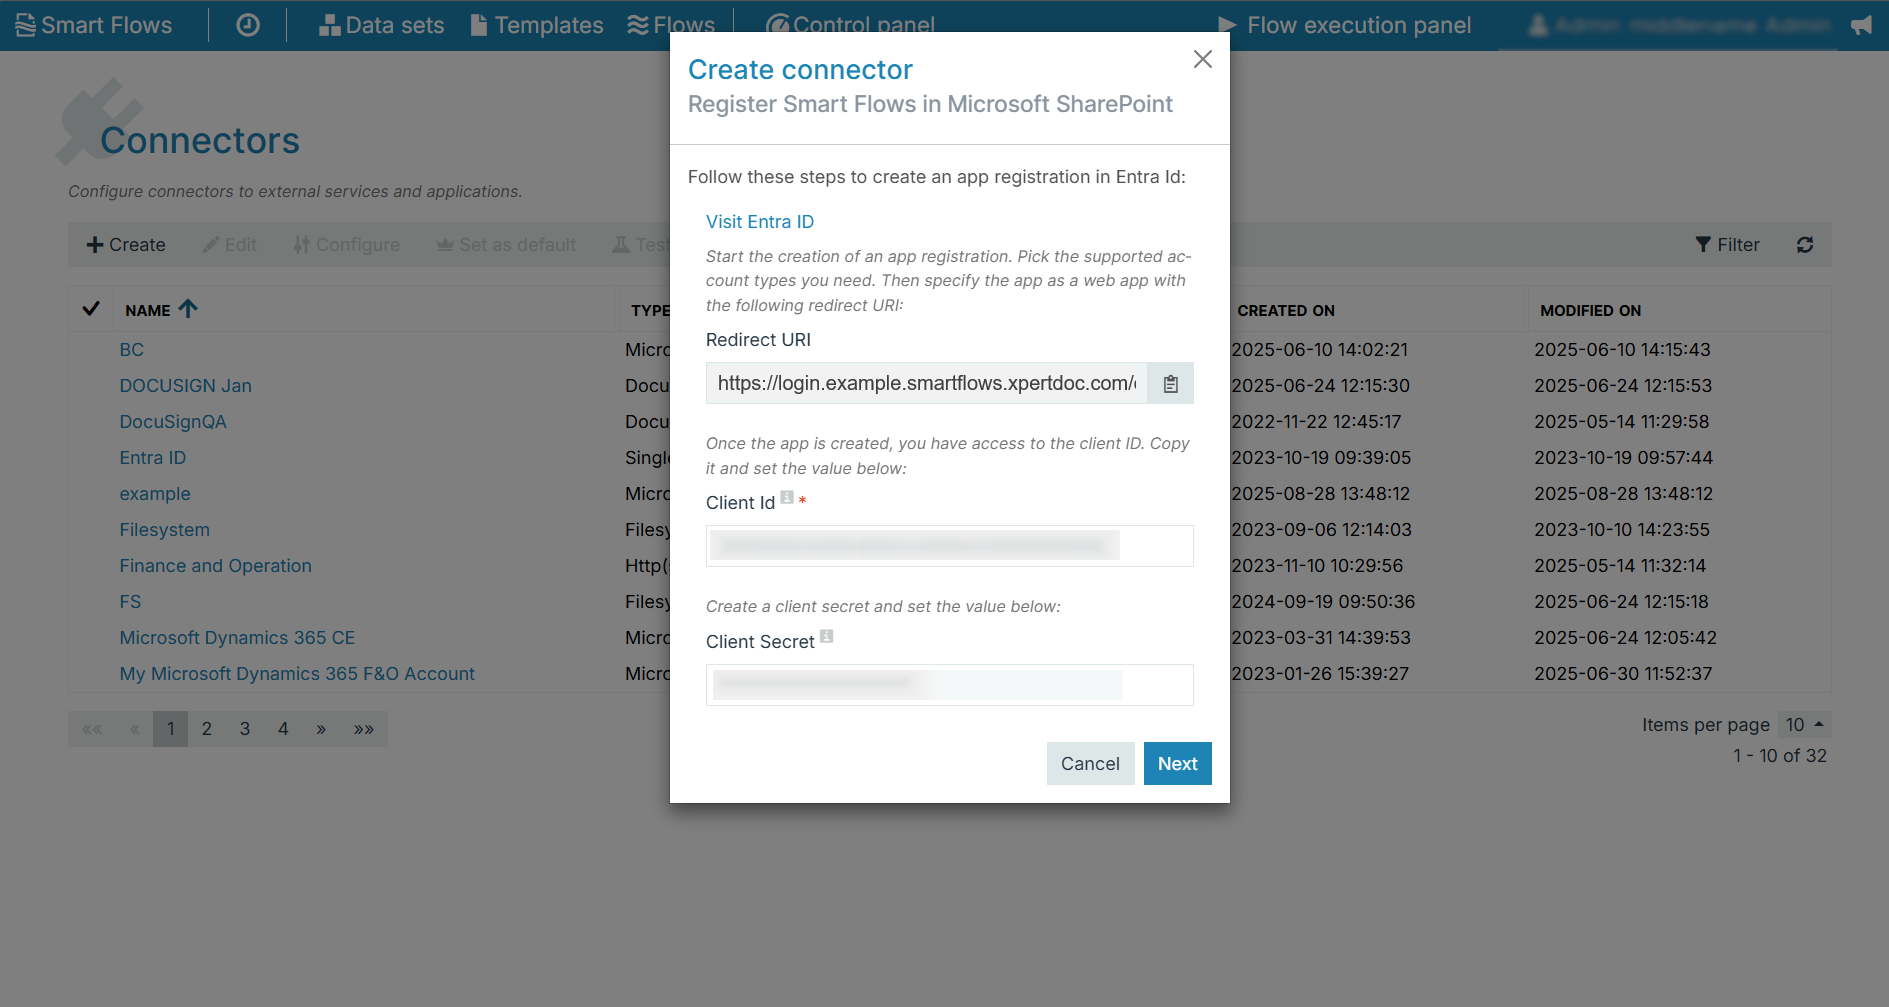
The Create connector Authorize Experlogix Smart Flows window displays.
-
Select Authorize Smart Flows.
You are redirected to a Microsoft OAuth 2.0 Consent Screen.
-
Check the box beside ‘Consent on behalf of your organization’ and select Accept
You are redirected back to Smart Flows.
-
Select Authorize again, and select Next.
-
From the dropdown menu, choose a library (or leave as Default), then select Next > Finish.
The account used to authorize the Connector must have permissions in Microsoft Entra ID to approve the application and grant consent. Depending on your tenant configuration, this may require elevated administrative access.
The authorizing account must also be:
-
Assigned the SharePoint Administrator role
-
An Owner of the target SharePoint site
-
An Owner of any Microsoft Teams groups connected to that site
Insufficient permissions in any of these areas will prevent connector authorization or block access to SharePoint resources.
Username/Password
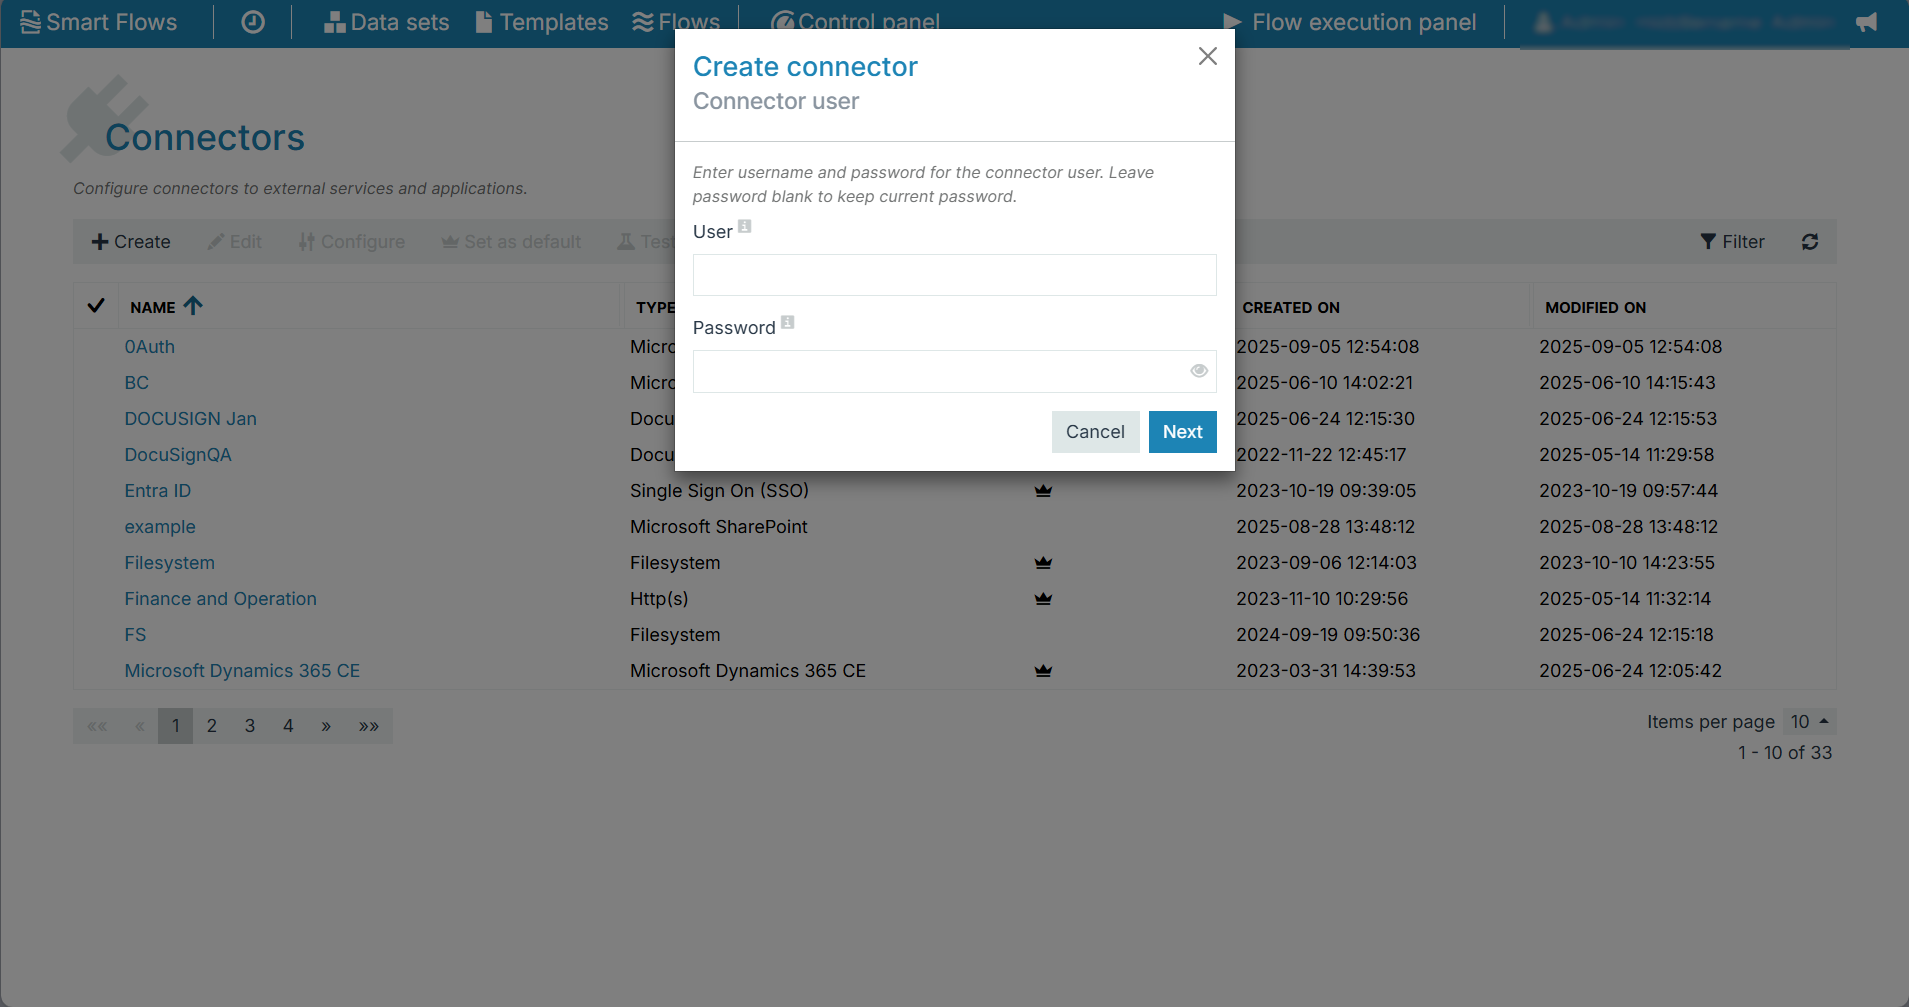
If you select Username/Password as the Authorization Type:
-
Input the username and password of an account that has the required permissions to grant Smart Flows access to SharePoint.
The Create connector Default library window displays.
-
From the dropdown menu, choose a Library (or leave as Default), then select Next > Finish.
The SharePoint connector is created. Check out Microsoft SharePoint Connector to see all the features available.