
This knowledge base section describes how to set up the Experlogix Smart Flows connector for Microsoft Dynamics 365 Business Central. The connector enables Smart Flows to securely connect to Business Central to retrieve and update business data, trigger flows, generate documents, and perform document-related actions directly in the context of Business Central records.
By connecting Smart Flows with Business Central, organizations can embed document automation and flow execution into their financial and operational processes, such as sales orders, invoices, and other touchpoints with customers and vendors.
In the sections below, we explain:
-
how to configure the connector for Microsoft Dynamics 365 Business Central environments.
-
how to make Smart Flows capabilities available to Business Central users within their day-to-day workflows.
Connector in a nutshell
|
Item |
Description |
|---|---|
|
Connector name |
Microsoft Dynamics 365 Business Central |
|
License |
Requires Experlogix Smart Flows plugin for Microsoft Dynamics 365 Business Central |
|
Required version of Smart Flows |
4.26+ |
|
Max number per project |
1 |
|
Available for Single Sign-On |
Yes |
|
Support for Individual User Authentication |
Yes |
|
Supported authentication patterns |
OAuth (Experlogix CloudConnect) |
|
Business Central extension |
Experlogix Core extension for Microsoft Dynamics 365 Business Central |
|
Experlogix Smart Flows extension for Microsoft Dynamics 365 Business Central |
Extension certified |
|
Yes |
Extension installation options |
|
Automated via connector configuration |
Scope |
|
Company-level access within the selected Business Central environment |
|
Connector configuration
-
Navigate to Control Panel > Connectors.
-
Create a new connector.
-
Give your connector a Name, optionally a description and set the Type to Microsoft Dynamics 365 Business Central.
-
Select Next to continue the connector configuration.
The following steps require a more in-depth description.
Part 1 - Authorizing Smart Flows to connect with your Microsoft Dynamics 365 BC instance
We are creating a connection between Smart Flows and Microsoft Dynamics 365 BC, so we need to authorize Smart Flows to establish that connection.
-
Click Authorize Experlogix Smart Flows.
-
Sign in with a Microsoft account that has access to the Business Central environment.
-
Grant the requested permissions.
-
Select environment and company
-
Choose the Business Central environment.
-
Select the Company to connect to.
-
Part 2 - Installing and configuring the Experlogix extensions for Microsoft Dynamics 365 Business Central
Now we have authorization to connect, we can install and configure extensions to customize Business Central. The connector requires two extensions to be installed:
-
The Experlogix Core extension, an extension that bridges BC and Experlogix integration hub Cloud Connect.
-
The Smart Flows extension that contains document automation-specific customizations.
Import options
-
Install Core and Smart Flows extensions (recommended)
-
Install Core extension only
-
Manual install (downloads the extensions from Microsoft Marketplace. You can navigate to Extension Management in BC and install the downloaded extensions manually)
If the extensions have already been installed in your BC instance, you can skip this step.
Wait for the configuration of your connector to complete (this may take a few moments).
Configuration options
Once the extensions are installed, several configuration pages become available in Business Central to manage the integration.
-
Experlogix Settings - The Experlogix Settings page contains the core connection details between Business Central and Smart Flows. This is where you can review and validate the technical configuration that enables data exchange and flow execution.
-
Experlogix Documents Buttons - The Experlogix Documents Buttons page allows you to manage which Business Central entities display the Experlogix Documents action.
Here, you can maintain a table of entities (such as customers, sales orders, or invoices) for which users can launch Smart Flows directly from Business Central. This enables seamless, context-aware flow execution as part of users’ daily workflows. Initially, the list contains about 40 entities that are commonly used to trigger flow executions.
-
Experlogix Logging - The Logging page provides a detailed audit trail of interactions between Business Central and Smart Flows. It records requests, responses, and errors, making it an essential tool for troubleshooting and diagnostics when something does not behave as expected.
Part 3 - Giving Microsoft Business Central User access to flows
The Experlogix Smart Flows extension for Microsoft Dynamics 365 Business Central adds three dedicated permission sets to Business Central to manage access and responsibilities within Smart Flows:
-
XPL-SFAdmin (Smart Flows Administrator) - Full administrative access. Users with this permission set can configure Smart Flows settings, manage environments, maintain configurations, and oversee the overall setup.
-
XPL-Designer (Smart Flows Designer) - Intended for functional or technical users who design and maintain flows, templates and data sets. This permission set allows users to create, modify, and manage flow, template and data set definitions.
-
XPL-User (Smart Flows User) - Designed for end users who execute flows as part of their daily business processes.
To start and execute flows, a user must be assigned at least the XPL-User permission set. Without this, the Experlogix Documents action to start a flow execution in the context of Business Central is unavailable.
Assigning permission sets to Microsoft Dynamics 365 Business Central users
Follow Microsoft’s standard procedures to assign the Experlogix Smart Flows permission sets to users.
Define granular permissions - Business Central.
Configuring the Microsoft Dynamics 365 BC connector for single sign-on (Recommended)
To successfully use Smart Flows from Microsoft Dynamics 365 Business Central, users must be properly recognized and licensed within Smart Flows. While the Dynamics 365 BC permission sets control the visibility of the action button in the ribbon, they do not by themselves grant the ability to execute flows.
Smart Flows user requirements
For a user to run Smart Flows from Dynamics 365 CE, the following conditions must be met:
-
The user must exist in the Smart Flows user table.
-
The user must be active in Smart Flows.
-
A valid Smart Flows license must be assigned to the user.
Automatic user creation and licensing (recommended)
By default, Smart Flows supports automatic user provisioning for Dynamics 365 BC users:
-
When a user runs their first Smart Flow from Dynamics 365 BC, Smart Flows will:
-
Automatically create the user in the Smart Flows user table.
-
Activate the user.
-
Assign an available Smart Flows license.
This behavior ensures a seamless onboarding experience for end users and minimizes administrative overhead.
Required connector setting
To enable automatic user creation and licensing, it is highly recommended to keep the following setting enabled: Allow users to log in to Smart Flows with this connector. You can verify this setting as follows:
-
Open the Smart Flows Control Panel.
-
Navigate to Connectors.
-
Open your active Microsoft Dynamics 365 Business Central connector.
-
Go to Basic settings.
-
Under Authentication settings, verify the following settings:
“Allow users to log in to Smart Flows with this connector” is set to Yes.
If this setting is disabled, users will not be automatically created or licensed in Smart Flows, and flow execution from Dynamics 365 Business Central will fail unless users are manually managed in advance.
Syncing Microsoft Dynamics 365 Business Central users with an Experlogix Smart Flows permission set (Optional)
Smart Flows provides a user synchronization capability that allows you to automatically create active, licensed users in the Smart Flows user table based on users from connected systems, such as Microsoft Dynamics 365 BC. User syncing is especially useful to ensure a smooth first-time experience for end users.
By syncing users in advance, Smart Flows already recognizes users when they run their first flow execution. This avoids delays or execution issues that can otherwise occur when users are created and licensed on demand.
How user syncing works
When user syncing is executed:
-
Smart Flows retrieves users from all connected systems
-
Only users who have a Smart Flows role or permission set in the connected system are included
-
For each retrieved user, Smart Flows will:
-
Create a corresponding record in the Smart Flows user table
-
Set the user to active
-
Assign a Smart Flows license
This ensures that only authorized users are provisioned and that they are ready to use Smart Flows immediately.
User syncing is recommended when:
-
You want to onboard many users at once
-
You want to avoid first-run delays for users
-
You prefer controlled, preemptive user provisioning instead of on-demand creation
-
You are rolling out Smart Flows to a new group or organization
How to sync users
To start user synchronization:
-
Open the Project Console.
-
Navigate to Control Panel.
-
Open Users.
-
In the command bar of the user table, select Sync.
Once started, Smart Flows launches a background operation that retrieves all users from connected systems who have a Smart Flows role or permission set assigned.
All retrieved users are then created as active, licensed users in the Smart Flows user table. After sync, you’ll see a summary of the sync operation result, indicating how many users have been updated per synced connector and showing sync errors if any.
Individual user authentications for Business Central (Optional)
Experlogix Smart Flows provides users with robust yet user-friendly security features to manage how they interact with Microsoft Dynamics 365 Business Central (BC). By default, the Business Central connector utilizes a single set of connector-level credentials to execute operations.
Enabling individual user authentications ensures that every Business Central action performed by Smart Flows respects each user's specific permissions and data access rules. This empowers you to simplify compliance and optimize security.
Why use this feature?
You may want to ensure that all document automation activities in Microsoft Dynamics 365 Business Central are logged under the actual user who triggers the flow, rather than a generic service account. You may also want to control how background automations behave if a user is not present to authenticate.
Read on to learn how to configure individual user authentications for your Business Central connector and manage non-interactive flow behaviors.
Enabling Individual User Authentications
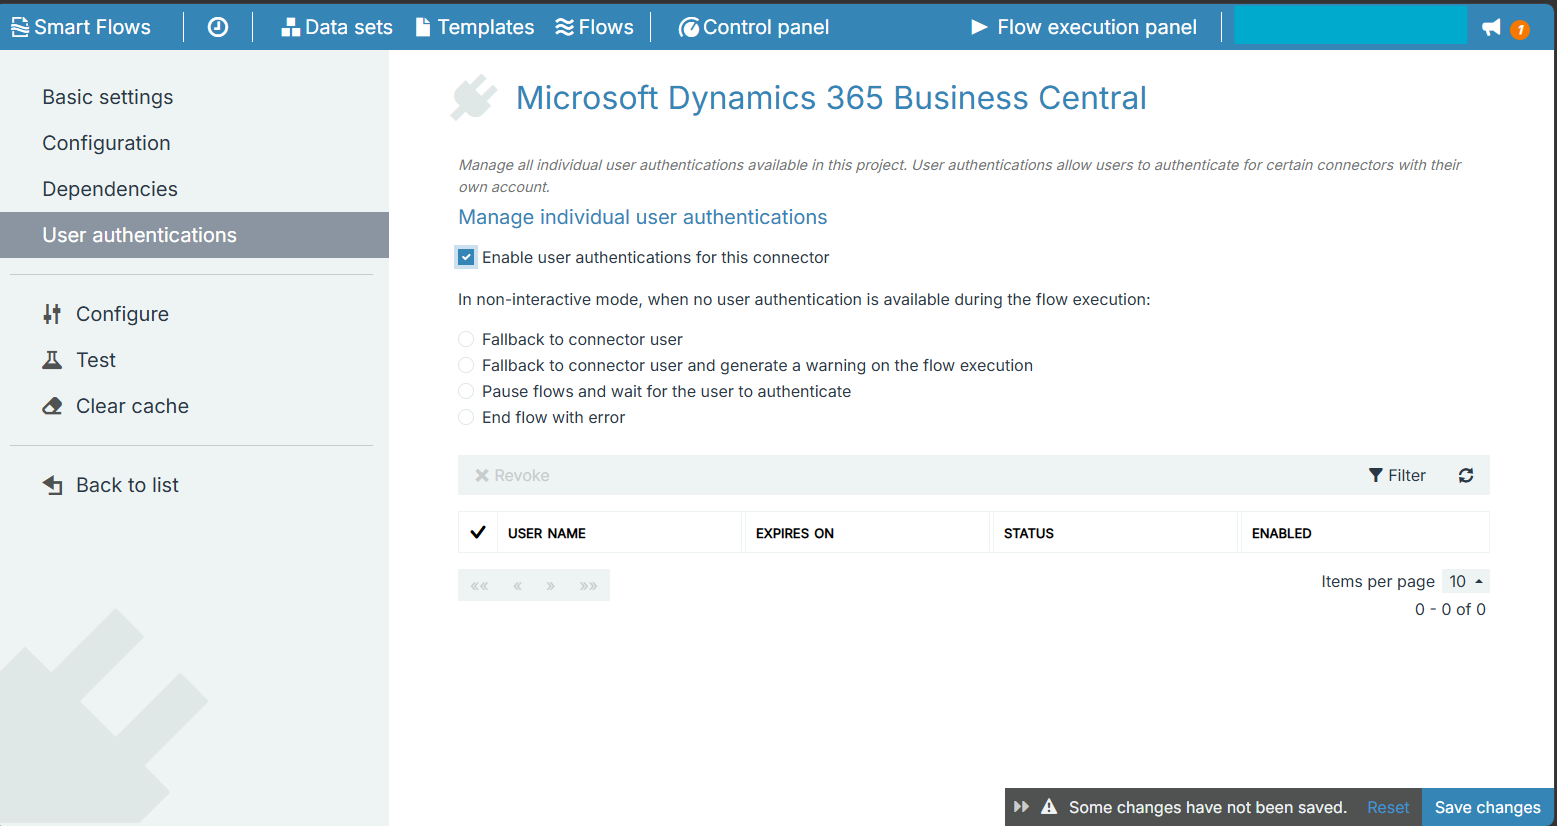
-
Go to the Control Panel of your Smart Flows project.
-
Navigate to Connectors and select your Microsoft Dynamics 365 BC connector.
-
Select User Authentications.
-
Select Enable user authentications for this connector under Manage individual user authentications.
-
Save changes.
Note:
Once enabled, users will be prompted to connect their account when they run a flow, leveraging an intuitive visual interface. The prompt will be shown when the flow executes a flow block that is associated with the Business Central connector. Once authenticated, the user will not be prompted to authenticate again until the stored token expires or is manually revoked.
Configuring Non-Interactive Mode Settings
When flows automate business-critical document processes in the background (non-interactive mode), users cannot manually log in. Smart Flows gives you flexible options to control behavior if a valid user authentication is not available during these background executions.
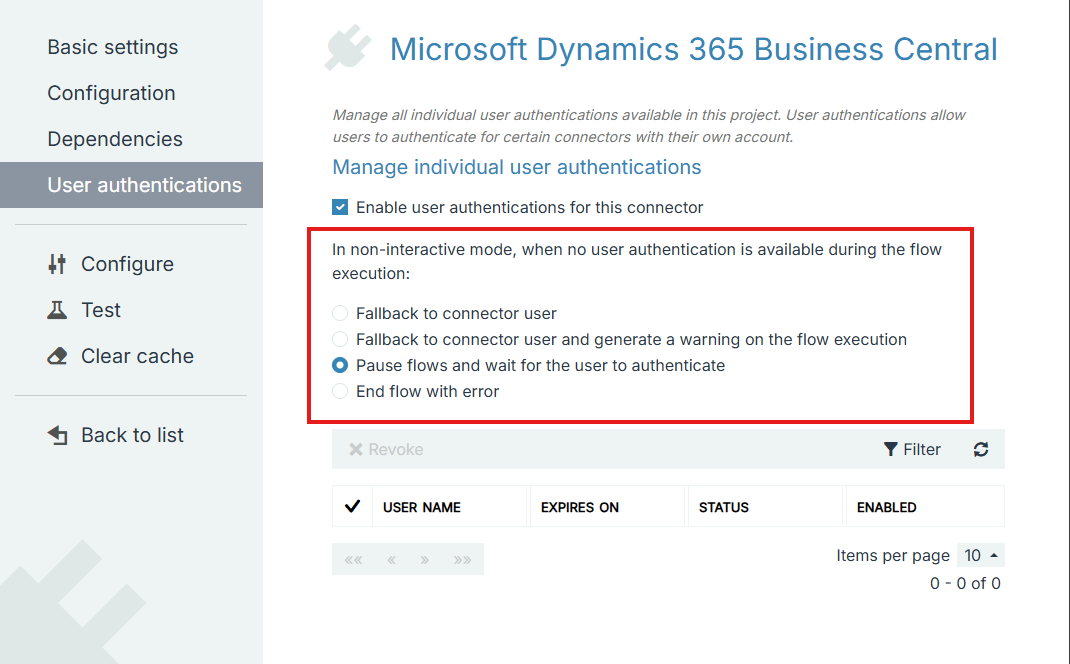
Choose one of the following fallback behaviors:
-
Fallback to connector user: Automate seamlessly by continuing the flow silently using the default connector credentials.
-
Fallback to connector user and generate a warning on the flow execution: Continue the flow using default credentials, but log a warning to provide visibility that individual user authentication was bypassed.
-
Pause flows and wait for the user to authenticate: Pause execution and wait for the user to log in and provide their authentication before continuing the document generation.
-
End flow with error: Stop the flow immediately and fail with an error to strictly enforce individual authentication.
User Experience
When a user runs a flow that requires Business Central access for the first time, Smart Flows provides an intuitive connection prompt.
-
Connect: Users select Connect to log in with their Business Central credentials. Once connected, access is maintained until it expires or is manually revoked.
-
Always use connector user: Administrators have the option to select Always use connector user allowing the flow to run using the default connector credentials instead of their individual account.
To simplify ongoing access, users will receive an automated notification before their connection expires: Connected App [Name] will expire in [X] day(s). Please renew in time to avoid an invalid Connected App when executing flows.
Visit Individual User Authentication page to read more.